Apache Phoenix Reference Guide
Version 5.3.0
Apache Phoenix Team
Apache Phoenix Documentation
Complete Apache Phoenix documentation in one continuous page.
Overview
OLTP and operational analytics for Apache Hadoop
Download
Download latest Apache Phoenix binary and source release artifacts
Issues
Browse Apache Phoenix JIRAs
Source
Sync and build Apache Phoenix from source code
Apache Phoenix enables OLTP and operational analytics in Hadoop for low-latency applications by combining:
- the power of standard SQL and JDBC APIs, with full ACID transaction capabilities
- the flexibility of late-bound, schema-on-read capabilities from the NoSQL world by leveraging HBase as its backing store
Apache Phoenix is fully integrated with other Hadoop products such as Spark, Hive, Pig, Flume, and MapReduce.
Who is using Apache Phoenix? Read more here.
Mission
Become the trusted data platform for OLTP and operational analytics for Hadoop through well-defined, industry-standard APIs.
Quick Start
Tired of reading and just want to get started? Take a look at our FAQs, listen to the Apache Phoenix talk from Hadoop Summit 2015, review the overview presentation, and jump to our quick start guide here.
SQL Support
Apache Phoenix takes your SQL query, compiles it into a series of HBase scans, and orchestrates those scans to produce regular JDBC result sets. Direct use of the HBase API, along with coprocessors and custom filters, results in performance on the order of milliseconds for small queries, or seconds for tens of millions of rows.
To see a complete list of what is supported, go to our language reference. All standard SQL query constructs are supported, including SELECT, FROM, WHERE, GROUP BY, HAVING, ORDER BY, etc. It also supports a full set of DML commands, as well as table creation and versioned incremental alterations through DDL commands.
Here is a list of what is currently not supported:
- Relational operators:
INTERSECT,MINUS - Miscellaneous built-in functions: these are easy to add — read this blog for step-by-step instructions.
Connection
Use JDBC to get a connection to an HBase cluster:
Connection conn = DriverManager.getConnection("jdbc:phoenix:server1,server2:3333", props);Where props are optional properties that may include Phoenix and HBase configuration values.
The JDBC connection string is composed as:
jdbc:phoenix[:<zookeeper quorum>[:<port number>[:<root node>[:<principal>[:<keytab file>]]]]]For omitted parts, values are taken from hbase-site.xml (hbase.zookeeper.quorum, hbase.zookeeper.property.clientPort, and zookeeper.znode.parent).
The optional principal and keytab file may be used to connect to a Kerberos-secured cluster. If only principal is specified, each distinct user gets a dedicated HBase connection (HConnection), allowing multiple different connections with different configuration properties on the same JVM.
For example, for longer-running queries:
Connection conn = DriverManager.getConnection("jdbc:phoenix:my_server:longRunning", longRunningProps);And for shorter-running queries:
Connection conn = DriverManager.getConnection("jdbc:phoenix:my_server:shortRunning", shortRunningProps);See the relevant FAQ entry for example URLs.
Phoenix also supports connecting to HBase without ZooKeeper.
Transactions
To enable full ACID transactions (beta in 4.7.0), set phoenix.transactions.enabled=true. In this case, you also need to run the transaction manager included in the distribution. Once enabled, a table may optionally be declared as transactional (see transactions).
Commits over transactional tables are all-or-none: either all data is committed (including secondary index updates) or none is committed (and an exception is thrown). Both cross-table and cross-row transactions are supported. Transactional tables also see their own uncommitted data when querying. An optimistic concurrency model is used to detect row-level conflicts with first-commit-wins semantics.
Non-transactional tables have no guarantees beyond HBase row-level atomicity (see HBase ACID semantics). Also, non-transactional tables do not see updates until commit occurs.
Phoenix DML commands (UPSERT VALUES, UPSERT SELECT, DELETE) batch pending changes on the client side. Changes are sent to server on commit and discarded on rollback. If auto-commit is enabled, Phoenix will execute the entire DML command server-side via coprocessors whenever possible for better performance.
Timestamps
Most applications let HBase manage timestamps. In cases where timestamps must be controlled, the CurrentSCN property can be set at connection time to control timestamps for DDL, DML, and queries. This also enables snapshot queries against prior row values because Phoenix uses this property as scan max timestamp.
Timestamps cannot be controlled for transactional tables. Instead, the transaction manager assigns timestamps that become HBase cell timestamps on commit. They still correspond to wall-clock time, but are multiplied by 1,000,000 to ensure enough granularity for uniqueness across the cluster.
Schema
Apache Phoenix supports table creation and versioned incremental alterations through DDL commands. Table metadata is stored in an HBase table and versioned, so snapshot queries over prior versions automatically use the correct schema.
A Phoenix table can be created through CREATE TABLE and can either be:
- Built from scratch: HBase table and column families are created automatically.
- Mapped to an existing HBase table: either as a read-write TABLE or a read-only VIEW, with the caveat that row key/key-value binary representation must match Phoenix data types (see Data Types).
- For a read-write TABLE, column families are created automatically if absent. An empty key value is added to the first column family of each existing row to minimize projection size for queries.
- For a read-only VIEW, all column families must already exist. The only change is adding Phoenix coprocessors for query processing. The primary use case is transferring existing data into Phoenix; DML is not allowed on a VIEW, and query performance may be lower than with a TABLE.
All schema is versioned (up to 1000 versions kept). Snapshot queries over older data pick up the correct schema based on connection time via CurrentSCN.
Altering
A Phoenix table may be altered via ALTER TABLE. When a SQL statement references a table, Phoenix checks with the server by default to ensure metadata and statistics are up to date.
If table structure is known to be stable, this RPC may be unnecessary. UPDATE_CACHE_FREQUENCY (added in 4.7) lets users define how often the server is checked for metadata/statistics updates. Possible values: ALWAYS (default), NEVER, or a millisecond value.
For example, this DDL creates table FOO and tells clients to check for updates every 15 minutes:
CREATE TABLE FOO (k BIGINT PRIMARY KEY, v VARCHAR) UPDATE_CACHE_FREQUENCY=900000;Views
Phoenix supports updatable views on top of tables, with the unique capability of adding columns by leveraging HBase schemaless behavior. All views share the same underlying HBase table and may be indexed independently. Read more here.
Multi-tenancy
Built on top of view support, Phoenix also supports multi-tenancy. As with views, a multi-tenant view can add columns defined solely for that user.
Schema at read time
Another schema-related feature allows columns to be defined dynamically at query time. This is useful when not all columns are known at create time. More details here.
Mapping to an Existing HBase Table
Phoenix supports mapping to an existing HBase table through CREATE TABLE and CREATE VIEW. In both cases, HBase metadata remains as-is, except that with CREATE TABLE, KEEP_DELETED_CELLS is enabled so flashback queries work correctly.
For CREATE TABLE, missing HBase metadata (table/column families) is created if needed. Table and column family names are case-sensitive at HBase level; Phoenix uppercases names by default. To preserve case sensitivity, wrap names in double quotes:
CREATE VIEW "MyTable" ("a".ID VARCHAR PRIMARY KEY);For CREATE TABLE, an empty key value is added per row so queries behave as expected without projecting all columns during scans. For CREATE VIEW, this is not done and no HBase metadata is created. Existing HBase metadata must match DDL metadata, or ERROR 505 (42000): Table is read only is thrown.
Another caveat: bytes serialized in HBase must match Phoenix serialization expectations.
- For
VARCHAR,CHAR, andUNSIGNED_*types, Phoenix uses HBaseBytesutility methods. CHARexpects only single-byte characters.UNSIGNED_*expects non-negative values.
Composite row keys are formed by concatenating values, with a zero byte separator after variable-length types. For more on type system details, see Data Types.
Salting
Tables can be declared salted to avoid HBase region hotspotting. Declare a salt bucket count and Phoenix manages salting transparently. See details here, and write-throughput comparison here.
APIs
Catalog metadata (tables, columns, primary keys, and types) can be retrieved through Java SQL metadata interfaces: DatabaseMetaData, ParameterMetaData, and ResultSetMetaData.
For schema/table/column retrieval via DatabaseMetaData, schema pattern, table pattern, and column pattern are LIKE-style expressions (% and _, escaped by \).
In metadata APIs, table catalog argument is used to filter by tenant ID for multi-tenant tables.
Quick Start
What is this new Phoenix thing I've been hearing about?
Phoenix is an open source SQL skin for HBase. You use the standard JDBC APIs instead of the regular HBase client APIs to create tables, insert data, and query your HBase data.
Doesn't putting an extra layer between my application and HBase just slow things down?
Actually, no. Phoenix achieves as good or likely better performance than if you hand-coded it yourself (not to mention with a heck of a lot less code) by:
- compiling your SQL queries to native HBase scans
- determining the optimal start and stop for your scan key
- orchestrating the parallel execution of your scans
- bringing the computation to the data by
- pushing the predicates in your where clause to a server-side filter
- executing aggregate queries through server-side hooks (called co-processors)
- secondary indexes to improve performance for queries on non row key columns
- stats gathering to improve parallelization and guide choices between optimizations
- skip scan filter to optimize IN, LIKE, and OR queries
- optional salting of row keys to evenly distribute write load
Ok, so it's fast. But why SQL? It's so 1970s
Well, that's kind of the point: give folks something with which they're already familiar. What better way to spur the adoption of HBase? On top of that, using JDBC and SQL:
- Reduces the amount of code users need to write
- Allows for performance optimizations transparent to the user
- Opens the door for leveraging and integrating lots of existing tooling
But how can SQL support my favorite HBase technique of x,y,z
Didn't make it to the last HBase Meetup did you? SQL is just a way of expressing what you want to get not how you want to get it. Check out my presentation for various existing and to-be-done Phoenix features to support your favorite HBase trick. Have ideas of your own? We'd love to hear about them: file an issue for us and/or join our mailing list.
Blah, blah, blah - I just want to get started!
Ok, great! Just follow our install instructions:
- download and expand our installation binary tar corresponding to your HBase version
- copy the phoenix server jar into the lib directory of every region server and master
- restart HBase
- add the phoenix client jar to the classpath of your JDBC client or application
- We have detailed instructions for setting up SQuirreL SQL as your SQL client
I don't want to download and setup anything else!
Ok, fair enough - you can create your own SQL scripts and execute them using our command line tools instead. Let's walk through an example now. Begin by navigating to the bin/ directory of your Phoenix install location.
First, let's create a us_population.sql file, containing a table definition:
CREATE TABLE IF NOT EXISTS us_population (
  state CHAR(2) NOT NULL,
  city VARCHAR NOT NULL,
  population BIGINT
  CONSTRAINT my_pk PRIMARY KEY (state, city)
);
Now let's create a us_population.csv file containing some data to put in that table:
NY,New York,8143197
CA,Los Angeles,3844829
IL,Chicago,2842518
TX,Houston,2016582
PA,Philadelphia,1463281
AZ,Phoenix,1461575
TX,San Antonio,1256509
CA,San Diego,1255540
TX,Dallas,1213825
CA,San Jose,912332
Execute the following command from a command terminal to create and populate the table
./psql.py <your_zookeeper_quorum> us_population.sql us_population.csvStart the interactive sql client
./sqlline.py <your_zookeeper_quorum>and issue a query
SELECT state as "State",count(city) as "City Count",sum(population) as "Population Sum"
FROM us_population
GROUP BY state
ORDER BY sum(population) DESC;
Congratulations! You've just created your first Phoenix table, inserted data into it, and executed an aggregate query with just a few lines of code in 15 minutes or less!
Big deal - 10 rows! What else you got?
Ok, ok - tough crowd. Check out our bin/performance.py script to create as many rows as you want, for any schema you come up with, and run timed queries against it.
Why is it called Phoenix anyway? Did some other project crash and burn and this is the next generation?
I'm sorry, but we're out of time and space, so we'll have to answer that next time!
FAQ
Questions answered in this page:
- I want to get started. Is there a Phoenix Hello World?
- What is the Phoenix JDBC URL syntax?
- Is there a way to bulk load in Phoenix?
- How I map Phoenix table to an existing HBase table?
- Are there any tips for optimizing Phoenix?
- How do I create Secondary Index on a table?
- Why isn't my secondary index being used?
- How fast is Phoenix? Why is it so fast?
- How do I connect to secure HBase cluster?
- What HBase and Hadoop versions are supported?
- Can phoenix work on tables with arbitrary timestamp as flexible as HBase API?
- Why isn't my query doing a RANGE SCAN?
- Should I pool Phoenix JDBC Connections?
- Why does Phoenix add an empty or dummy KeyValue when doing an upsert?
I want to get started. Is there a Phoenix Hello World?
Pre-requisite: Download and install the latest Phoenix.
Using console
Start Sqlline:
$ sqlline.py [zookeeper quorum hosts]Execute the following statements when Sqlline connects:
create table test (mykey integer not null primary key, mycolumn varchar);
upsert into test values (1,'Hello');
upsert into test values (2,'World!');
select * from test;
You should get the following output:
+-------+------------+
| MYKEY |  MYCOLUMN  |
+-------+------------+
| 1     | Hello      |
| 2     | World!     |
+-------+------------+
Using Java
Create test.java file with the following content:
import java.sql.Connection;
import java.sql.DriverManager;
import java.sql.ResultSet;
import java.sql.SQLException;
import java.sql.PreparedStatement;
import java.sql.Statement;

public class test {

	public static void main(String[] args) throws SQLException {
		Statement stmt = null;
		ResultSet rset = null;

		Connection con = DriverManager.getConnection("jdbc:phoenix:[zookeeper quorum hosts]");
		stmt = con.createStatement();

		stmt.executeUpdate("create table test (mykey integer not null primary key, mycolumn varchar)");
		stmt.executeUpdate("upsert into test values (1,'Hello')");
		stmt.executeUpdate("upsert into test values (2,'World!')");
		con.commit();

		PreparedStatement statement = con.prepareStatement("select * from test");
		rset = statement.executeQuery();
		while (rset.next()) {
			System.out.println(rset.getString("mycolumn"));
		}
		statement.close();
		con.close();
	}
}
Compile and execute on command line
$ javac test.java
$ java -cp "../phoenix-[version]-client.jar:." test
You should get the following output
Hello
World!
What is the Phoenix JDBC URL syntax?
Thick Driver
See Using the Phoenix JDBC Driver for a more up-to-date description
The Phoenix (Thick) Driver JDBC URL syntax is as follows (where elements in square brackets are optional):
jdbc:phoenix:[comma-separated ZooKeeper Quorum Hosts [: ZK port [:hbase root znode [:kerberos_principal [:path to kerberos keytab] ] ] ]The simplest URL is:
jdbc:phoenixWhereas the most complicated URL is:
jdbc:phoenix:zookeeper1.domain,zookeeper2.domain,zookeeper3.domain:2181:/hbase-1:phoenix@EXAMPLE.COM:/etc/security/keytabs/phoenix.keytabPlease note that each optional element in the URL requires all previous optional elements. For example, to specify the HBase root ZNode, the ZooKeeper port must also be specified.
See also Connection String.
Thin Driver
The Phoenix Thin Driver (used with the Phoenix Query Server) JDBC URL syntax is as follows:
jdbc:phoenix:thin:[key=value[;key=value...]]There are a number of keys exposed for client-use. The most commonly-used keys are: url and serialization. The url
key is required to interact with the Phoenix Query Server.
The simplest URL is:
jdbc:phoenix:thin:url=http://localhost:8765Where as very complicated URL is:
jdbc:phoenix:thin:url=http://queryserver.domain:8765;serialization=PROTOBUF;authentication=SPENGO;principal=phoenix@EXAMPLE.COM;keytab=/etc/security/keytabs/phoenix.keytabPlease refer to the Apache Avatica documentation for a full list of supported options in the Thin client JDBC URL, or see the Query Server documentation
Is there a way to bulk load in Phoenix?
Map Reduce
See the example here
CSV
CSV data can be bulk loaded with built in utility named psql. Typical upsert rates are 20K - 50K rows per second (depends on how wide are the rows).
Usage example:
-
Create table using psql:
$ psql.py [zookeeper] ../examples/web_stat.sql -
Upsert CSV bulk data:
$ psql.py [zookeeper] ../examples/web_stat.csv
How I map Phoenix table to an existing HBase table?
You can create both a Phoenix table or view through the CREATE TABLE/CREATE VIEW DDL statement on a pre-existing HBase table. In both cases, we'll leave the HBase metadata as-is. For CREATE TABLE, we'll create any metadata (table, column families) that doesn't already exist. We'll also add an empty key value for each row so that queries behave as expected (without requiring all columns to be projected during scans).
The other caveat is that the way the bytes were serialized must match the way the bytes are serialized by Phoenix. For VARCHAR, CHAR, and UNSIGNED_* types, we use the HBase Bytes methods. The CHAR type expects only single-byte characters and the UNSIGNED types expect values greater than or equal to zero. For signed types (TINYINT, SMALLINT, INTEGER and BIGINT), Phoenix will flip the first bit so that negative values will sort before positive values. Because HBase sorts row keys in lexicographical order and negative value's first bit is 1 while positive 0 so that negative value is 'greater than' positive value if we don't flip the first bit. So if you stored integers by HBase native API and want to access them by Phoenix, make sure that all your data types are UNSIGNED types.
Our composite row keys are formed by simply concatenating the values together, with a zero byte character used as a separator after a variable length type.
If you create an HBase table like this:
create 't1', {NAME => 'f1', VERSIONS => 5}then you have an HBase table with a name of t1 and a column family with a name of f1. Remember, in HBase, you don't model the possible KeyValues or the structure of the row key. This is the information you specify in Phoenix above and beyond the table and column family.
So in Phoenix, you'd create a view like this:
CREATE VIEW "t1" ( pk VARCHAR PRIMARY KEY, "f1".val VARCHAR )The pk column declares that your row key is a VARCHAR (i.e. a string) while the "f1".val column declares that your HBase table will contain KeyValues with a column family and column qualifier of "f1":VAL and that their value will be a VARCHAR.
Note that you don't need the double quotes if you create your HBase table with all caps names (since this is how Phoenix normalizes strings, by upper casing them). For example, with:
create 'T1', {NAME => 'F1', VERSIONS => 5}you could create this Phoenix view:
CREATE VIEW t1 ( pk VARCHAR PRIMARY KEY, f1.val VARCHAR )Or if you're creating new HBase tables, just let Phoenix do everything for you like this (No need to use the HBase shell at all.):
CREATE TABLE t1 ( pk VARCHAR PRIMARY KEY, val VARCHAR )Are there any tips for optimizing Phoenix?
-
Use Salting to increase read/write performance
Salting can significantly increase read/write performance by pre-splitting the data into multiple regions. Although Salting will yield better performance in most scenarios.
Example:CREATE TABLE TEST (HOST VARCHAR NOT NULL PRIMARY KEY, DESCRIPTION VARCHAR) SALT_BUCKETS=16Note: Ideally for a 16 region server cluster with quad-core CPUs, choose salt buckets between 32-64 for optimal performance.
-
Pre-split table
Salting does automatic table splitting but in case you want to exactly control where table split occurs with out adding extra byte or change row key order then you can pre-split a table.
Example:CREATE TABLE TEST (HOST VARCHAR NOT NULL PRIMARY KEY, DESCRIPTION VARCHAR) SPLIT ON ('CS','EU','NA') -
Use multiple column families
Column family contains related data in separate files. If you query use selected columns then it make sense to group those columns together in a column family to improve read performance.
Example:
Following create table DDL will create two column faimiles A and B.CREATE TABLE TEST (MYKEY VARCHAR NOT NULL PRIMARY KEY, A.COL1 VARCHAR, A.COL2 VARCHAR, B.COL3 VARCHAR) -
Use compression
On disk compression improves performance on large tables
Example:CREATE TABLE TEST (HOST VARCHAR NOT NULL PRIMARY KEY, DESCRIPTION VARCHAR) COMPRESSION='GZ' -
Create indexes See How do I connect to secure HBase cluster?
-
Optimize cluster parameters See https://hbase.apache.org/docs/performance
-
Optimize Phoenix parameters See Configuration
How do I create Secondary Index on a table?
Starting with Phoenix version 2.1, Phoenix supports index over mutable and immutable data. Note that Phoenix 2.0.x only supports Index over immutable data. Index write performance index with immutable table is slightly faster than mutable table however data in immutable table cannot be updated.
Example:
- Create table
Immutable table:create table test (mykey varchar primary key, col1 varchar, col2 varchar) IMMUTABLE_ROWS=true;
Mutable table:create table test (mykey varchar primary key, col1 varchar, col2 varchar); - Creating index on col2
create index idx on test (col2) - Creating index on col1 and a covered index on col2
create index idx on test (col1) include (col2)
Upsert rows in this test table and Phoenix query optimizer will choose correct index to use. You can see in explain plan if Phoenix is using the index table. You can also give a hint in Phoenix query to use a specific index.
See Secondary Indexing for further information
Why isn't my secondary index being used?
The secondary index won't be used unless all columns used in the query are in it ( as indexed or covered columns). All columns making up the primary key of the data table will automatically be included in the index.
Example: DDL create table usertable (id varchar primary key, firstname varchar, lastname varchar); create index idx_name on usertable (firstname);
Query: DDL select id, firstname, lastname from usertable where firstname = 'foo';
Index would not be used in this case as lastname is not part of indexed or covered column. This can be verified by looking at the explain plan. To fix this create index that has either lastname part of index or covered column. Example: create idx_name on usertable (firstname) include (lastname);
You can force Phoenix to use secondary for uncovered columns by specifying an index hint
How fast is Phoenix? Why is it so fast?
Phoenix is fast. Full table scan of 100M rows usually completes in 20 seconds (narrow table on a medium sized cluster). This time come down to few milliseconds if query contains filter on key columns. For filters on non-key columns or non-leading key columns, you can add index on these columns which leads to performance equivalent to filtering on key column by making copy of table with indexed column(s) part of key.
Why is Phoenix fast even when doing full scan:
- Phoenix chunks up your query using the region boundaries and runs them in parallel on the client using a configurable number of threads.
- The aggregation will be done in a coprocessor on the server-side, collapsing the amount of data that gets returned back to the client rather than returning it all.
How do I connect to secure HBase cluster?
Specify the principal and corresponding keytab in the JDBC URL as show above. For ancient Phoenix versions heck out the excellent post by Anil Gupta
What HBase and Hadoop versions are supported?
Phoenix 4.x supports HBase 1.x running on Hadoop 2
Phoenix 5.x supports HBase 2.x running on Hadoop 3
See the release notes and BUILDING in recent releases for the exact versions supported, and on how to build Phoenix for specific HBase and Hadoop versions
Can phoenix work on tables with arbitrary timestamp as flexible as HBase API?
By default, Phoenix lets HBase manage the timestamps and just shows you the latest values for everything. However, Phoenix also allows arbitrary timestamps to be supplied by the user. To do that you'd specify a CurrentSCN at connection time, like this:
Properties props = new Properties();
props.setProperty("CurrentSCN", Long.toString(ts));
Connection conn = DriverManager.connect(myUrl, props);

conn.createStatement().execute("UPSERT INTO myTable VALUES ('a')");
conn.commit();
The above is equivalent to doing this with the HBase API:
myTable.put(Bytes.toBytes('a'), ts);By specifying a CurrentSCN, you're telling Phoenix that you want everything for that connection to be done at that timestamp. Note that this applies to queries done on the connection as well - for example, a query over myTable above would not see the data it just upserted, since it only sees data that was created before its CurrentSCN property. This provides a way of doing snapshot, flashback, or point-in-time queries.
Keep in mind that creating a new connection is not an expensive operation. The same underlying HConnection is used for all connections to the same cluster, so it's more or less like instantiating a few objects.
Why isn't my query doing a RANGE SCAN?
CREATE TABLE TEST (
  pk1 char(1) not null,
  pk2 char(1) not null,
  pk3 char(1) not null,
  non-pk varchar,
  CONSTRAINT PK PRIMARY KEY(pk1, pk2, pk3)
);
RANGE SCAN means that only a subset of the rows in your table will be scanned over. This occurs if you use one or more leading columns from your primary key constraint. Query that is not filtering on leading PK columns ex. select * from test where pk2='x' and pk3='y'; will result in full scan whereas the following query will result in range scan select * from test where pk1='x' and pk2='y';. Note that you can add a secondary index on your pk2 and pk3 columns and that would cause a range scan to be done for the first query (over the index table).
DEGENERATE SCAN means that a query can't possibly return any rows. If we can determine that at compile time, then we don't bother to even run the scan.
FULL SCAN means that all rows of the table will be scanned over (potentially with a filter applied if you have a WHERE clause)
SKIP SCAN means that either a subset or all rows in your table will be scanned over, however it will skip large groups of rows depending on the conditions in your filter. See this blog for more detail. We don't do a SKIP SCAN if you have no filter on the leading primary key columns, but you can force a SKIP SCAN by using the /*+ SKIP_SCAN */ hint. Under some conditions, namely when the cardinality of your leading primary key columns is low, it will be more efficient than a FULL SCAN.
Should I pool Phoenix JDBC Connections?
No, it is not necessary to pool Phoenix JDBC Connections.
Phoenix's Connection objects are different from most other JDBC Connections due to the underlying HBase connection. The Phoenix Connection object is designed to be a thin object that is inexpensive to create. If Phoenix Connections are reused, it is possible that the underlying HBase connection is not always left in a healthy state by the previous user. It is better to create new Phoenix Connections to ensure that you avoid any potential issues.
Implementing pooling for Phoenix could be done simply by creating a delegate Connection that instantiates a new Phoenix connection when retrieved from the pool and then closes the connection when returning it to the pool (see PHOENIX-2388).
Why does Phoenix add an empty/dummy KeyValue when doing an upsert?
The empty or dummy KeyValue (with a column qualifier of _0) is needed to ensure that a given column is available
for all rows.
As you may know, data is stored in HBase as KeyValues, meaning that
the full row key is stored for each column value. This also implies
that the row key is not stored at all unless there is at least one
column stored.
Now consider JDBC row which has an integer primary key, and several
columns which are all null. In order to be able to store the primary
key, a KeyValue needs to be stored to show that the row is present at
all. This column is represented by the empty column that you've
noticed. This allows doing a SELECT * FROM TABLE and receiving
records for all rows, even those whose non-pk columns are null.
The same issue comes up even if only one column is null for some (or all) records. A scan over Phoenix will include the empty column to ensure that rows that only consist of the primary key (and have null for all non-key columns) will be included in a scan result.
Building
Building the Main Phoenix Project
Phoenix consists of several subprojects.
The core project is phoenix, which depends on phoenix-thirdparty, phoenix-omid, and phoenix-tephra.
phoenix-queryserver and phoenix-connectors are optional packages that also depend on phoenix.
Check out the source and follow the build instructions in BUILDING.md (or README.md) in the repository root.
Using Phoenix in a Maven Project
Phoenix artifacts are published to Apache and Maven Central repositories. Add the dependency below to your pom.xml:
<dependencies>
  <dependency>
    <groupId>org.apache.phoenix</groupId>
    <artifactId>phoenix-client-hbase-[hbase.profile]</artifactId>
    <version>[phoenix.version]</version>
  </dependency>
</dependencies>
Where:
[phoenix.version]is the Phoenix release version (for example,5.1.2or4.16.1)[hbase.profile]is the compatible HBase profile
See Downloads for supported release/profile combinations.
Branches
The main Phoenix project currently has two active branches.
4.xworks with HBase 1 and Hadoop 25.xworks with HBase 2 and Hadoop 3
See Downloads and BUILDING.md for exact version compatibility by release.
See also:
Client Classpath and JDBC URL
Using the Phoenix JDBC Driver
This page is about using the Phoenix thick client.
The thin client for Phoenix Query Server is described on its own page.
The Phoenix classpath
To use Phoenix, both the JDBC driver JAR and hbase-site.xml must be added to the application classpath.
Phoenix driver JAR
The Phoenix JDBC client is built on top of the HBase client, and has an unusually high number of dependencies. To make this manageable, Phoenix provides a single shaded uberjar that can be added to the classpath.
Phoenix uses some private and semi-public HBase APIs, which may change between HBase versions, and provides separate binary distributions for different HBase versions.
Choose the binary distribution or Maven artifact corresponding to the HBase version on your cluster.
Copy the driver JAR from the binary distribution.
Copy the corresponding phoenix-client-embedded-hbase-[hbase.profile]-[phoenix.version].jar to the application classpath.
Add the dependency via Maven.
<dependencies>
  <dependency>
    <groupId>org.apache.phoenix</groupId>
    <artifactId>phoenix-client-embedded-hbase-[hbase.profile]</artifactId>
    <version>[phoenix.version]</version>
  </dependency>
</dependencies>hbase-site.xml from your target cluster to the classpath.HBase / Hadoop configuration files
As Phoenix is built on top of the HBase client, it needs the HBase configuration files for correct operation. For some configurations, it may also need other Hadoop / HDFS config files like core-site.xml.
Download the correct hbase-site.xml (the client one, usually in /etc/hbase/conf) from the cluster, and copy it to a directory on the classpath.
It is important to add the directory containing hbase-site.xml, and not the full file path, to the classpath.
Alternatively, package hbase-site.xml into the root directory of a JAR file and add that JAR to the classpath.
If hbase-site.xml changes on the cluster, make sure to copy the updated file to your application classpath.
For some development clusters that use default configuration Phoenix may work without this, but not having the correct hbase-site.xml on the
classpath is almost guaranteed to cause problems.
The Phoenix JDBC URL
The Phoenix URL contains two main parts. The first describes the connection to HBase; the second specifies extra Phoenix options.
jdbc:<protocol variant>[:<server list>[:<port>[:<zk root node>[:<principal>[:<keytab file>]]]]][;<option>=<value>]*protocol variant: The HBase connection registry to use (details below).server list: A comma-separated list of hostnames or IPv4 addresses. It is also possible to specify per-host ports, as defined in HBASE-12706. In this case:characters must be escaped with\. You may need to escape again in Java source strings.port: An integer port number. Ports specified inserver listtake precedence.zk root node: The root znode for HBase. Must be empty for non-ZK registries.principal: The Kerberos principal used for authentication.
If onlyprincipalis specified, this defines a distinct user identity with its own dedicated HBase connection (HConnection) and allows multiple differently configured connections in the same JVM.keytab: Kerberos keytab used for authentication. Must be specified together withprincipal.option: A connection option.value: A connection option value.
Parameters from end of the connection definition can be omitted.
Use empty strings for missing parameters in the middle of the URL.
For example, the jdbc:phoenix::::principal:/home/user/keytab URL can be used to specify the kerberos principal and keytab, while using the default connection specified in hbase-site.xml.
Default connection
The underlying HBase client identifies the cluster based on parameters in hbase-site.xml.
While Phoenix allows overriding this, it is usually best to use the cluster definition from hbase-site.xml.
The only time the connection should be directly specified is when switching between otherwise identically configured HBase instances, like a production and a disaster recovery cluster.
To use the defaults from hbase-site.xml, use the jdbc:phoenix URL or jdbc:phoenix;option=value if additional options are needed.
See HBase documentation for how each registry is configured in hbase-site.xml.
The jdbc:phoenix: protocol variant
If this protocol variant is specified, Phoenix will select the registry based on the value of hbase.client.registry.impl.
If hbase.client.registry.impl is not defined, Phoenix chooses a default based on the HBase client version it includes.
The jdbc:phoenix+zk: protocol variant
This uses the original ZooKeeper-based HBase connection registry. The server list and port specify the ZK quorum. HBASE-12706 is supported; : characters must be escaped with \.
Examples:
jdbc:phoenix+zk:localhost:2181:/hbase:principal:keytab- fully specifiedjdbc:phoenix+zk:host1\:2181,host1\:2182,host2\:2183- heterogeneous ports, default ZK root nodejdbc:phoenix+zk- use default ZK parameters fromhbase-site.xml(usingjdbc:phoenixis preferred in most cases)
The jdbc:phoenix+master: protocol variant
This uses the Master based connection registry added in HBASE-18095, and is available from HBase 2.3.0. The zk root node parameter must never be specified.
Examples:
jdbc:phoenix+master:master1\:16001,master2\:16002::principal:/path/to/keytab- fully specifiedjdbc:phoenix+master:master1,master2- use default master port for both hosts
The jdbc:phoenix+rpc: protocol variant
This uses the Master based connection registry added in HBASE-26150, and is available from HBase 2.5.0.
This is very similar to the phoenix+master variant, but also allows specifying RegionServers in the host list.
There is no built-in default port for this registry, the port must always be specified together with the host list.
Examples:
jdbc:phoenix+rpc:server1\:16001,server2\:16002::principal:/path/to/keytab- fully specifiedjdbc:phoenix+rpc- use values fromhbase-site.xml
Notes
Support for master and rpc registries is only available in Phoenix 5.1.4+
and 5.2.0+.
Earlier versions support only the jdbc:phoenix: protocol variant implementing the original HBase ZooKeeper connection registry.
Support for registry variants is only available for HBase versions that support them. Phoenix will throw an error if a variant that the HBase client version doesn't support is specified.
Phoenix 5.2 also supports High Availability connections. Documentation for that is only available in the JIRA ticket.
Tuning Guide
Tuning Phoenix can be complex, but with a little knowledge of how it works you can make significant improvements to read and write performance. The most important factor is schema design, especially how it affects underlying HBase row keys. See "General Tips" below for design guidance based on anticipated data access patterns. Subsequent sections describe how to use secondary indexes, hints, and explain plans.
Note: Phoenix and HBase work well when your application does point lookups and small range scans. This can be achieved by good primary key design (see below). If you find that your application requires many full table scans, then Phoenix and HBase are likely not the best tool for the job. Instead, look at using other tools that write to HDFS directly using columnar representations such as Parquet.
Primary Keys
The underlying row key design is the single most important factor in Phoenix performance, and it's important to get it right at design time because you cannot change it later without re-writing the data and index tables.
The Phoenix primary keys are concatenated to create the underlying row key in Apache HBase. Choose and order primary key columns to align with common query patterns. The leading key column has the greatest performance impact. For example, if you lead with a column containing org IDs, it is easy to select all rows for a specific org. You can also add the HBase row timestamp to the primary key to improve scan efficiency by skipping rows outside the queried time range.
Every primary key imposes a cost because the entire row key is appended to every piece of data in memory and on disk. The larger the row key, the greater the storage overhead. Find ways to store information compactly in columns you plan to use for primary keys — store deltas instead of complete time stamps, for example.
To sum up, the best practice is to design primary keys to add up to a row key that lets you scan the smallest amount of data.
Tip: When choosing primary keys, lead with the column you filter most frequently across the queries that are most important to optimize. If you use ORDER BY, make sure your PK columns match expressions in the ORDER BY clause.
Monotonically increasing Primary keys
If your primary keys are monotonically increasing, use salting to help distribute writes across the cluster and improve parallelization. Example:
CREATE TABLE … ( … ) SALT_BUCKETS = N
For optimal performance the number of salt buckets should approximately equal the number of region servers. Do not salt automatically. Use salting only when experiencing hotspotting. The downside of salting is that it imposes a cost on read because when you want to query the data you have to run multiple queries to do a range scan.
General Tips
The following sections provide a few general tips for different access scenarios.
Is the Data Random-Access?
- As with any random read workloads, SSDs can improve performance because of their faster random seek time.
Is the data read-heavy or write-heavy?
- For read-heavy data:
- Create global indexes. This will affect write speed depending on the number of columns included in an index because each index writes to its own separate table.
- Use multiple indexes to provide fast access to common queries.
- When specifying machines for HBase, do not skimp on cores; HBase needs them.
- For write-heavy data:
- Pre-split the table. It can be helpful to split the table into predefined regions, or if keys are monotonically increasing, use salting to avoid creating write hotspots on a small number of nodes. Use real data types rather than raw byte data.
- Create local indexes. Reads from local indexes have a performance penalty, so it's important to do performance testing. See the Pherf tool.
Which columns will be accessed often?
- Choose commonly-queried columns as primary keys. For more information, see “Primary Keys” below.
- Create additional indexes to support common query patterns, including heavily accessed fields that are not in the primary key.
Can the data be append-only (immutable)?
- If the data is immutable or append-only, declare the table and its indexes as immutable using the
IMMUTABLE_ROWSoption at creation time to reduce the write-time cost. If you need to make an existing table immutable, you can do so withALTER TABLE trans.event SET IMMUTABLE_ROWS=trueafter creation time.- If speed is more important than data integrity, you can use the
DISABLE_WALoption. Note: it is possible to lose data withDISABLE_WALif a region server fails.
- If speed is more important than data integrity, you can use the
- Set the
UPDATE_CACHE_FREQUENCYoption to 15 minutes or so if your metadata doesn't change very often. This property determines how often an RPC is done to ensure you're seeing the latest schema. - If the data is not sparse (over 50% of the cells have values), use the SINGLE_CELL_ARRAY_WITH_OFFSETS data encoding scheme introduced in Phoenix 4.10, which obtains faster performance by reducing the size of the data. For more information, see “Column Mapping and Immutable Data Encoding” on the Apache Phoenix blog.
Is the table very large?
- Use the
ASYNCkeyword with yourCREATE INDEXcall to create the index asynchronously via MapReduce job. You'll need to manually start the job; see Index Population for details. - If the data is too large to scan the table completely, use primary keys to create an underlying composite row key that makes it easy to return a subset of the data or facilitates skip-scanning — Phoenix can jump directly to matching keys when the query includes key sets in the predicate.
Is transactionality required?
A transaction is a data operation that is atomic — that is, guaranteed to succeed completely or not at all. For example, if you need to make cross-row updates to a data table, then you should consider your data transactional.
- If you need transactionality, use the
TRANSACTIONALoption. (See also Transactions)
Block Encoding
Using compression or encoding is a must. Both SNAPPY and FAST_DIFF are good all around options.
FAST_DIFF encoding is automatically enabled on all Phoenix tables by default, and almost always improves overall read latencies and throughput by allowing more data to fit into blockcache. Note: FAST_DIFF encoding can increase garbage produced during request processing.
Set encoding at table creation time. Example:
CREATE TABLE … ( … ) DATA_BLOCK_ENCODING=‘FAST_DIFF’
Schema Design
Because the schema affects the way the data is written to the underlying HBase layer, Phoenix performance relies on the design of your tables, indexes, and primary keys.
Phoenix and the HBase data model
HBase stores data in tables, which in turn contain columns grouped in column families. A row in an HBase table consists of versioned cells associated with one or more columns. An HBase row is a collection of many key-value pairs in which the rowkey attribute of the keys are equal. Data in an HBase table is sorted by the rowkey, and all access is via the rowkey. Phoenix creates a relational data model on top of HBase, enforcing a PRIMARY KEY constraint whose columns are concatenated to form the row key for the underlying HBase table. For this reason, it's important to be cognizant of the size and number of the columns you include in the PK constraint, because a copy of the row key is included with every cell in the underlying HBase table.
Column Families
If some columns are accessed more frequently than others, create multiple column families to separate the frequently-accessed columns from rarely-accessed columns. This improves performance because HBase reads only the column families specified in the query.
Columns
Here are a few tips that apply to columns in general, whether they are indexed or not:
- Keep
VARCHARcolumns under 1MB or so due to I/O costs. When processing queries, HBase materializes cells in full before sending them over to the client, and the client receives them in full before handing them off to the application code. - For structured objects, don't use JSON, which is not very compact. Use a format such as protobuf, Avro, msgpack, or BSON.
- Consider compressing data before storage using a fast LZ variant to cut latency and I/O costs.
- Use the column mapping feature (added in Phoenix 4.10), which uses numerical HBase column qualifiers for non-PK columns instead of directly using column names. This improves performance when looking for a cell in the sorted list of cells returned by HBase, adds further across-the-board performance by reducing the disk size used by tables, and speeds up DDL operations like column rename and metadata-level column drops. For more information, see “Column Mapping and Immutable Data Encoding” on the Apache Phoenix blog.
Indexes
A Phoenix index is a physical table that stores a pivoted copy of some or all of the data in the main table to serve specific query patterns. When you issue a query, Phoenix automatically selects the best index. The primary index is created automatically based on selected primary keys. You can create secondary indexes by specifying included columns based on expected query patterns.
See also: Secondary Indexing
Secondary indexes
Secondary indexes can improve read performance by turning what would normally be a full table scan into a point lookup (at the cost of storage space and write speed). Secondary indexes can be added or removed after table creation and don't require changes to existing queries – queries simply run faster. A small number of secondary indexes is often sufficient. Depending on your needs, consider creating covered indexes or functional indexes, or both.
If your table is large, use ASYNC with CREATE INDEX to create indexes asynchronously. In this case, index build runs through MapReduce, so client restarts will not impact index creation and jobs can be retried automatically if needed. You still need to start the job manually, and then monitor it like any other MapReduce job.
Example:
CREATE INDEX IF NOT EXISTS event_object_id_idx_b
ON trans.event (object_id)
ASYNC UPDATE_CACHE_FREQUENCY = 60000;
See Index Population for details.
If you cannot create the index asynchronously, increase query timeout (phoenix.query.timeoutMs) to exceed expected index build time. If CREATE INDEX times out or the client goes down before completion, the build stops and must be run again. You can monitor the index table during creation: new regions appear as splits occur. You can query SYSTEM.STATS (populated by splits/compactions), or run COUNT(*) against the index table (higher load because it requires a full scan).
Tips:
-
Create local indexes for write-heavy use cases.
-
Create global indexes for read-heavy use cases. To save read-time overhead, consider creating covered indexes.
-
If the primary key is monotonically increasing, create salt buckets. The salt buckets can't be changed later, so design them to handle future growth. Salt buckets help avoid write hotspots, but can decrease overall throughput due to the additional scans needed on read.
-
Set up a cron job to build indexes. Use
ASYNCwithCREATE INDEXto avoid blocking. -
Only create the indexes you need.
-
Limit the number of indexes on frequently updated tables.
-
Use covered indexes to convert table scans into efficient point lookups or range queries over the index table instead of the primary table:
CREATE INDEX idx ON table_name ( ... ) INCLUDE ( ... );
Queries
It's important to know which queries execute on the server side versus client side, because this affects performance due to network I/O and other bottlenecks. If you're querying a billion-row table, you want as much computation as possible on the server side instead of transmitting rows to the client. Some queries must still execute on the client. Sorting data that resides on multiple region servers, for example, requires aggregation and re-sort on the client.
Reading
- Avoid joins unless one side is small, especially on frequent queries. For larger joins, see “Hints,” below.
- In the
WHEREclause, filter leading columns in the primary key constraint. - Filtering the first leading column with
INorORin theWHEREclause enables skip scan optimizations. - Equality or comparisons (
<or>) in theWHEREclause enable range-scan optimizations. - Let Phoenix optimize query parallelism using statistics. This provides an automatic benefit if using Phoenix 4.2 or greater in production.
See also: Joins
Range Queries
If you regularly scan large data sets from spinning disk, you're best off with GZIP (but watch write speed). Use a lot of cores for a scan to utilize the available memory bandwidth. Apache Phoenix makes it easy to utilize many cores to increase scan performance.
For range queries, the HBase block cache does not provide much advantage.
Large Range Queries
For large range queries, consider setting Scan.setCacheBlocks(false) even if the whole scan could fit into the block cache.
If you mostly perform large range queries you might even want to consider running HBase with a much smaller heap and size the block cache down, to only rely on the OS Cache. This will alleviate some garbage collection related issues.
Point Lookups
For point lookups it is quite important to have your data set cached, and you should use the HBase block cache.
Hints
Hints let you override default query processing behavior and specify such factors as which index to use, what type of scan to perform, and what type of join to use.
- During the query, Hint global index if you want to force it when query includes a column not in the index.
- If necessary, you can do bigger joins with the
/*+ USE_SORT_MERGE_JOIN */hint, but a big join will be an expensive operation over huge numbers of rows. - If the overall size of all right-hand-side tables would exceed the memory size limit, use the
/*+ NO_STAR_JOIN */hint.
See also: Hint.
Explain plans
An EXPLAIN plan tells you a lot about how a query will be run. To generate an explain plan run this query and to interpret the plan, see this reference.
Parallelization
You can improve parallelization with the UPDATE STATISTICS command. This command subdivides each region by determining keys called guideposts that are equidistant from each other, then uses these guideposts to break up queries into multiple parallel scans. Statistics are turned on by default. With Phoenix 4.9, the user can set guidepost width for each table. Optimal guidepost width depends on a number of factors such as cluster size, cluster usage, number of cores per node, table size, and disk I/O.
In Phoenix 4.12, configuration phoenix.use.stats.parallelization was added to control whether statistics are used to drive parallelization. Stats collection can still run regardless. Collected information is also used to estimate bytes and rows scanned when generating EXPLAIN.
Writing
Updating data with UPSERT VALUES
When using UPSERT VALUES to write a large number of records, turn off autocommit and batch records in reasonably small batches (try 100 rows and adjust from there to fine-tune performance).
Note: With the default fat driver, executeBatch() does not provide benefit. Instead, update multiple rows by executing UPSERT VALUES multiple times and then use commit() to submit the batch. With the thin driver, however, use executeBatch() to minimize RPCs between the client and query server.
try (Connection conn = DriverManager.getConnection(url)) {
  conn.setAutoCommit(false);
  int batchSize = 0;
  int commitSize = 1000; // number of rows you want to commit per batch.
  try (PreparedStatement stmt = conn.prepareStatement(upsert)) {
    // set params...
    while (/* there are records to upsert */) {
      stmt.executeUpdate();
      batchSize++;
      if (batchSize % commitSize == 0) {
        conn.commit();
      }
   }
 conn.commit(); // commit the last batch of records
 }
Note: Because the Phoenix client keeps uncommitted rows in memory, be careful not to set commitSize too high.
Updating data with UPSERT SELECT
When using UPSERT SELECT to write many rows in a single statement, turn on autocommit and the rows will be automatically batched according to the phoenix.mutate.batchSize. This will minimize the amount of data returned back to the client and is the most efficient means of updating many rows.
Deleting data
When deleting a large data set, turn on autoCommit before issuing the DELETE query so that the client does not need to remember the row keys of all the keys as they are deleted. This prevents the client from buffering the rows affected by the DELETE so that Phoenix can delete them directly on the region servers without the expense of returning them to the client.
Reducing RPC traffic
To reduce RPC traffic, set UPDATE_CACHE_FREQUENCY (4.7 or above) on your tables and indexes when creating them (or via ALTER TABLE/ALTER INDEX). See Altering.
Using local indexes
If using 4.8, consider using local indexes to minimize the write time. In this case, the writes for the secondary index will be to the same region server as your base table. This approach does involve a performance hit on the read side, though, so make sure to quantify both write speed improvement and read speed reduction.
Further tuning
For advice about tuning the underlying HBase and JVM layers, see Operational and Performance Configuration Options in the Apache HBase™ Reference Guide.
Special Cases
The following sections provide Phoenix-specific additions to the tuning recommendations in the Apache HBase™ Reference Guide section referenced above.
For applications where failing quickly is better than waiting
In addition to the HBase tuning referenced above, set phoenix.query.timeoutMs in hbase-site.xml on the client side to the maximum tolerable wait time in milliseconds.
For applications that can tolerate slightly out of date information
In addition to the HBase tuning referenced above, set phoenix.connection.consistency = timeline in hbase-site.xml on the client side for all connections.
Installation
Installation
To install a pre-built Phoenix, use these directions:
- Download and expand the latest
phoenix-hbase-[hbase.version]-[phoenix.version]-bin.tar.gzfor your HBase version. - Add
phoenix-server-hbase-[hbase.version]-[phoenix.version].jarto the classpath of all HBase region servers and masters, and remove any previous version. An easy way is to copy it into the HBaselibdirectory. - Restart HBase.
- Add
phoenix-client-hbase-[hbase.version]-[phoenix.version].jarto the classpath of any JDBC client.
To install Phoenix from source:
- Download and expand the latest
phoenix-[phoenix.version]-src.tar.gzfor your HBase version, or check it out from the main source repository. - Follow the build instructions in
BUILDING.mdin the root directory of the source distribution/repository to build the binary assembly. - Follow the instructions above, but use the assembly built from source.
Getting Started
Want to get started quickly? Take a look at our FAQs and quick start guide here.
Command Line
A terminal interface to execute SQL from the command line is now bundled with Phoenix. To start it, execute the following from the bin directory:
$ sqlline.py [zk quorum hosts]To execute SQL scripts from the command line, you can include a SQL file argument like this:
$ sqlline.py [zk quorum hosts] ../examples/stock_symbol.sql
For more information, see the manual.
Loading Data
In addition, you can use bin/psql.py to load CSV data or execute SQL scripts. For example:
$ psql.py localhost ../examples/web_stat.sql ../examples/web_stat.csv ../examples/web_stat_queries.sqlOther alternatives include:
- Using our map-reduce based CSV loader for bigger data sets
- Mapping an existing HBase table to a Phoenix table and using the UPSERT SELECT command to populate a new table.
- Populating the table through our UPSERT VALUES command.
SQuirreL SQL Client
If you'd rather use a client GUI to interact with Phoenix, download and install SQuirrel. Since Phoenix is a JDBC driver, integration with tools such as this are seamless. Here are the setup steps necessary:
Remove prior phoenix-[_oldversion_]-client.jar from the SQuirreL lib
directory, then copy phoenix-[_newversion_]-client.jar there (_newversion_
should match the Phoenix server jar used with your HBase installation).
Drivers -> New Driver).In Add Driver, set Name to Phoenix, and set the Example URL to
jdbc:phoenix:localhost.
Enter org.apache.phoenix.jdbc.PhoenixDriver into the Class Name field and
click OK.
Switch to Alias tab and create a new Alias (Aliases -> New Alias).
In the dialog, use Name: any name, Driver: Phoenix, User Name: anything,
Password: anything.
Construct URL as follows: jdbc:phoenix:[zookeeper quorum server]. For
example, to connect to local HBase use jdbc:phoenix:localhost.
Press Test (it should succeed if everything is set up correctly), then press OK to close.
Double-click your newly created Phoenix alias and click Connect. You are now ready to run SQL queries against Phoenix.
Through SQuirreL, you can issue SQL statements in the SQL tab (create tables, insert data, run queries), and inspect table metadata in the Object tab (for example, list tables, columns, primary keys, and types).
Note that most graphical clients that support generic JDBC drives should also work, and the setup process is usually similar.
Samples
The best place to see samples are in our unit tests under src/test/java. The ones in the endToEnd package are tests demonstrating how to use all aspects of the Phoenix JDBC driver. We also have some examples in the examples directory.
Configuration
Configuration
Phoenix provides many different knobs and dials to configure and tune the system to run more optimally on your cluster. The configuration is done through a series of Phoenix-specific properties specified both on client and server-side hbase-site.xml files. In addition to these properties, there are of course all the HBase configuration properties with the most important ones documented here.
The table below outlines the full set of Phoenix-specific configuration properties and their defaults.
| Property | Description | Default |
|---|---|---|
data.tx.snapshot.dir | Server-side property specifying the HDFS directory used to store snapshots of the transaction state. No default value. | None |
data.tx.timeout | Server-side property specifying the timeout in seconds for a transaction to complete. Default is 30 seconds. | 30 |
phoenix.query.timeoutMs | Client-side property specifying the number of milliseconds after which a query will timeout on the client. Default is 10 min. | 600000 |
phoenix.query.keepAliveMs | Maximum time in milliseconds that excess idle threads will wait for new tasks before terminating when the number of threads is greater than the cores in the client side thread pool executor. Default is 60 sec. | 60000 |
phoenix.query.threadPoolSize | Number of threads in client side thread pool executor. As the number of machines/cores in the cluster grows, this value should be increased. | 128 |
phoenix.query.queueSize | Max queue depth of the bounded round robin backing the client side thread pool executor, beyond which an attempt to queue additional work is rejected. If zero, a SynchronousQueue is used instead of the bounded round robin queue. The default value is 5000. | 5000 |
phoenix.stats.guidepost.width | Server-side parameter that specifies the number of bytes between guideposts. A smaller amount increases parallelization, but also increases the number of chunks which must be merged on the client side. The default value is 100 MB. | 104857600 |
phoenix.stats.guidepost.per.region | Server-side parameter that specifies the number of guideposts per region. If set to a value greater than zero, then the guidepost width is determined by MAX_FILE_SIZE of table / phoenix.stats.guidepost.per.region. Otherwise, if not set, then the phoenix.stats.guidepost.width parameter is used. No default value. | None |
phoenix.stats.updateFrequency | Server-side parameter that determines the frequency in milliseconds for which statistics will be refreshed from the statistics table and subsequently used by the client. The default value is 15 min. | 900000 |
phoenix.stats.minUpdateFrequency | Client-side parameter that determines the minimum amount of time in milliseconds that must pass before statistics may again be manually collected through another UPDATE STATISTICS call. The default value is phoenix.stats.updateFrequency / 2. | 450000 |
phoenix.stats.useCurrentTime | Server-side parameter that if true causes the current time on the server-side to be used as the timestamp of rows in the statistics table when background tasks such as compactions or splits occur. If false, then the max timestamp found while traversing the table over which statistics are being collected is used as the timestamp. Unless your client is controlling the timestamps while reading and writing data, this parameter should be left alone. The default value is true. | true |
phoenix.query.spoolThresholdBytes | Threshold size in bytes after which results from parallelly executed query results are spooled to disk. Default is 20 mb. | 20971520 |
phoenix.query.maxSpoolToDiskBytes | Threshold size in bytes up to which results from parallelly executed query results are spooled to disk above which the query will fail. Default is 1 GB. | 1024000000 |
phoenix.query.maxGlobalMemoryPercentage | Percentage of total heap memory (i.e. Runtime.getRuntime().maxMemory()) that all threads may use. Only coarse-grained memory usage is tracked, mainly accounting for memory usage in the intermediate map built during group by aggregation. When this limit is reached clients block while attempting to get more memory, essentially throttling memory usage. Defaults to 15% | 15 |
phoenix.query.maxGlobalMemorySize | Max size in bytes of total tracked memory usage. By default not specified, however, if present, the lower of this parameter and phoenix.query.maxGlobalMemoryPercentage will be used. | |
phoenix.query.maxGlobalMemoryWaitMs | Maximum amount of time that a client will block while waiting for more memory to become available. After this amount of time, an InsufficientMemoryException is thrown. Default is 10 sec. | 10000 |
phoenix.query.maxTenantMemoryPercentage | Maximum percentage of phoenix.query.maxGlobalMemoryPercentage that any one tenant is allowed to consume. After this percentage, an InsufficientMemoryException is thrown. Default is 100% | 100 |
phoenix.query.dateFormat | Default pattern to use for conversion of a date to/from a string, whether through the TO_CHAR(<date>) or TO_DATE(<date-string>) functions, or through resultSet.getString(<date-column>). Default is yyyy-MM-dd HH:mm:ss.SSS | yyyy-MM-dd HH:mm:ss.SSS |
phoenix.query.dateFormatTimeZone | A timezone id that specifies the default time zone in which date, time, and timestamp literals should be interpreted when interpreting string literals or using the TO_DATE function. A time zone id can be a timezone abbreviation such as "PST", or a full name such as "America/Los_Angeles", or a custom offset such as "GMT-9:00". The time zone id "LOCAL" can also be used to interpret all date, time, and timestamp literals as being in the current timezone of the client. | GMT |
phoenix.query.timeFormat | Default pattern to use for conversion of TIME to/from a string, whether through the TO_CHAR(<time>) or TO_TIME(<time-string>) functions, or through resultSet.getString(<time-column>). Default is yyyy-MM-dd HH:mm:ss.SSS | yyyy-MM-dd HH:mm:ss.SSS |
phoenix.query.timestampFormat | Default pattern to use for conversion of TIMESTAMP to/from a string, whether through the TO_CHAR(<timestamp>) or TO_TIMESTAMP(<timestamp-string>) functions, or through resultSet.getString(<timestamp-column>). Default is yyyy-MM-dd HH:mm:ss.SSS | yyyy-MM-dd HH:mm:ss.SSS |
phoenix.query.numberFormat | Default pattern to use for conversion of a decimal number to/from a string, whether through the TO_CHAR(<decimal-number>) or TO_NUMBER(<decimal-string>) functions, or through resultSet.getString(<decimal-column>). Default is #,##0.### | #,##0.### |
phoenix.mutate.maxSize | The maximum number of rows that may be batched on the client before a commit or rollback must be called. | 500000 |
phoenix.mutate.batchSize | The number of rows that are batched together and automatically committed during the execution of an UPSERT SELECT or DELETE statement. This property may be overridden at connection time by specifying the UpsertBatchSize property value. Note that the connection property value does not affect the batch size used by the coprocessor when these statements are executed completely on the server side. | 1000 |
phoenix.query.maxServerCacheBytes | Maximum size (in bytes) of a single sub-query result (usually the filtered result of a table) before compression and conversion to a hash map. Attempting to hash an intermediate sub-query result of a size bigger than this setting will result in a MaxServerCacheSizeExceededException. Default 100MB. | 104857600 |
phoenix.coprocessor.maxServerCacheTimeToLiveMs | Maximum living time (in milliseconds) of server caches. A cache entry expires after this amount of time has passed since last access. Consider adjusting this parameter when a server-side IOException("Could not find hash cache for joinId") happens. Getting warnings like "Earlier hash cache(s) might have expired on servers" might also be a sign that this number should be increased. | 30000 |
phoenix.query.useIndexes | Client-side property determining whether or not indexes are considered by the optimizer to satisfy a query. Default is true | true |
phoenix.index.failure.handling.rebuild | Server-side property determining whether or not a mutable index is rebuilt in the background in the event of a commit failure. Only applicable for indexes on mutable, non transactional tables. Default is true | true |
phoenix.index.failure.block.write | Server-side property determining whether or not writes to the data table are disallowed in the event of a commit failure until the index can be caught up with the data table. Requires that phoenix.index.failure.handling.rebuild is true as well. Only applicable for indexes on mutable, non transactional tables. Default is false | false |
phoenix.index.failure.handling.rebuild.interval | Server-side property controlling the millisecond frequency at which the server checks whether or not a mutable index needs to be partially rebuilt to catch up with updates to the data table. Only applicable for indexes on mutable, non transactional tables. Default is 10 seconds. | 10000 |
phoenix.index.failure.handling.rebuild.overlap.time | Server-side property controlling how many milliseconds to go back from the timestamp at which the failure occurred to go back when a partial rebuild is performed. Only applicable for indexes on mutable, non transactional tables. Default is 1 millisecond. | 1 |
phoenix.index.mutableBatchSizeThreshold | Number of mutations in a batch beyond which index metadata will be sent as a separate RPC to each region server as opposed to included inline with each mutation. Defaults to 5. | 5 |
phoenix.schema.dropMetaData | Determines whether or not an HBase table is dropped when the Phoenix table is dropped. Default is true | true |
phoenix.groupby.spillable | Determines whether or not a GROUP BY over a large number of distinct values is allowed to spill to disk on the region server. If false, an InsufficientMemoryException will be thrown instead. Default is true | true |
phoenix.groupby.spillFiles | Number of memory mapped spill files to be used when spilling GROUP BY distinct values to disk. Default is 2 | 2 |
phoenix.groupby.maxCacheSize | Size in bytes of pages cached during GROUP BY spilling. Default is 100Mb | 102400000 |
phoenix.groupby.estimatedDistinctValues | Number of estimated distinct values when a GROUP BY is performed. Used to perform initial sizing with growth of 1.5x each time reallocation is required. Default is 1000 | 1000 |
phoenix.distinct.value.compress.threshold | Size in bytes beyond which aggregate operations which require tracking distinct value counts (such as COUNT DISTINCT) will use Snappy compression. Default is 1Mb | 1024000 |
phoenix.index.maxDataFileSizePerc | Percentage used to determine the MAX_FILESIZE for the shared index table for views relative to the data table MAX_FILESIZE. The percentage should be estimated based on the anticipated average size of a view index row versus the data row. Default is 50%. | 50 |
phoenix.coprocessor.maxMetaDataCacheTimeToLiveMs | Time in milliseconds after which the server-side metadata cache for a tenant will expire if not accessed. Default is 30mins | 180000 |
phoenix.coprocessor.maxMetaDataCacheSize | Max size in bytes of total server-side metadata cache after which evictions will begin to occur based on least recent access time. Default is 20Mb | 20480000 |
phoenix.client.maxMetaDataCacheSize | Max size in bytes of total client-side metadata cache after which evictions will begin to occur based on least recent access time. Default is 10Mb | 10240000 |
phoenix.sequence.cacheSize | Number of sequence values to reserve from the server and cache on the client when the next sequence value is allocated. Only used if not defined by the sequence itself. Default is 100 | 100 |
phoenix.clock.skew.interval | Delay interval(in milliseconds) when opening SYSTEM.CATALOG to compensate possible time clock skew when SYSTEM.CATALOG moves among region servers. | 2000 |
phoenix.index.failure.handling.rebuild | Boolean flag which turns on/off auto-rebuild a failed index from when some updates are failed to be updated into the index. | true |
phoenix.index.failure.handling.rebuild.interval | Time interval(in milliseconds) for index rebuild backend Job to check if there is an index to be rebuilt | 10000 |
phoenix.index.failure.handling.rebuild.overlap.time | Index rebuild job builds an index from when it failed - the time interval(in milliseconds) in order to create a time overlap to prevent missing updates when there exists time clock skew. | 300000 |
phoenix.query.force.rowkeyorder | Whether or not a non aggregate query returns rows in row key order for salted tables. For version prior to 4.4, use phoenix.query.rowKeyOrderSaltedTable instead. Default is true. | true |
phoenix.connection.autoCommit | Whether or not a new connection has auto-commit enabled when it is created. | false |
phoenix.table.default.store.nulls | The default value of the STORE_NULLS flag used for table creation which determines whether or not null values should be explicitly stored in HBase. This is a client side parameter. Available starting from Phoenix 4.3. | false |
phoenix.table.istransactional.default | The default value of the TRANSACTIONAL flag used for table creation which determines whether or not a table is transactional . This is a client side parameter. Available starting from Phoenix 4.7. | false |
phoenix.transactions.enabled | Determines whether or not transactions are enabled in Phoenix. A table may not be declared as transactional if transactions are disabled. This is a client side parameter. Available starting from Phoenix 4.7. | false |
phoenix.mapreduce.split.by.stats | Determines whether to use the splits determined by statistics for MapReduce input splits. Default is true. This is a server side parameter. Available starting from Phoenix 4.10. Set to false to enable behavior from previous versions. | true |
phoenix.log.level | Client-side property enabling query (only SELECT statement) logging. The logs are written to the SYSTEM.LOG table (requires a user to have W access on SYSTEM.LOG table). Possible values: OFF = No logging; INFO = Enables query logging; DEBUG = More details on Query (Explain plan, HBase Scan Details etc); TRACE = Logs query bind parameters as well. Available starting from Phoenix 4.14. WARNING: Enabling this feature may leak sensitive information to anyone who can access the SYSTEM.LOG table. | OFF |
phoenix.log.sample.rate | Client-side property controlling the probability of logging a query to the query log. Set to a value between 0.0(no query) and 1.0(100% queries) . Available starting from Phoenix 4.14. | 1.0 |
Backward Compatibility
Phoenix maintains backward compatibility across at least two minor releases to allow for no downtime through server-side rolling restarts upon upgrading. See below for details.
Versioning Convention
Phoenix uses a standard three number versioning schema of the form:
<major version> . <minor version> . <patch version>For example, 4.2.1 has a major version of 4,
a minor version of 2, and a patch version of 1.
Patch Release
Upgrading to a new patch release (i.e. only the patch version has changed) is the simplest case. The jar upgrade may occur in any order: client first or server first, and a mix of clients with different patch release versions is fine.
Minor Release
When upgrading to a new minor release (i.e. the major version is the same, but the minor version has changed), sometimes modifications to the system tables are necessary to either fix a bug or provide a new feature. This upgrade will occur automatically the first time a newly upgraded client connects to the newly upgraded server. It is required that the server-side jar be upgraded first across your entire cluster, before any clients are upgraded. An older client (two minor versions back) will work with a newer server jar when the minor version is different, but not vice versa. In other words, clients do not need to be upgraded in lock step with the server. However, as the server version moves forward, the client version should move forward as well. This allows Phoenix to evolve its client/server protocol while still providing clients sufficient time to upgrade their clients.
As of the 4.3 release, a mix of clients on different minor release versions is supported as well (note that prior releases required all clients to be upgraded at the same time). Another improvement as of the 4.3 release is that an upgrade may be done directly from one minor version to another higher minor version (prior releases required an upgrade to each minor version in between).
Major Release
Upgrading to a new major release may require downtime as well as potentially the running of a migration script. Additionally, all clients and servers may need to be upgraded at the same time. This will be determined on a release-by-release basis.
Release Notes
Specific details on issues and their fixes that may impact you can be found here.
Performance
This page has not been updated recently and may not reflect the current state of the project.
Phoenix follows the philosophy of bringing the computation to the data by using:
- coprocessors to perform operations on the server-side thus minimizing client/server data transfer
- custom filters to prune data as close to the source as possible.
In addition, to minimize startup costs, Phoenix uses native HBase APIs rather than going through the MapReduce framework.
Phoenix vs related products
Below are charts showing relative performance between Phoenix and some other related products.
Phoenix vs Hive (running over HDFS and HBase)
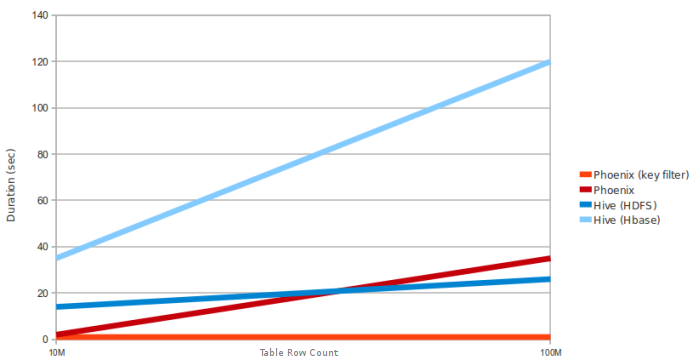
Query: SELECT COUNT(1) from a table over 10M and 100M rows. Data has 5 narrow columns. Number of region
servers: 4 (HBase heap: 10GB, processor: 6 cores @ 3.3GHz Xeon).
Phoenix vs Impala (running over HBase)
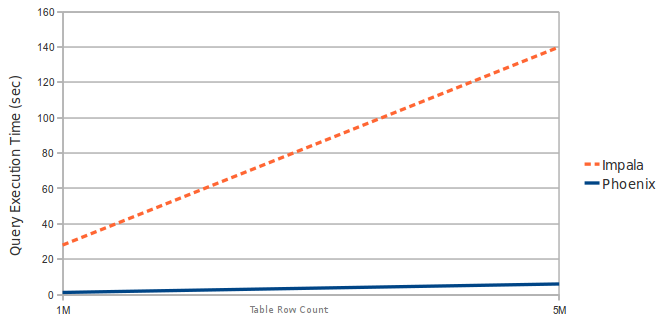
Query: SELECT COUNT(1) from a table over 1M and 5M rows. Data has 3 narrow columns. Number of region servers: 1 (virtual machine, HBase heap: 2GB, processor: 2 cores @ 3.3GHz Xeon).
Latest Automated Performance Run
Latest Automated Performance Run | Automated Performance Runs History
Performance improvements in Phoenix 1.2
Essential Column Family
The Phoenix 1.2 query filter leverages the HBase Filter Essential Column Family feature. This improves performance when Phoenix filters data split across multiple column families (CFs) by loading only essential CFs first. In a second pass, all CFs are loaded as needed.
Consider the following schema in which data is split into two CFs:
CREATE TABLE t (k VARCHAR NOT NULL PRIMARY KEY, a.c1 INTEGER, b.c2 VARCHAR, b.c3 VARCHAR, b.c4 VARCHAR).
Running a query similar to the following shows significant performance gains when a subset of rows matches the filter:
SELECT COUNT(c2) FROM t WHERE c1 = ?
The following chart shows in-memory query performance for the query above with 10M rows on 4 region servers, when 10% of rows match the filter. Note: cf-a is approximately 8 bytes and cf-b is approximately 400 bytes wide.
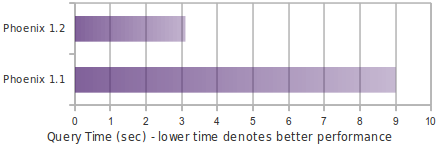
Skip Scan
Skip Scan Filter leverages HBase filter SEEK_NEXT_USING_HINT (docs). It significantly improves point queries over key columns.
Consider the following schema in which data is split into two CFs:
CREATE TABLE t (k VARCHAR NOT NULL PRIMARY KEY, a.c1 INTEGER, b.c2 VARCHAR, b.c3 VARCHAR).
Running a query similar to the following shows significant performance gains when a subset of rows matches the filter:
SELECT COUNT(c1) FROM t WHERE k IN (1% random k's)
The following chart shows in-memory query performance of the query above with 10M rows on 4 region servers when 1% random keys over the full key range are passed in the IN clause. Note: all VARCHAR columns are approximately 15 bytes.
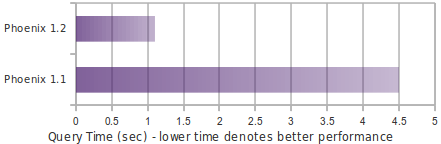
Salting
Salting in Phoenix 1.2 improves both read and write performance by adding an extra hash byte at the start of the key and pre-splitting data into regions. This reduces hotspotting on one or a few region servers. Read more about this feature here.
Consider the following schema:
CREATE TABLE T (HOST CHAR(2) NOT NULL,DOMAIN VARCHAR NOT NULL,
FEATURE VARCHAR NOT NULL,DATE DATE NOT NULL,USAGE.CORE BIGINT,USAGE.DB BIGINT,STATS.ACTIVE_VISITOR
INTEGER CONSTRAINT PK PRIMARY KEY (HOST, DOMAIN, FEATURE, DATE)) SALT_BUCKETS = 4.
The following chart shows write performance with and without salting, where the table is split into 4 regions on a 4-region-server cluster (note: for optimal performance, salt bucket count should match region server count).
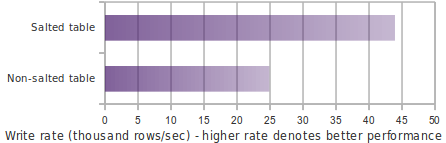
The following chart shows in-memory query performance for a 10M-row table where host='NA' matches 3.3M rows.
select count(1) from t where host='NA'
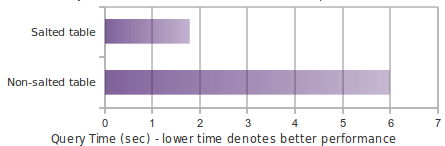
Top-N
The following chart shows in-memory query time for a Top-N query over 10M rows using Phoenix 1.2 and Hive over HBase.
select core from t order by core desc limit 10
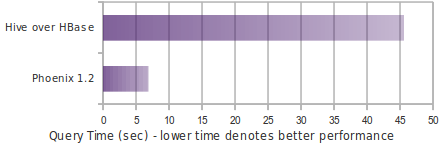
Performance Testing

Overview
Pherf is a standalone tool for performance and functional testing through Phoenix. Pherf can be used both to generate highly customized datasets and to measure SQL performance against that data.
Build all of Phoenix (includes Pherf default profile)
mvn clean package -DskipTestsRunning
- Edit
config/env.shto include the required property values. bin/pherf-standalone.py -h- Example:
bin/pherf-standalone.py -drop all -l -q -z [zookeeper] -schemaFile .*user_defined_schema.sql -scenarioFile .*user_defined_scenario.xml
Example run commands
List all scenario files available to run.
./pherf-standalone.py -listFilesDrop all existing tables, load and query data specified in all scenario files.
./pherf-standalone.py -drop all -l -q -z localhostPherf arguments:
-hHelp-lApply schema and load data-qExecutes multi-threaded query sets and writes results-z [quorum]ZooKeeper quorum-mEnable monitor for statistics-monitorFrequency [frequency in ms]Frequency at which the monitor will snapshot stats to log file-drop [pattern]Regex drop all tables with schema name as PHERF. Example drop Event tables:-drop .*(EVENT).*. Drop all:-drop .*or-drop all-scenarioFileRegex or file name of a specific scenario file to run-schemaFileRegex or file name of a specific schema file to run-exportExports query results to CSV files inCSV_EXPORTdirectory-diffCompares results with previously exported results-hintExecutes all queries with specified hint. Example:SMALL-rowCountOverride-rowCountOverride [number of rows]Specify number of rows to be upserted rather than using row count specified in schema
Adding Rules for Data Creation
Review test_scenario.xml for syntax examples.
- Rules are defined as
<columns />and are applied in the order they appear in file. - Rules of the same type override the values of a prior rule of the same type. If
<userDefined>true</userDefined>is set, rule will only apply override when type and name match the column name in Phoenix. <prefix>tag is set at the column level. It can be used to define a constant string appended to the beginning ofCHARandVARCHARdata type values.- Required field Supported Phoenix types:
VARCHAR,CHAR,DATE,DECIMAL,INTEGER- denoted by the
<type>tag
- denoted by the
- User defined true changes rule matching to use both name and type fields to determine equivalence.
- Default is false if not specified and equivalence will be determined by type only. An important note here is that you can still override rules without the user defined flag, but they will change the rule globally and not just for a specified column.
- Required field Supported Data Sequences
RANDOM: Random value which can be bound by other fields such as length.SEQUENTIAL: Monotonically increasing long prepended to random strings.- Only supported on
VARCHARandCHARtypes
- Only supported on
LIST: Means pick values from predefined list of values
- Required field Length defines boundary for random values for
CHARandVARCHARtypes.- denoted by the
<length>tag
- denoted by the
- Column level Min/Max value defines boundaries for numerical values. For
DATEs, these values supply a range between which values are generated. At the column level the granularity is a year. At a specific data value level, the granularity is down to the Ms.- denoted by the
<minValue>tag - denoted by the
<maxValue>tag
- denoted by the
- Null chance denotes the probability of generating a null value. From [0-100]. The higher the number, the more likely
the value will be null. Denoted by
<nullChance>. - Name can either be any text or the actual column name in the Phoenix table.
- denoted by the
<name>tag
- denoted by the
- Value List is used in conjunction with
LISTdata sequences. Each entry is aDataValuewith a specified value to be used when generating data.- Denoted by the
<valueList><datavalue><value/></datavalue></valueList>tags - If the distribution attribute on the datavalue is set, values will be created according to that probability.
- When distribution is used, values must add up to 100%.
- If distribution is not used, values will be randomly picked from the list with equal distribution.
- Denoted by the
Defining Scenario
A scenario can have multiple querySets. Consider the following example: concurrency of 1-4 means that each query will be executed starting with concurrency level of 1 and reach up to maximum concurrency of 4. Per thread, query would be executed to a minimum of 10 times or 10 seconds (whichever comes first). QuerySet by default is executed serially but you can change executionType to PARALLEL so queries are executed concurrently. Each Query may have an optional timeoutDuration field that defines the amount of time (in milliseconds) before execution for that Query is cancelled. Scenarios are defined in XML files stored in the resource directory.
<scenarios>
  <querySet concurrency="1-4" executionType="PARALLEL" executionDurationInMs="10000" numberOfExecutions="10">
    <query id="q1" verifyRowCount="false" statement="select count(*) from PHERF.TEST_TABLE"/>
    <query id="q2" tenantId="1234567890" timeoutDuration="10000" ddl="create view if not exists myview(mypk varchar not null primary key, mycol varchar)" statement="upsert select ..."/>
  </querySet>
  <querySet concurrency="3" executionType="SERIAL" executionDurationInMs="20000" numberOfExecutions="100">
    <query id="q3" verifyRowCount="false" statement="select count(*) from PHERF.TEST_TABLE"/>
    <query id="q4" statement="select count(*) from PHERF.TEST_TABLE WHERE TENANT_ID='00D000000000062'"/>
  </querySet>
</scenarios>
Results
Results are written real time in results directory. Open the result that is saved in .jpg format for real time visualization. Results are written using DataModelResult objects, which are modified over the course of each Pherf run.
XML results
Pherf XML results have a similar format to the corresponding scenario.xml file used for the Pherf run, but also include additional information, such as the execution time of queries, whether queries timed out, and result row count.
<queryResults expectedAggregateRowCount="100000" id="q1" statement="SELECT COUNT(*) FROM PHERF.USER_DEFINED_TEST" timeoutDuration="0">
  <threadTimes threadName="1,1">
    <runTimesInMs elapsedDurationInMs="1873" resultRowCount="100000" startTime="2020-04-09T11:28:12.623-07:00" timedOut="true"/>
    <runTimesInMs elapsedDurationInMs="1793" resultRowCount="100000" startTime="2020-04-09T11:28:14.511-07:00" timedOut="true"/>
    <runTimesInMs elapsedDurationInMs="1764" resultRowCount="100000" startTime="2020-04-09T11:28:16.319-07:00" timedOut="true"/>
  </threadTimes>
</queryResults>
CSV results
Each row in a CSV result file represents a single execution of a query and provides details about a query execution's
runtime, timeout status, result row count, and more. The header file format can be found in Header.java.
Testing
Default quorum is localhost. If you want to override set the system variable.
Run unit tests: mvn test -DZK_QUORUM=localhost
Run a specific method: mvn -Dtest=ClassName#methodName test
More to come...
Integrations
Spark Integration
The phoenix-spark plugin extends Phoenix's MapReduce support to allow Spark to load Phoenix tables as DataFrames, and enables persisting them back to Phoenix.
Prerequisites
- Phoenix 4.4.0+
- Spark 1.3.1+ (prebuilt with Hadoop 2.4 recommended)
Why not JDBC?
Although Spark supports connecting directly to JDBC databases, it's only able to parallelize queries by partitioning on a numeric column. It also requires a known lower bound, upper bound and partition count in order to create split queries.
In contrast, the phoenix-spark integration is able to leverage the underlying splits provided by Phoenix in order to retrieve and save data across multiple workers. All that's required is a database URL and a table name. Optional SELECT columns can be given, as well as pushdown predicates for efficient filtering.
The choice of which method to use to access Phoenix comes down to each specific use case.
Spark setup
-
To ensure that all requisite Phoenix/HBase platform dependencies are available on the classpath for Spark executors and drivers, set both
spark.executor.extraClassPathandspark.driver.extraClassPathinspark-defaults.confto includephoenix-<version>-client.jar. -
Note that for Phoenix versions 4.7 and 4.8 you must use the 'phoenix-
<version>-client-spark.jar'. -
As of Phoenix 4.10,
phoenix-<version>-client.jaris compiled against Spark 2.x. If compatibility with Spark 1.x is needed, compile Phoenix with thespark16Maven profile. -
To help your IDE, you can add the following provided dependency to your build:
<dependency> <groupId>org.apache.phoenix</groupId> <artifactId>phoenix-spark</artifactId> <version>${phoenix.version}</version> <scope>provided</scope> </dependency> -
As of Phoenix 4.15.0, the connectors project is separated from the main Phoenix project (see phoenix-connectors) and will have its own releases. You can add the following dependency in your project:
<dependency>
  <groupId>org.apache.phoenix</groupId>
  <artifactId>phoenix-spark</artifactId>
  <version>${phoenix.connectors.version}</version>
</dependency>
The first released connectors jar is connectors-1.0.0 (replace phoenix.connectors.version above with this version).
Reading Phoenix Tables
Given a Phoenix table with the following DDL and DML:
CREATE TABLE TABLE1 (ID BIGINT NOT NULL PRIMARY KEY, COL1 VARCHAR);
UPSERT INTO TABLE1 (ID, COL1) VALUES (1, 'test_row_1');
UPSERT INTO TABLE1 (ID, COL1) VALUES (2, 'test_row_2');
Load as a DataFrame using the DataSourceV2 API
Scala example:
import org.apache.spark.SparkContext
import org.apache.spark.sql.{SQLContext, SparkSession}
import org.apache.phoenix.spark.datasource.v2.PhoenixDataSource

val spark = SparkSession
  .builder()
  .appName("phoenix-test")
  .master("local")
  .getOrCreate()

// Load data from TABLE1
val df = spark.sqlContext
  .read
  .format("phoenix")
  .options(Map("table" -> "TABLE1", PhoenixDataSource.ZOOKEEPER_URL -> "phoenix-server:2181"))
  .load

df.filter(df("COL1") === "test_row_1" && df("ID") === 1L)
  .select(df("ID"))
  .show
Java example:
import org.apache.spark.SparkConf;
import org.apache.spark.api.java.JavaSparkContext;
import org.apache.spark.sql.Dataset;
import org.apache.spark.sql.Row;
import org.apache.spark.sql.SQLContext;

import static org.apache.phoenix.spark.datasource.v2.PhoenixDataSource.ZOOKEEPER_URL;

public class PhoenixSparkRead {

    public static void main() throws Exception {
        SparkConf sparkConf = new SparkConf().setMaster("local").setAppName("phoenix-test");
        JavaSparkContext jsc = new JavaSparkContext(sparkConf);
        SQLContext sqlContext = new SQLContext(jsc);

        // Load data from TABLE1
        Dataset<Row> df = sqlContext
            .read()
            .format("phoenix")
            .option("table", "TABLE1")
            .option(ZOOKEEPER_URL, "phoenix-server:2181")
            .load();
        df.createOrReplaceTempView("TABLE1");

        SQLContext sqlCtx = new SQLContext(jsc);
        df = sqlCtx.sql("SELECT * FROM TABLE1 WHERE COL1='test_row_1' AND ID=1L");
        df.show();
        jsc.stop();
    }
}
Saving to Phoenix
Save DataFrames to Phoenix using DataSourceV2
The save method on DataFrame allows passing in a data source type. You can use
phoenix for DataSourceV2 and must also pass in a table and zkUrl parameter to
specify which table and server to persist the DataFrame to. The column names are derived from
the DataFrame's schema field names, and must match the Phoenix column names.
The save method also takes a SaveMode option, for which only SaveMode.Overwrite is supported.
Given two Phoenix tables with the following DDL:
CREATE TABLE INPUT_TABLE (id BIGINT NOT NULL PRIMARY KEY, col1 VARCHAR, col2 INTEGER);
CREATE TABLE OUTPUT_TABLE (id BIGINT NOT NULL PRIMARY KEY, col1 VARCHAR, col2 INTEGER);
you can load from an input table and save to an output table as a DataFrame as follows in Scala:
import org.apache.spark.SparkContext
import org.apache.spark.sql.{SQLContext, SparkSession, SaveMode}
import org.apache.phoenix.spark.datasource.v2.PhoenixDataSource

val spark = SparkSession
  .builder()
  .appName("phoenix-test")
  .master("local")
  .getOrCreate()

// Load INPUT_TABLE
val df = spark.sqlContext
  .read
  .format("phoenix")
  .options(Map("table" -> "INPUT_TABLE", PhoenixDataSource.ZOOKEEPER_URL -> "phoenix-server:2181"))
  .load

// Save to OUTPUT_TABLE
df.write
  .format("phoenix")
  .mode(SaveMode.Overwrite)
  .options(Map("table" -> "OUTPUT_TABLE", PhoenixDataSource.ZOOKEEPER_URL -> "phoenix-server:2181"))
  .save()
Java example:
import org.apache.spark.SparkConf;
import org.apache.spark.api.java.JavaSparkContext;
import org.apache.spark.sql.Dataset;
import org.apache.spark.sql.Row;
import org.apache.spark.sql.SaveMode;
import org.apache.spark.sql.SQLContext;

import static org.apache.phoenix.spark.datasource.v2.PhoenixDataSource.ZOOKEEPER_URL;

public class PhoenixSparkWriteFromInputTable {

    public static void main() throws Exception {
        SparkConf sparkConf = new SparkConf().setMaster("local").setAppName("phoenix-test");
        JavaSparkContext jsc = new JavaSparkContext(sparkConf);
        SQLContext sqlContext = new SQLContext(jsc);

        // Load INPUT_TABLE
        Dataset<Row> df = sqlContext
            .read()
            .format("phoenix")
            .option("table", "INPUT_TABLE")
            .option(ZOOKEEPER_URL, "phoenix-server:2181")
            .load();

        // Save to OUTPUT_TABLE
        df.write()
          .format("phoenix")
          .mode(SaveMode.Overwrite)
          .option("table", "OUTPUT_TABLE")
          .option(ZOOKEEPER_URL, "phoenix-server:2181")
          .save();
        jsc.stop();
    }
}
Save from an external RDD with a schema to a Phoenix table
Just like the previous example, you can pass in the data source type as phoenix and specify the table and
zkUrl parameters indicating which table and server to persist the DataFrame to.
Note that the schema of the RDD must match its column data and this must match the schema of the Phoenix table that you save to.
Given an output Phoenix table with the following DDL:
CREATE TABLE OUTPUT_TABLE (id BIGINT NOT NULL PRIMARY KEY, col1 VARCHAR, col2 INTEGER);you can save a dataframe from an RDD as follows in Scala:
import org.apache.spark.SparkContext
import org.apache.spark.sql.types.{IntegerType, LongType, StringType, StructType, StructField}
import org.apache.spark.sql.{Row, SQLContext, SparkSession, SaveMode}
import org.apache.phoenix.spark.datasource.v2.PhoenixDataSource

val spark = SparkSession
  .builder()
  .appName("phoenix-test")
  .master("local")
  .getOrCreate()

val dataSet = List(Row(1L, "1", 1), Row(2L, "2", 2), Row(3L, "3", 3))

val schema = StructType(
  Seq(StructField("ID", LongType, nullable = false),
    StructField("COL1", StringType),
    StructField("COL2", IntegerType)))

val rowRDD = spark.sparkContext.parallelize(dataSet)

// Apply the schema to the RDD.
val df = spark.sqlContext.createDataFrame(rowRDD, schema)

df.write
  .format("phoenix")
  .options(Map("table" -> "OUTPUT_TABLE", PhoenixDataSource.ZOOKEEPER_URL -> "phoenix-server:2181"))
  .mode(SaveMode.Overwrite)
  .save()
Java example:
import org.apache.spark.SparkConf;
import org.apache.spark.api.java.JavaSparkContext;
import org.apache.spark.sql.Dataset;
import org.apache.spark.sql.Row;
import org.apache.spark.sql.RowFactory;
import org.apache.spark.sql.SaveMode;
import org.apache.spark.sql.SparkSession;
import org.apache.spark.sql.SQLContext;
import org.apache.spark.sql.types.DataTypes;
import org.apache.spark.sql.types.StructField;
import org.apache.spark.sql.types.StructType;

import java.util.ArrayList;
import java.util.List;

import static org.apache.phoenix.spark.datasource.v2.PhoenixDataSource.ZOOKEEPER_URL;

public class PhoenixSparkWriteFromRDDWithSchema {

    public static void main() throws Exception {
        SparkConf sparkConf = new SparkConf().setMaster("local").setAppName("phoenix-test");
        JavaSparkContext jsc = new JavaSparkContext(sparkConf);
        SQLContext sqlContext = new SQLContext(jsc);
        SparkSession spark = sqlContext.sparkSession();
        Dataset<Row> df;

        // Generate the schema based on the fields
        List<StructField> fields = new ArrayList<>();
        fields.add(DataTypes.createStructField("ID", DataTypes.LongType, false));
        fields.add(DataTypes.createStructField("COL1", DataTypes.StringType, true));
        fields.add(DataTypes.createStructField("COL2", DataTypes.IntegerType, true));
        StructType schema = DataTypes.createStructType(fields);

        // Generate the rows with the same exact schema
        List<Row> rows = new ArrayList<>();
        for (int i = 1; i < 4; i++) {
            rows.add(RowFactory.create(Long.valueOf(i), String.valueOf(i), i));
        }

        // Create a DataFrame from the rows and the specified schema
        df = spark.createDataFrame(rows, schema);
        df.write()
            .format("phoenix")
            .mode(SaveMode.Overwrite)
            .option("table", "OUTPUT_TABLE")
            .option(ZOOKEEPER_URL,  "phoenix-server:2181")
            .save();

        jsc.stop();
    }
}
PySpark
With Spark's DataFrame support, you can also use pyspark to read and write from Phoenix tables.
Load a DataFrame
Given a table TABLE1 and a ZooKeeper URL of phoenix-server:2181, you can load the table as a
DataFrame using the following Python code in pyspark:
df = sqlContext.read \
  .format("phoenix") \
  .option("table", "TABLE1") \
  .option("zkUrl", "phoenix-server:2181") \
  .load()
Save a DataFrame
Given the same table and ZooKeeper URL above, you can save a DataFrame to a Phoenix table using the following code:
df.write \
  .format("phoenix") \
  .mode("overwrite") \
  .option("table", "TABLE1") \
  .option("zkUrl", "phoenix-server:2181") \
  .save()
Notes
-
If you want to use DataSourceV1, you can use source type
"org.apache.phoenix.spark"instead of"phoenix", however this is deprecated as ofconnectors-1.0.0. -
The (deprecated) functions
phoenixTableAsDataFrame,phoenixTableAsRDDandsaveToPhoenixall support optionally specifying aconfHadoop configuration parameter with custom Phoenix client settings, as well as an optionalzkUrlparameter for the Phoenix connection URL. -
If
zkUrlisn't specified, it's assumed that the "hbase.zookeeper.quorum" property has been set in theconfparameter. Similarly, if no configuration is passed in,zkUrlmust be specified. -
As of PHOENIX-5197, you can pass configurations from the driver to executors as a comma-separated list against the key
phoenixConfigsi.e (PhoenixDataSource.PHOENIX_CONFIGS), for ex:df = spark .sqlContext .read .format("phoenix") .options(Map("table" -> "Table1", "zkUrl" -> "phoenix-server:2181", "phoenixConfigs" -> "hbase.client.retries.number=10,hbase.client.pause=10000")) .load;
This list of properties is parsed and populated into a properties map which is passed to DriverManager.getConnection(connString, propsMap).
Note that the same property values will be used for both the driver and all executors and
these configurations are used each time a connection is made (both on the driver and executors).
Limitations
- Basic support for column and predicate pushdown using the Data Source API
- The Data Source API does not support passing custom Phoenix settings in configuration, you must create the DataFrame or RDD directly if you need fine-grained configuration.
- No support for aggregate or distinct queries as explained in our Map Reduce Integration documentation.
PageRank example
This example makes use of the Enron email data set, provided by the Stanford Network Analysis Project, and executes the GraphX implementation of PageRank on it to find interesting entities. It then saves the results back to Phoenix.
-
Download and extract the file enron.csv.gz
-
Create the necessary Phoenix schema
CREATE TABLE EMAIL_ENRON(MAIL_FROM BIGINT NOT NULL, MAIL_TO BIGINT NOT NULL CONSTRAINT pk PRIMARY KEY(MAIL_FROM, MAIL_TO)); CREATE TABLE EMAIL_ENRON_PAGERANK(ID BIGINT NOT NULL, RANK DOUBLE CONSTRAINT pk PRIMARY KEY(ID)); -
Load the email data into Phoenix (assuming localhost for ZooKeeper quorum URL)
gunzip /tmp/enron.csv.gz cd /path/to/phoenix/bin ./psql.py -t EMAIL_ENRON localhost /tmp/enron.csv -
In spark-shell, with the phoenix-client in the Spark driver classpath, run the following:
import org.apache.spark.graphx._ import org.apache.phoenix.spark._ val rdd = sc.phoenixTableAsRDD("EMAIL_ENRON", Seq("MAIL_FROM", "MAIL_TO"), zkUrl=Some("localhost")) // load from phoenix val rawEdges = rdd.map{ e => (e("MAIL_FROM").asInstanceOf[VertexId], e("MAIL_TO").asInstanceOf[VertexId]) } // map to vertexids val graph = Graph.fromEdgeTuples(rawEdges, 1.0) // create a graph val pr = graph.pageRank(0.001) // run pagerank pr.vertices.saveToPhoenix("EMAIL_ENRON_PAGERANK", Seq("ID", "RANK"), zkUrl = Some("localhost")) // save to phoenix -
Query the top ranked entities in SQL
SELECT * FROM EMAIL_ENRON_PAGERANK ORDER BY RANK DESC LIMIT 5;
+------------------------------------------+------------------------------------------+
|                    ID                    |                   RANK                   |
+------------------------------------------+------------------------------------------+
| 5038                                     | 497.2989872977676                        |
| 273                                      | 117.18141799210386                       |
| 140                                      | 108.63091596789913                       |
| 458                                      | 107.2728800448782                        |
| 588                                      | 106.11840798585399                       |
+------------------------------------------+------------------------------------------+
Deprecated Usages
Load as a DataFrame directly using a Configuration object
import org.apache.hadoop.conf.Configuration
import org.apache.spark.SparkContext
import org.apache.spark.sql.SQLContext
import org.apache.phoenix.spark._

val configuration = new Configuration()
// Can set Phoenix-specific settings, requires 'hbase.zookeeper.quorum'

val sc = new SparkContext("local", "phoenix-test")
val sqlContext = new SQLContext(sc)

// Load the columns 'ID' and 'COL1' from TABLE1 as a DataFrame
val df = sqlContext.phoenixTableAsDataFrame(
  "TABLE1", Array("ID", "COL1"), conf = configuration
)

df.show
Load as an RDD, using a Zookeeper URL
import org.apache.spark.SparkContext
import org.apache.spark.sql.SQLContext
import org.apache.phoenix.spark._
import org.apache.spark.rdd.RDD

val sc = new SparkContext("local", "phoenix-test")

// Load the columns 'ID' and 'COL1' from TABLE1 as an RDD
val rdd: RDD[Map[String, AnyRef]] = sc.phoenixTableAsRDD(
  "TABLE1", Seq("ID", "COL1"), zkUrl = Some("phoenix-server:2181")
)

rdd.count()

val firstId = rdd.first()("ID").asInstanceOf[Long]
val firstCol = rdd.first()("COL1").asInstanceOf[String]
Saving RDDs to Phoenix
saveToPhoenix is an implicit method on RDD[Product], or an RDD of Tuples. The data types must
correspond to the Java types Phoenix supports Datatypes
Given a Phoenix table with the following DDL:
CREATE TABLE OUTPUT_TEST_TABLE (id BIGINT NOT NULL PRIMARY KEY, col1 VARCHAR, col2 INTEGER);import org.apache.spark.SparkContext
import org.apache.phoenix.spark._
val sc = new SparkContext("local", "phoenix-test")
val dataSet = List((1L, "1", 1), (2L, "2", 2), (3L, "3", 3))
sc
.parallelize(dataSet)
.saveToPhoenix(
"OUTPUT_TEST_TABLE",
Seq("ID","COL1","COL2"),
zkUrl = Some("phoenix-server:2181")
)Apache Hive
The Apache Phoenix Storage Handler is a plugin that enables Apache Hive access to Phoenix tables from the Apache Hive command line using HiveQL.
Prerequisites
This document describes the plugin available in the phoenix-connectors source repo, as of December 2023.
- Phoenix 5.1.0+
- Hive 3.1.2+
- phoenix-connectors
6.0.0-SNAPSHOT
The Phoenix Storage handler currently only supports Hive 3.1. It has only been tested with Hive Hive 3.1.3, and Phoenix 5.1.3.
A variant for Hive 4 is planned after Hive 4.0.0 is released.
Building
The Phoenix Storage Handler used to be part of the main Phoenix repo, but it has been refactored into the separate phoenix-connectors repo after the release of Phoenix 5.0.
At the time of writing there is no released version of the connectors project, so it must be built from the Git source repository HEAD.
Official releases will be available on the Downloads page.
Check the value of the hbase.version property in the root pom.xml.
If it is older than HBase 2.5.0, then you need to rebuild HBase locally as described
in BUILDING.md in the main Phoenix repository.
Check out the HEAD version of https://github.com/apache/phoenix-connectors. Build it with:
mvn clean packageThe binary distribution will be created in phoenix5-connectors-assembly/target.
The driver is built for HBase 2.4.x by default.
To build it for other HBase versions, set hbase.version, hbase.compat.version, hadoop.version, zookeeper.version, and hbase-thirdparty-version to the versions used by HBase. hbase.compat.version is the matching hbase-compat module in Phoenix; other versions can be copied from the root pom.xml in the HBase source.
For example, to build with HBase 2.1.10 (rebuilt with -Dhadoop.profile=3.0), use:
mvn clean package -Dhbase.version=2.1.10 -Dhbase.compat.version=2.1.6 -Dhadoop.version=3.0.3 -Dzookeeper.version=3.4.10 -Dhbase-thirdparty-version=2.1.0Preparing Hive 3
Hive 3.1 ships with HBase 2.0 beta, which is incompatible with Phoenix. To use the Phoenix Storage handler, HBase and its dependencies have to be removed from Hive.
To remove the shipped HBase 2.0 beta perform the following on each Hive node:
-
Create a backup of the Hive /lib directory
-
Remove the HBase dependencies from the /lib directory:
mkdir ../lib-removed
mv hbase-* javax.inject* jcodings-* jersey-* joni-* osgi-resource-locator-* ../lib-removed/
Even though Hive ships with HBase jars, it includes a mechanism to load the hbase mapredcp jars automatically.
To ensure that Hive finds and uses the correct HBase JARs and hbase-site.xml, set the following
environment variables in hive-env.sh on each node, or make sure they are set properly in the environment:
HBASE_HOME: The root directory of the HBase installation.HBASE_CONF_DIR: The directory wherehbase-site.xmlresides. Defaults to/etc/hbase/conf, or if it does not exist, to$HBASE_HOME/conf.HBASE_BIN_DIR: The directory that holds thehbasecommand. Defaults to$HBASE_HOME/bin.
It is assumed that the Hadoop variables are already set correctly, and the HBase libraries and up-to-date hbase-site.xml are available on each Hive node.
Hive Setup
It is necessary to make the phoenix5-hive-shaded-6.0.0-SNAPSHOT-shaded.jar available for every hive component.
There are many ways to achieve this; one of the simpler options is to use the HIVE_AUX_JARS_PATH environment variable.
If hive-env.sh already sets HIVE_AUX_JARS_PATH, then copy the connector JAR there.
Otherwise, create a world-readable directory on the system and copy the connector JAR there. Then add:
HIVE_AUX_JARS_PATH=<PATH TO DIRECTORY>to hive-env.sh.
This must be performed on every Hive node.
Table Creation and Deletion
The Phoenix Storage Handler supports only EXTERNAL Hive tables.
Create EXTERNAL Table
For EXTERNAL tables, Hive works with an existing Phoenix table and manages only Hive metadata. Dropping an EXTERNAL table from Hive deletes only Hive metadata but does not delete the Phoenix table.
create external table ext_table (
  i1 int,
  s1 string,
  f1 float,
  d1 decimal
)
STORED BY 'org.apache.phoenix.hive.PhoenixStorageHandler'
TBLPROPERTIES (
  "phoenix.table.name" = "ext_table",
  "phoenix.zookeeper.quorum" = "localhost",
  "phoenix.zookeeper.znode.parent" = "/hbase",
  "phoenix.zookeeper.client.port" = "2181",
  "phoenix.rowkeys" = "i1",
  "phoenix.column.mapping" = "i1:i1, s1:s1, f1:f1, d1:d1"
);
Properties
- phoenix.table.name
- Specifies the Phoenix table name
- Default: the same as the Hive table
- phoenix.zookeeper.quorum
- Specifies the ZooKeeper quorum for HBase
- Default: localhost
- phoenix.zookeeper.znode.parent
- Specifies the ZooKeeper parent node for HBase
- Default: /hbase
- phoenix.zookeeper.client.port
- Specifies the ZooKeeper port
- Default: 2181
- phoenix.rowkeys
- The list of columns to be the primary key in a Phoenix table
- Required
- phoenix.column.mapping
- Mappings between column names for Hive and Phoenix. See Limitations for details.
The phoenix.zookeeper.* properties are optional. If they are not specified, values from hbase-site.xml will be used.
Data Ingestion, Deletions, and Updates
Data ingestion can be done by all ways that Hive and Phoenix support:
Hive:
insert into table T values (....);
insert into table T select c1,c2,c3 from source_table;
Phoenix:
upsert into table T values (.....);Phoenix CSV BulkLoad tools can also be used.
All delete and update operations should be performed on the Phoenix side. See Limitations for more details.
Additional Configuration Options
Those options can be set in a Hive command-line interface (CLI) environment.
Performance Tuning
| Parameter | Default Value | Description |
|---|---|---|
| phoenix.upsert.batch.size | 1000 | Batch size for upsert. |
| [phoenix-table-name].disable.wal | false | Temporarily sets the table attribute DISABLE_WAL to true. Sometimes used to improve performance |
| [phoenix-table-name].auto.flush | false | When WAL is disabled and if this value is true, then MemStore is flushed to an HFile. |
Disabling WAL can lead to data loss.
Query Data
You can use HiveQL for querying data in a Phoenix table. A Hive query on a single table can be as fast as running the query in the Phoenix CLI with the following property settings: hive.fetch.task.conversion=more and hive.exec.parallel=true
| Parameter | Default Value | Description |
|---|---|---|
| hbase.scan.cache | 100 | Read row size for a unit request |
| hbase.scan.cacheblock | false | Whether or not cache block |
| split.by.stats | false | If true, mappers use table statistics. One mapper per guide post. |
| [hive-table-name].reducer.count | 1 | Number of reducers. In Tez mode, this affects only single-table queries. See Limitations. |
| [phoenix-table-name].query.hint | Hint for Phoenix query (for example, NO_INDEX) |
Limitations
- Hive update and delete operations require transaction manager support on both Hive and Phoenix sides. Related Hive and Phoenix JIRAs are listed in the Resources section.
- Column mapping does not work correctly with mapping row key columns.
- MapReduce and Tez jobs always have a single reducer.
Resources
- PHOENIX-2743: Implementation accepted by the Apache Phoenix community. Original pull request contains modifications for Hive classes.
- PHOENIX-331: An outdated implementation with support for Hive 0.98.
Pig Integration
Pig integration may be divided into two parts: a StoreFunc as a means to generate Phoenix-encoded data through Pig, and a Loader which enables Phoenix-encoded data to be read by Pig.
Pig StoreFunc
The StoreFunc allows users to write data in Phoenix-encoded format to HBase tables using Pig scripts. This is a nice way to bulk upload data from a MapReduce job in parallel to a Phoenix table in HBase. All you need to specify is the endpoint address, HBase table name and a batch size. For example:
A = load 'testdata' as (a:chararray, b:chararray, c:chararray, d:chararray, e:datetime);
STORE A into 'hbase://CORE.ENTITY_HISTORY' using
    org.apache.phoenix.pig.PhoenixHBaseStorage('localhost', '-batchSize 5000');
The above reads a file testdata and writes the elements to table CORE.ENTITY_HISTORY in HBase running on localhost. The first StoreFunc argument is the server, and the second is the batch size for Phoenix upserts. The batch size is related to how many rows you can hold in memory. A good default is 1000 rows, but if your rows are wide, you may want to decrease this.
Note that Pig types must be in sync with the target Phoenix data types. This StoreFunc tries best to cast based on input Pig types and target Phoenix data types, but it is recommended to provide an appropriate schema.
Gotchas
It is advised that the upsert operation be idempotent. That is, trying to re-upsert data should not cause any inconsistencies. This is important in the case when a Pig job fails in process of writing to a Phoenix table. There is no notion of rollback (due to lack of transactions in HBase), and re-trying the upsert with PhoenixHBaseStorage must result in the same data in HBase table.
For example, let’s assume we are writing records n1...n10 to HBase. If the job fails in the middle of this process, we are left in an inconsistent state where n1...n7 made it to the phoenix tables but n8...n10 were missed. If we retry the same operation, n1...n7 would be re-upserted and n8...n10 would be upserted this time.
Pig Loader
A Pig data loader allows users to read data from Phoenix-backed HBase tables within a Pig script.
The LoadFunc provides two alternative ways to load data.
-
Given a table name, the following will load the data for all the columns in the HIRES table:
A = load 'hbase://table/HIRES' using org.apache.phoenix.pig.PhoenixHBaseLoader('localhost');To restrict the list of columns, you may specify the column names as part of LOAD as shown below:
A = load 'hbase://table/HIRES/ID,NAME' using org.apache.phoenix.pig.PhoenixHBaseLoader('localhost');Here, only data for ID and NAME columns are returned.
-
Given a query, the following loads data for all those rows whose AGE column has a value of greater than 50:
A = load 'hbase://query/SELECT ID,NAME FROM HIRES WHERE AGE > 50' using org.apache.phoenix.pig.PhoenixHBaseLoader('localhost');The LOAD func merely executes the given SQL query and returns the results. Though there is a provision to provide a query as part of LOAD, it is restricted to the following:
- Only a
SELECTquery is allowed. No DML statements such asUPSERTorDELETE. - The query may not contain any
GROUP BY,ORDER BY,LIMIT, orDISTINCTclauses. - The query may not contain any
AGGREGATEfunctions.
- Only a
In both cases, the ZooKeeper quorum should be passed to PhoenixHBaseLoader as a constructor argument.
The LoadFunc makes a best effort to map Phoenix data types to Pig datatypes. You can check org.apache.phoenix.pig.util.TypeUtil to see how each Phoenix data type maps to Pig.
Example
Determine the number of users by a CLIENT ID.
DDL
CREATE TABLE HIRES (
  CLIENTID INTEGER NOT NULL,
  EMPID INTEGER NOT NULL,
  NAME VARCHAR
  CONSTRAINT pk PRIMARY KEY(CLIENTID, EMPID)
);
Pig Script
raw = LOAD 'hbase://table/HIRES' USING org.apache.phoenix.pig.PhoenixHBaseLoader('localhost');
grpd = GROUP raw BY CLIENTID;
cnt = FOREACH grpd GENERATE group AS CLIENT, COUNT(raw);
DUMP cnt;
Future Work
- Support for
ARRAYdata type. - Usage of expressions within the SELECT clause when providing a full query.
Map Reduce Integration
Phoenix provides support for retrieving and writing to Phoenix tables from within MapReduce jobs. The framework now provides custom InputFormat and OutputFormat classes PhoenixInputFormat , PhoenixOutputFormat.
PhoenixMapReduceUtil provides several utility methods to set the input and output configuration parameters to the job.
When a Phoenix table is the source for the MapReduce job, we can provide a SELECT query or pass a table name and specific columns to import data. To retrieve data from the table within the mapper class, we need to have a class that implements DBWritable and pass it as an argument to PhoenixMapReduceUtil.setInput. The custom DBWritable class provides an implementation for readFields(ResultSet rs) that allows us to retrieve columns for each row. This custom DBWritable class will form the input value to the mapper class.
Note: The SELECT query must not perform any aggregation or use DISTINCT as these are not supported by our map-reduce integration.
Similarly, when writing to a Phoenix table, we use PhoenixMapReduceUtil.setOutput to set the output table and columns.
Note: Phoenix internally builds the UPSERT query for you .
The output key and value class for the job should always be NullWritable and the custom DBWritable class that implements the write method.
Let's dive into an example where we have a table, STOCK, that holds the master data of quarterly recordings in a double array for each year, and we want to find the max price of each stock across all years. Let's store the output in STOCK_STATS, which is another Phoenix table.
Note: You can definitely configure a job to read from HDFS and load into a Phoenix table.
a) stock
CREATE TABLE IF NOT EXISTS STOCK (
  STOCK_NAME VARCHAR NOT NULL,
  RECORDING_YEAR INTEGER NOT NULL,
  RECORDINGS_QUARTER DOUBLE ARRAY[],
  CONSTRAINT pk PRIMARY KEY (STOCK_NAME, RECORDING_YEAR)
);
b) stock_stats
CREATE TABLE IF NOT EXISTS STOCK_STATS (
  STOCK_NAME VARCHAR NOT NULL,
  MAX_RECORDING DOUBLE,
  CONSTRAINT pk PRIMARY KEY (STOCK_NAME)
);
Sample Data
UPSERT into STOCK values ('AAPL',2009,ARRAY[85.88,91.04,88.5,90.3]);
UPSERT into STOCK values ('AAPL',2008,ARRAY[199.27,200.26,192.55,194.84]);
UPSERT into STOCK values ('AAPL',2007,ARRAY[86.29,86.58,81.90,83.80]);
UPSERT into STOCK values ('CSCO',2009,ARRAY[16.41,17.00,16.25,16.96]);
UPSERT into STOCK values ('CSCO',2008,ARRAY[27.00,27.30,26.21,26.54]);
UPSERT into STOCK values ('CSCO',2007,ARRAY[27.46,27.98,27.33,27.73]);
UPSERT into STOCK values ('CSCO',2006,ARRAY[17.21,17.49,17.18,17.45]);
UPSERT into STOCK values ('GOOG',2009,ARRAY[308.60,321.82,305.50,321.32]);
UPSERT into STOCK values ('GOOG',2008,ARRAY[692.87,697.37,677.73,685.19]);
UPSERT into STOCK values ('GOOG',2007,ARRAY[466.00,476.66,461.11,467.59]);
UPSERT into STOCK values ('GOOG',2006,ARRAY[422.52,435.67,418.22,435.23]);
UPSERT into STOCK values ('MSFT',2009,ARRAY[19.53,20.40,19.37,20.33]);
UPSERT into STOCK values ('MSFT',2008,ARRAY[35.79,35.96,35.00,35.22]);
UPSERT into STOCK values ('MSFT',2007,ARRAY[29.91,30.25,29.40,29.86]);
UPSERT into STOCK values ('MSFT',2006,ARRAY[26.25,27.00,26.10,26.84]);
UPSERT into STOCK values ('YHOO',2009,ARRAY[12.17,12.85,12.12,12.85]);
UPSERT into STOCK values ('YHOO',2008,ARRAY[23.80,24.15,23.60,23.72]);
UPSERT into STOCK values ('YHOO',2007,ARRAY[25.85,26.26,25.26,25.61]);
UPSERT into STOCK values ('YHOO',2006,ARRAY[39.69,41.22,38.79,40.91]);
Below is a simple job configuration
Job Configuration
final Configuration configuration = HBaseConfiguration.create();
final Job job = Job.getInstance(configuration, "phoenix-mr-job");

// We can either specify a selectQuery or ignore it when we would like to retrieve all the columns
final String selectQuery = "SELECT STOCK_NAME,RECORDING_YEAR,RECORDINGS_QUARTER FROM STOCK ";

// StockWritable is the DBWritable class that enables us to process the result of the above query
PhoenixMapReduceUtil.setInput(job, StockWritable.class, "STOCK", selectQuery);

// Set the target Phoenix table and the columns
PhoenixMapReduceUtil.setOutput(job, "STOCK_STATS", "STOCK_NAME,MAX_RECORDING");

job.setMapperClass(StockMapper.class);
job.setReducerClass(StockReducer.class);
job.setOutputFormatClass(PhoenixOutputFormat.class);

job.setMapOutputKeyClass(Text.class);
job.setMapOutputValueClass(DoubleWritable.class);
job.setOutputKeyClass(NullWritable.class);
job.setOutputValueClass(StockWritable.class);
TableMapReduceUtil.addDependencyJars(job);
job.waitForCompletion(true);
StockWritable
public class StockWritable implements DBWritable, Writable {
  private String stockName;
  private int year;
  private double[] recordings;
  private double maxPrice;

  @Override
  public void readFields(DataInput input) throws IOException {
  }

  @Override
  public void write(DataOutput output) throws IOException {
  }

  @Override
  public void readFields(ResultSet rs) throws SQLException {
    stockName = rs.getString("STOCK_NAME");
    year = rs.getInt("RECORDING_YEAR");
    final Array recordingsArray = rs.getArray("RECORDINGS_QUARTER");
    recordings = (double[]) recordingsArray.getArray();
  }

  @Override
  public void write(PreparedStatement pstmt) throws SQLException {
    pstmt.setString(1, stockName);
    pstmt.setDouble(2, maxPrice);
  }

  // getters / setters for the fields
  ...
  ...
}
Stock Mapper
public static class StockMapper extends Mapper<NullWritable, StockWritable, Text, DoubleWritable> {
  private Text stock = new Text();
  private DoubleWritable price = new DoubleWritable();

  @Override
  protected void map(NullWritable key, StockWritable stockWritable, Context context)
      throws IOException, InterruptedException {
    double[] recordings = stockWritable.getRecordings();
    final String stockName = stockWritable.getStockName();
    double maxPrice = Double.MIN_VALUE;
    for (double recording : recordings) {
      if (maxPrice < recording) {
        maxPrice = recording;
      }
    }
    stock.set(stockName);
    price.set(maxPrice);
    context.write(stock, price);
  }
}
Stock Reducer
public static class StockReducer extends Reducer<Text, DoubleWritable, NullWritable, StockWritable> {
  @Override
  protected void reduce(Text key, Iterable<DoubleWritable> recordings, Context context)
      throws IOException, InterruptedException {
    double maxPrice = Double.MIN_VALUE;
    for (DoubleWritable recording : recordings) {
      if (maxPrice < recording.get()) {
        maxPrice = recording.get();
      }
    }
    final StockWritable stock = new StockWritable();
    stock.setStockName(key.toString());
    stock.setMaxPrice(maxPrice);
    context.write(NullWritable.get(), stock);
  }
}
Packaging and Running
- Ensure
phoenix-[version]-client.jaris in the classpath of your MapReduce job JAR. - To run the job, use the hadoop jar command with the necessary arguments.
Flume Plugin
The plugin enables reliable and efficient streaming of large amounts of data/logs into HBase using the Phoenix API. The custom Phoenix sink and event serializer must be configured in the Flume agent configuration file. Currently, the only supported event serializer is RegexEventSerializer, which parses the Flume event body using a configured regex.
Prerequisites
- Phoenix v3.0.0-SNAPSHOT+
- Flume 1.4.0+
Installation and Setup
- Download and build Phoenix v3.0.0-SNAPSHOT.
- Follow the instructions here to build the project, as the Flume plugin is still under beta.
- Create a
plugins.ddirectory within$FLUME_HOME. Within that, create sub-directoryphoenix-sink/lib. - Copy generated
phoenix-3.0.0-SNAPSHOT-client.jarto$FLUME_HOME/plugins.d/phoenix-sink/lib.
Configuration
| Property Name | Default | Description |
|---|---|---|
type | org.apache.phoenix.flume.sink.PhoenixSink | |
batchSize | 100 | Default number of events per transaction. |
zookeeperQuorum | ZooKeeper quorum of the HBase cluster. | |
table | Name of the table in HBase to write to. | |
ddl | The CREATE TABLE query for the HBase table where events will be upserted. If specified, the query will be executed. Recommended to include the IF NOT EXISTS clause in the DDL. | |
serializer | regex | Event serializer for processing the Flume event. Currently only regex is supported. |
serializer.regex | (.*) | Regular expression for parsing the event. |
serializer.columns | Columns extracted from the Flume event for inserting into HBase. | |
serializer.headers | Flume event headers included as part of the UPSERT query. Data type for these columns is VARCHAR by default. | |
serializer.rowkeyType | A custom row key generator. Can be one of timestamp, date, uuid, random, or nanotimestamp. Configure this when a custom row key should be auto-generated for the primary key column. |
For an example configuration for ingesting Apache access logs into Phoenix, see this property file. It uses UUID as a row key generator for the primary key.
Starting the agent
$ bin/flume-ng agent -f conf/flume-conf.properties -c ./conf -n agentMonitoring
To monitor the agent and sink process, enable JMX via flume-env.sh ($FLUME_HOME/conf/flume-env.sh). Ensure you have the following line uncommented:
JAVA_OPTS="-Xms1g -Xmx1g -Dcom.sun.management.jmxremote -Dcom.sun.management.jmxremote.port=3141 -Dcom.sun.management.jmxremote.authenticate=false -Dcom.sun.management.jmxremote.ssl=false"Kafka Plugin
The plugin enables reliable and efficient streaming of large amounts of data/logs into HBase using the Phoenix API.
Apache Kafka™ is a distributed, partitioned, replicated commit log service. It provides the functionality of a messaging system, but with a unique design.
At a high level, producers send messages over the network to the Kafka cluster, which then serves them to consumers:
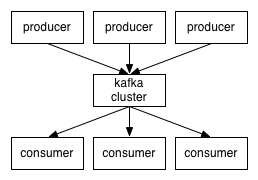
Phoenix provides PhoenixConsumer to receive messages from Kafka producers.
Prerequisites
- Phoenix 4.10.0+
- Kafka 0.9.0.0+
Installation and Setup
Use our binary artifacts for Phoenix 4.10.0+ directly or download and build Phoenix yourself (see instructions here).
PhoenixConsumer with RegexEventSerializer
Create a kafka-consumer-regex.properties file with the following properties:
serializer=regex
serializer.rowkeyType=uuid
serializer.regex=([^\,]*),([^\,]*),([^\,]*)
serializer.columns=c1,c2,c3

jdbcUrl=jdbc:phoenix:localhost
table=SAMPLE1
ddl=CREATE TABLE IF NOT EXISTS SAMPLE1(uid VARCHAR NOT NULL,c1 VARCHAR,c2 VARCHAR,c3 VARCHAR CONSTRAINT pk PRIMARY KEY(uid))

bootstrap.servers=localhost:9092
topics=topic1,topic2
poll.timeout.ms=100
PhoenixConsumer with JsonEventSerializer
Create a kafka-consumer-json.properties file with the following properties:
serializer=json
serializer.rowkeyType=uuid
serializer.columns=c1,c2,c3

jdbcUrl=jdbc:phoenix:localhost
table=SAMPLE2
ddl=CREATE TABLE IF NOT EXISTS SAMPLE2(uid VARCHAR NOT NULL,c1 VARCHAR,c2 VARCHAR,c3 VARCHAR CONSTRAINT pk PRIMARY KEY(uid))

bootstrap.servers=localhost:9092
topics=topic1,topic2
poll.timeout.ms=100
PhoenixConsumer Execution Procedure
Start the Kafka producer, then send some messages:
> bin/kafka-console-producer.sh --broker-list localhost:9092 --topic topic1Learn more about Apache Kafka here.
Start PhoenixConsumer using the command below:
HADOOP_CLASSPATH=$(hbase classpath):/path/to/hbase/conf hadoop jar phoenix-kafka-<version>-minimal.jar org.apache.phoenix.kafka.consumer.PhoenixConsumerTool --file /data/kafka-consumer.propertiesThe input file must be present on HDFS (not the local filesystem where the command is being run).
Configuration
| Property Name | Default | Description |
|---|---|---|
bootstrap.servers | List of Kafka servers used to bootstrap connections to Kafka. Format: host1:port1,host2:port2,... | |
topics | List of topics to use as input for this connector. Format: topic1,topic2,... | |
poll.timeout.ms | 100 | Default poll timeout in milliseconds. |
batchSize | 100 | Default number of events per transaction. |
zookeeperQuorum | ZooKeeper quorum of the HBase cluster. | |
table | Name of the table in HBase to write to. | |
ddl | The CREATE TABLE query for the HBase table where events will be upserted. If specified, this query is executed. It is recommended to include IF NOT EXISTS in the DDL. | |
serializer | Event serializer for processing Kafka messages. This plugin supports Phoenix Flume event serializers (for example, regex, json). | |
serializer.regex | (.*) | Regular expression for parsing the message. |
serializer.columns | Columns that will be extracted from the message for inserting into HBase. | |
serializer.headers | Headers that go as part of the UPSERT query. Data type for these columns is VARCHAR by default. | |
serializer.rowkeyType | Custom row key generator. Can be one of timestamp, date, uuid, random, or nanotimestamp. Configure this when a custom row key should be auto-generated for the primary key column. |
Note: This plugin supports Phoenix Flume event serializers.
- RegexEventSerializer parses Kafka messages based on the regex specified in the configuration file.
- JsonEventSerializer parses Kafka messages based on the schema specified in the configuration file.
Python Driver
The Python driver for Apache Phoenix implements the Python DB 2.0 API to access Phoenix via Phoenix Query Server. The driver is tested with Python 2.7 and 3.5-3.8. This code was originally called python-phoenixdb and was graciously donated by its authors to the Apache Phoenix project.
All future development of the project is being done in Apache Phoenix.
Installation
From PyPI
The latest release is always available from PyPI, and can be installed by
pip/pip3 as usual.
pip3 install --user phoenixdbFrom source
You can build phoenixdb from the official source release,
or use the latest development version from the source
repository. The python-phoenixdb source
lives in the python-phoenixdb directory of the phoenix-queryserver
repository.
$ cd python-phoenixdb # (Only when building from the git repo)
$ pip install -r requirements.txt
$ python setup.py install
Examples
import phoenixdb
import phoenixdb.cursor

database_url = 'http://localhost:8765/'
conn = phoenixdb.connect(database_url, autocommit=True)

cursor = conn.cursor()
cursor.execute("CREATE TABLE users (id INTEGER PRIMARY KEY, username VARCHAR)")
cursor.execute("UPSERT INTO users VALUES (?, ?)", (1, 'admin'))
cursor.execute("SELECT * FROM users")
print(cursor.fetchall())

cursor = conn.cursor(cursor_factory=phoenixdb.cursor.DictCursor)
cursor.execute("SELECT * FROM users WHERE id=1")
print(cursor.fetchone()['USERNAME'])
Limitations
- None presently known.
Resources
- PHOENIX-4636: Initial landing of the driver into Apache Phoenix.
- PHOENIX-4688: Implementation of Kerberos authentication via SPNEGO.
Addons
Phoenix ORM library

PHO is an Object Relational Mapping (ORM) library for building and executing queries on HBase using Apache Phoenix. It provides ORM-style mappings and DSL-style query building. Initially developed and open sourced by eHarmony, it is available on GitHub.
Its interfaces and generic annotations make it possible to switch data store APIs in the future without changing query definitions. Currently, it supports HBase integration through Apache Phoenix, and can be extended with other implementations.
Entity Class
Suppose we have the following TestClass we want to query in our data store:
// class must be annotated with Entity
import com.google.code.morphia.annotations.Embedded;
import com.google.code.morphia.annotations.Entity;

@Entity(value = "user_matches")
public class MatchDataFeedItemDto {
    @Embedded
    private MatchCommunicationElement communication;
    @Embedded
    private MatchElement match;
    @Embedded
    private MatchProfileElement matchedUser;
}

public class MatchElement {
    // row key
    @Property(value = "UID")
    private long userId;
    @Property(value = "MID")
    private long matchId;
    @Property(value = "DLVRYDT")
    private Date deliveredDate;
    @Property(value = "STATUS")
    private int status;
}
Query Building
Query building can be done in DSL style. More advanced query building is under development, but for now we will use a combination of QueryBuilder and static, Hibernate-style Restrictions methods to construct queries.
Simple queries
Construct a query to find all user matches delivered in the past two days and not in a closed state.
import com.eharmony.datastore.api.DataStoreApi;
import com.eharmony.datastore.model.MatchDataFeedItemDto;
import com.eharmony.datastore.query.QuerySelect;
import com.eharmony.datastore.query.builder.QueryBuilder;
import com.eharmony.datastore.query.criterion.Restrictions;

@Repository
public class MatchStoreQueryRepositoryImpl implements MatchStoreQueryRepository {
    final QuerySelect<MatchDataFeedItemDto, MatchDataFeedItemDto> query = QueryBuilder
        .builderFor(MatchDataFeedItemDto.class)
        .select()
        .add(Restrictions.eq("userId", userId))
        .add(Restrictions.eq("status", 2))
        .add(Restrictions.gt("deliveredDate", timeThreshold.getTime()))
        .build();

    Iterable<MatchDataFeedItemDto> feedItems = dataStoreApi.findAll(query);
}
Compound queries
Construct a more complex query where we find items older than one day, include multiple status values, order by deliveryDate, and limit result size to 10.
// provided
List<Integer> statusFilters = request.getMatchStatusFilters();
String sortBy = request.getSortBy();
Disjunction disjunction = new Disjunction();

for (Integer statusFilter : statusFilters) {
    disjunction.add(Restrictions.eq("status", statusFilter));
}

final QuerySelect<MatchDataFeedItemDto, MatchDataFeedItemDto> query = QueryBuilder
    .builderFor(MatchDataFeedItemDto.class)
    .select()
    .add(Restrictions.eq("userId", userId))
    .add(Restrictions.gt("deliveredDate", timeThreshold.getTime()))
    .add(disjunction)
    .addOrder(new Ordering(sortBy, Order.DESCENDING))
    .build();

Iterable<MatchDataFeedItemDto> feedItems = dataStoreApi.findAll(query);
By default, expressions are combined with AND when added separately.
Query Interface
The following query components are supported:
// equals
EqualityExpression eq(String propertyName, Object value);

// does not equal
EqualityExpression ne(String propertyName, Object value);

// less than
EqualityExpression lt(String propertyName, Object value);

// less than or equal
EqualityExpression lte(String propertyName, Object value);

// greater than
EqualityExpression gt(String propertyName, Object value);

// greater than or equal
EqualityExpression gte(String propertyName, Object value);

// between from and to (inclusive)
RangeExpression between(String propertyName, Object from, Object to);

// and - takes a variable list of expressions as arguments
Conjunction and(Criterion... criteria);

// or - takes a variable list of expressions as arguments
Disjunction or(Criterion... criteria);
Resolving Entity and Property Names
Always use the property names of your Java objects in your queries. If these names differ from those used in your datastore, use annotations to provide mappings. Entity resolvers are configured to map entity classes to table or collection names. Property resolvers are configured to map object variable names to column or field names.
The following annotations are currently supported for the indicated data store type.
Custom EntityResolvers and PropertyResolvers are straightforward to configure and create.
See Morphia annotations for entity class annotation mappings.
Query Execution
The QueryExecutor interface supports the following operations:
// return an iterable of type R from the query against type T
// (R and T are often the same type)
<T, R> Iterable<R> findAll(QuerySelect<T, R> query);

// return one R from the query against type T
<T, R> R findOne(QuerySelect<T, R> query);

// save the entity of type T to the data store
<T> T save(T entity);

// save all entities in the provided iterable to the data store
<T> Iterable<T> save(Iterable<T> entities);

// save entities in batches with a configured batch size
<T> int[] saveBatch(Iterable<T> entities);
Configuration
Here are some example Spring configuration files for HBase using Apache Phoenix.
HBase
Configuration properties:
hbase.connection.url=jdbc:phoenix:zkhost:2181<util:list id="entityPropertiesMappings">
<value>com.eharmony.datastore.model.MatchDataFeedItemDto</value>
</util:list>
<bean id="entityPropertiesMappingContext" class="com.eharmony.pho.mapper.EntityPropertiesMappingContext">
<constructor-arg ref="entityPropertiesMappings"/>
</bean>
<bean id="entityPropertiesResolver" class="com.eharmony.pho.mapper.EntityPropertiesResolver">
<constructor-arg ref="entityPropertiesMappingContext"/>
</bean>
<bean id="phoenixHBaseQueryTranslator" class="com.eharmony.pho.hbase.translator.PhoenixHBaseQueryTranslator">
<constructor-arg name="propertyResolver" ref="entityPropertiesResolver" />
</bean>
<bean id="phoenixProjectedResultMapper" class="com.eharmony.pho.hbase.mapper.PhoenixProjectedResultMapper">
<constructor-arg name="entityPropertiesResolver" ref="entityPropertiesResolver" />
</bean>
<bean id="phoenixHBaseQueryExecutor" class="com.eharmony.pho.hbase.query.PhoenixHBaseQueryExecutor">
<constructor-arg name="queryTranslator" ref="phoenixHBaseQueryTranslator"/>
<constructor-arg name="resultMapper" ref="phoenixProjectedResultMapper" />
</bean>
<bean id="dataStoreApi" class="com.eharmony.pho.hbase.PhoenixHBaseDataStoreApiImpl">
<constructor-arg name="connectionUrl" value="${hbase.connection.url}"/>
<constructor-arg name="queryExecutor" ref="phoenixHBaseQueryExecutor"/>
</bean>Phoenix Omid Transaction Manager
The Apache Omid podling has recently decided to graduate as a sub-project of Apache Phoenix.
This graduation process is currently ongoing. Please follow the Apache Phoenix mailing lists for more information about this effort.
Phoenix Tephra Transaction Manager
The Apache Tephra podling has recently decided to graduate as a sub-project of Apache Phoenix.
This graduation process is currently ongoing. Please follow the Apache Phoenix mailing lists for more information about this effort.
Transactions
Transactions (beta). Above and beyond the row-level transactional semantics of HBase, Phoenix adds cross row and cross table transaction support with full ACID semantics by integrating with Tephra, now an Apache incubator project. Tephra provides snapshot isolation of concurrent transactions by implementing multi-versioned concurrency control.
Set up a system to use transactions in Phoenix with the following steps:
Add the following config to your client-side hbase-site.xml file to enable transactions:
<property>
  <name>phoenix.transactions.enabled</name>
  <value>true</value>
</property>
Add the following config to your server-side hbase-site.xml file to configure the transaction manager.
The "Transaction Server Configuration" section of Tephra describes the available configuration options.
<property>
  <name>data.tx.snapshot.dir</name>
  <value>/tmp/tephra/snapshots</value>
</property>
Also set the transaction timeout (time after which open transactions become invalid) to a reasonable value:
<property>
  <name>data.tx.timeout</name>
  <value>60</value>
</property>
Set $HBASE_HOME and start the transaction manager:
./bin/tephraThe transaction manager would typically be configured to run on one or more of the master nodes in your HBase cluster.
Once this setup is done, transactions may then be enabled on a table by table basis by using the TRANSACTIONAL=true property when you create your table:
CREATE TABLE my_table (k BIGINT PRIMARY KEY, v VARCHAR) TRANSACTIONAL=true;An existing table may also be altered to be transactional, but be careful because you cannot switch a transactional table back to being non transactional:
ALTER TABLE my_other_table SET TRANSACTIONAL=true;A transaction is started implicitly through the execution of a statement on a transactional table and then finished through either a commit or rollback. Once started, the statements will not see any data committed by other transactions until the transaction is complete. They will, however, see their own uncommitted data. For example:
SELECT * FROM my_table; -- This will start a transaction
UPSERT INTO my_table VALUES (1,'A');
SELECT count(*) FROM my_table WHERE k=1; -- Will see uncommitted row
DELETE FROM my_other_table WHERE k=2;
!commit -- Other transactions will now see your updates and you will see theirs
An exception is thrown if a transaction tries to commit a row that conflicts with other overlapping transaction that already committed. For example:
UPSERT INTO my_table VALUES (1,'A');In a second transaction perform a commit for the same row.
UPSERT INTO my_table VALUES (1,'B');
!commit
Now if you try to commit the first transaction you will get an exception
java.sql.SQLException: ERROR 523 (42900): Transaction aborted due to conflict with other mutations. Conflict detected for transaction 1454112544975000000.Queries are only able to view commits that completed before the current transaction started and are not able to view the in progress changes of other transactions.
Indexes added to a transactional table are transactional as well with regard to their incremental maintenance. For example, the following index added to my_table will be kept transactional consistent with its data table as mutations are made:
CREATE INDEX my_table (k BIGINT PRIMARY KEY, v VARCHAR) TRANSACTIONAL=true;During a commit, if either the index or data table write fails, an exception is thrown and the client can either roll back or retry. If the commit fails both the index and data table rows are not visible.
An external Tephra transaction that has already been started can be used with Phoenix by setting the transaction context of the Phoenix connection:
setTransactionContext(TransactionContext txContext)Limitations
- Starting a transaction on a connection with an SCN set is not allowed.
- Setting the maximum number of versions property while creating a transactional table limits the number of snapshots available for concurrent transactions.
- When a transaction times out or if it cannot be rolled back by the client, it is added to an invalid list. This list can potentially grow if there are a lot of failed or timed out transactions. For now, an administrator can manually clear transactions from this list after a major compaction has occurred. TEPHRA-35 describes ongoing work to automatically remove transactions from the invalid list once all data associated with the transaction has been removed.
- If adding an index asynchronously to an existing transactional table, make sure to run a major compaction before issuing the CREATE INDEX ASYNC command as otherwise invalid and/or uncommitted transactions may appear in your index PHOENIX-2154.
User-defined Functions
As of Phoenix 4.4.0 we have added the ability to allow users to create and deploy their own custom or domain-specific UDFs to the cluster.
Overview
Users can create temporary or permanent user-defined (domain-specific) scalar functions.
UDFs can be used like built-in functions in queries such as SELECT, UPSERT, DELETE, and when creating functional indexes.
Temporary functions are session-scoped and are not accessible from other sessions.
Permanent function metadata is stored in the SYSTEM.FUNCTION table.
Phoenix also supports tenant-specific functions. Functions created in one tenant-specific connection are not visible to other tenant-specific connections.
Only global tenant (no-tenant) functions are visible to all connections.
Phoenix leverages the HBase dynamic class loader to load UDF JARs from HDFS at the Phoenix client and region server without restarting services.
Configuration
Add the following parameters to hbase-site.xml on the Phoenix client:
<property>
  <name>phoenix.functions.allowUserDefinedFunctions</name>
  <value>true</value>
</property>
<property>
  <name>fs.hdfs.impl</name>
  <value>org.apache.hadoop.hdfs.DistributedFileSystem</value>
</property>
<property>
  <name>hbase.rootdir</name>
  <value>${hbase.tmp.dir}/hbase</value>
  <description>The directory shared by region servers and into
    which HBase persists.  The URL should be 'fully-qualified'
    to include the filesystem scheme.  For example, to specify the
    HDFS directory '/hbase' where the HDFS instance's namenode is
    running at namenode.example.org on port 9000, set this value to:
    hdfs://namenode.example.org:9000/hbase.  By default, we write
    to whatever ${hbase.tmp.dir} is set too -- usually /tmp --
    so change this configuration or else all data will be lost on
    machine restart.</description>
</property>
<property>
  <name>hbase.dynamic.jars.dir</name>
  <value>${hbase.rootdir}/lib</value>
  <description>
    The directory from which the custom udf jars can be loaded
    dynamically by the phoenix client/region server without the need to restart. However,
    an already loaded udf class would not be un-loaded. See
    HBASE-1936 for more details.
  </description>
</property>
The last two configuration values should match the HBase server-side configuration.
As with other configuration properties, phoenix.functions.allowUserDefinedFunctions
may be specified at JDBC connection time as a connection property.
Example:
Properties props = new Properties();
props.setProperty("phoenix.functions.allowUserDefinedFunctions", "true");
Connection conn = DriverManager.getConnection("jdbc:phoenix:localhost", props);
The following optional parameter is used by the dynamic class loader to copy JARs from HDFS into the local filesystem:
<property>
  <name>hbase.local.dir</name>
  <value>${hbase.tmp.dir}/local/</value>
  <description>Directory on the local filesystem to be used
    as a local storage.</description>
</property>
Creating Custom UDFs
Implement your custom UDF by following How to write custom UDF.
Compile your code into a JAR, then deploy the JAR to HDFS. It is recommended
to add the JAR to the HDFS directory configured by hbase.dynamic.jars.dir.
CREATE FUNCTION query.Dropping the UDFs
You can drop functions using the DROP FUNCTION query.
Dropping a function deletes the metadata for that function from Phoenix.
How to write custom UDF
You can follow these steps to write your UDF (for more detail, see this blog post):
- Create a new class derived from
org.apache.phoenix.expression.function.ScalarFunction. - Implement
getDataType()to determine the function return type. - Implement
evaluate()to calculate the result for each row. The method receivesorg.apache.phoenix.schema.tuple.Tuplewith the current row state and anorg.apache.hadoop.hbase.io.ImmutableBytesWritableto populate with the function result. The method returnsfalseif there is not enough information to calculate the result (usually because one argument is unknown), andtrueotherwise.
Below are additional optimization-related steps.
-
To contribute to scan start/stop key formation, custom functions need to override the following two methods from
ScalarFunction:/** * Determines whether or not a function may be used to form * the start/stop key of a scan * @return the zero-based position of the argument to traverse * into to look for a primary key column reference, or * {@value #NO_TRAVERSAL} if the function cannot be used to * form the scan key. */ public int getKeyFormationTraversalIndex() { return NO_TRAVERSAL; } /** * Manufactures a KeyPart used to construct the KeyRange given * a constant and a comparison operator. * @param childPart the KeyPart formulated for the child expression * at the {@link #getKeyFormationTraversalIndex()} position. * @return the KeyPart for constructing the KeyRange for this * function. */ public KeyPart newKeyPart(KeyPart childPart) { return null; } -
Additionally, to enable
ORDER BYoptimization or in-placeGROUP BY, override:/** * Determines whether or not the result of the function invocation * will be ordered in the same way as the input to the function. * Returning YES enables an optimization to occur when a * GROUP BY contains function invocations using the leading PK * column(s). * @return YES if the function invocation will always preserve order for * the inputs versus the outputs and false otherwise, YES_IF_LAST if the * function preserves order, but any further column reference would not * continue to preserve order, and NO if the function does not preserve * order. */ public OrderPreserving preservesOrder() { return OrderPreserving.NO; }
Limitations
- The JAR containing UDFs must be manually added to and deleted from HDFS. There is ongoing work to add SQL statements for JAR add/remove (PHOENIX-1890).
- The dynamic class loader copies UDF JARs to
{hbase.local.dir}/jarsat the Phoenix client and region server when a UDF is used in queries. These JARs must be deleted manually when a function is deleted. - Functional indexes must be rebuilt manually if the function implementation changes (PHOENIX-1907).
- Once loaded, a JAR is not unloaded. Use a different JAR for modified implementations to avoid restarting the cluster (PHOENIX-1907).
- To list functions, query the
SYSTEM."FUNCTION"table (PHOENIX-1921).
Secondary Indexes
Secondary indexes are an orthogonal way to access data from its primary access path. In HBase, you have a single index that is lexicographically sorted on the primary row key. Access to records in any way other than through the primary row requires scanning over potentially all the rows in the table to test them against your filter. With secondary indexing, the columns or expressions you index form an alternate row key to allow point lookups and range scans along this new axis.
Covered Indexes
Phoenix is particularly powerful in that we provide covered indexes - we do not need to go back to the primary table once we have found the index entry. Instead, we bundle the data we care about right in the index rows, saving read-time overhead.
For example, the following would create an index on the v1 and v2 columns and
include the v3 column in the index as well to prevent having to get it from the data table:
CREATE INDEX my_index ON my_table (v1,v2) INCLUDE (v3)Functional Indexes
Functional indexes (available in 4.3 and above) allow you to create
an index not just on columns, but on an arbitrary expressions. Then when a query uses that expression, the index
may be used to retrieve the results instead of the data table. For example, you could create an index on UPPER(FIRST_NAME||' '||LAST_NAME)
to allow you to do case insensitive searches on the combined first name and last name of a person.
For example, the following would create this functional index:
CREATE INDEX UPPER_NAME_IDX ON EMP (UPPER(FIRST_NAME||' '||LAST_NAME))With this index in place, when the following query is issued, the index would be used instead of the data table to retrieve the results:
SELECT EMP_ID FROM EMP WHERE UPPER(FIRST_NAME||' '||LAST_NAME)='JOHN DOE'Phoenix supports two types of indexing techniques: global and local indexing. Each are useful in different scenarios and have their own failure profiles and performance characteristics.
Global Indexes
Global indexing targets read heavy uses cases. With global indexes, all the performance penalties for indexes occur at write time. We intercept the data table updates on write (DELETE, UPSERT VALUES and UPSERT SELECT), build the index update and then sent any necessary updates to all interested index tables. At read time, Phoenix will select the index table to use that will produce the fastest query time and directly scan it just like any other HBase table. An index will not be used for a query that references a column that isn't part of the index.
Local Indexes
Local indexing targets write heavy, space constrained use cases. Just like with global indexes, Phoenix will automatically select whether or not to use a local index at query-time. With local indexes, index data and table data co-reside on same server preventing any network overhead during writes. Local indexes can be used even when the query isn't fully covered (i.e. Phoenix automatically retrieve the columns not in the index through point gets against the data table). Unlike global indexes, all local indexes of a table are stored in a single, separate shared table prior to 4.8.0 version. From 4.8.0 onwards we are storing all local index data in the separate shadow column families in the same data table. At read time when the local index is used, every region must be examined for the data as the exact region location of index data cannot be predetermined. Thus some overhead occurs at read-time.
Index Population
By default, when an index is created, it is populated synchronously during the CREATE INDEX call. This may not be feasible depending on the current size of the data table. As of 4.5, initially population of an index may be done asynchronously by including the ASYNC keyword in the index creation DDL statement:
CREATE INDEX async_index ON my_schema.my_table (v) ASYNCThe map reduce job that populates the index table must be kicked off separately through the HBase command line like this:
${HBASE_HOME}/bin/hbase org.apache.phoenix.mapreduce.index.IndexTool
  --schema MY_SCHEMA --data-table MY_TABLE --index-table ASYNC_IDX
  --output-path ASYNC_IDX_HFILES
Only when the map reduce job is complete will the index be activated and start to be used in queries. The job is resilient to the client being exited. The output-path option is used to specify a HDFS directory that is used for writing HFiles to.
You can also start index population for all indexes in BUILDING ("b") state with the following HBase command line:
${HBASE_HOME}/bin/hbase org.apache.phoenix.mapreduce.index.automation.PhoenixMRJobSubmitterASYNC Index threshold
As of 4.16 (and 5.1), setting the phoenix.index.async.threshold property to a positive number will disallow synchronous index creation if the estimated indexed data size exceeds phoenix.index.async.threshold (in bytes).
Index Usage
Indexes are automatically used by Phoenix to service a query when it's determined more efficient to do so. However, a global index will not be used unless all of the columns referenced in the query are contained in the index. For example, the following query would not use the index, because v2 is referenced in the query but not included in the index:
SELECT v2 FROM my_table WHERE v1 = 'foo'There are two means of getting an index to be used in this case:
-
Create a covered index by including
v2in the index:CREATE INDEX my_index ON my_table (v1) INCLUDE (v2)This will cause the v2 column value to be copied into the index and kept in synch as it changes. This will obviously increase the size of the index.
-
Create a local index:
CREATE LOCAL INDEX my_index ON my_table (v1)Unlike global indexes, local indexes will use an index even when all columns referenced in the query are not contained in the index. This is done by default for local indexes because we know that the table and index data coreside on the same region server thus ensuring the lookup is local.
Index Removal
To drop an index, you'd issue the following statement:
DROP INDEX my_index ON my_tableIf an indexed column is dropped in the data table, the index will automatically be dropped. In addition, if a covered column is dropped in the data table, it will be automatically dropped from the index as well.
Index Properties
Just like with the CREATE TABLE statement, the CREATE INDEX statement may pass through properties to apply to the underlying HBase table, including the ability to salt it:
CREATE INDEX my_index ON my_table (v2 DESC, v1) INCLUDE (v3)
SALT_BUCKETS=10, DATA_BLOCK_ENCODING='NONE'
Note that if the primary table is salted, then the index is automatically salted in the same way for global indexes. In addition, the MAX_FILESIZE for the index is adjusted down, relative to the size of the primary versus index table. For more on salting see here. With local indexes, on the other hand, specifying SALT_BUCKETS is not allowed.
Consistency Guarantees
On successful return to the client after a commit, all data is guaranteed to be written to all interested indexes and the primary table. In other words, index updates are synchronous with the same strong consistency guarantees provided by HBase.
However, since indexes are stored in separate tables than the data table, depending on the properties of the table and the type of index, the consistency between your table and index varies in the event that a commit fails due to a server-side crash. This is an important design consideration driven by your requirements and use case.
Outlined below are the different options with various levels of consistency guarantees.
Local Indexes
Since Phoenix 4.8 local indexes are always guaranteed to be consistent.
Global Indexes on Transactional Tables
By declaring your table as transactional, you achieve the highest level of consistency guarantee between your table and index. In this case, your commit of your table mutations and related index updates are atomic with strong ACID guarantees. If the commit fails, then none of your data (table or index) is updated, thus ensuring that your table and index are always in sync.
Why not just always declare your tables as transactional? This may be fine, especially if your table is declared as immutable, since the transactional overhead is very small in this case. However, if your data is mutable, make sure that the overhead associated with the conflict detection that occurs with transactional tables and the operational overhead of running the transaction manager is acceptable. Additionally, transactional tables with secondary indexes potentially lowers your availability of being able to write to your data table, as both the data table and its secondary index tables must be availalbe as otherwise the write will fail.
Global Indexes on Immutable Tables
For a table in which the data is only written once and never updated in-place, certain optimizations may be made to reduce the write-time overhead for incremental maintenance.
This is common with time-series data such as log or event data, where once a row is written, it will never be updated.
To take advantage of these optimizations, declare your table as immutable by adding the IMMUTABLE_ROWS=true property to your DDL statement:
CREATE TABLE my_table (k VARCHAR PRIMARY KEY, v VARCHAR) IMMUTABLE_ROWS=trueAll indexes on a table declared with IMMUTABLE_ROWS=true are considered immutable (note that by default, tables are considered mutable).
For global immutable indexes, the index is maintained entirely on the client-side with the index table being generated as changes to the data table occur.
Local immutable indexes, on the other hand, are maintained on the server-side.
Note that no safeguards are in-place to enforce that a table declared as immutable doesn't actually mutate data (as that would negate the performance gain achieved).
If that was to occur, the index would no longer be in sync with the table.
If you have an existing table that you'd like to switch from immutable indexing to mutable indexing, use the ALTER TABLE command as show below:
ALTER TABLE my_table SET IMMUTABLE_ROWS=falseGlobal Indexing for Immutable tables has been completely rewritten for version 4.15 (and 5.1)
Immutable table indexes for 4.15 (and 5.1) and newer versions
Immutable index updates go through the same three phase writes as mutable index updates do except that deleting or un-verifying existing index rows is not applicable to immutable indexes. This guarantees that the index tables are always in sync with the data tables.
Immutable table indexes for 4.14 (and 5.0) and older versions
Indexes on non transactional, immutable tables have no mechanism in place to automatically deal with a commit failure. Maintaining consistency between the table and index is left to the client to handle. Because the updates are idempotent, the simplest solution is for the client to continue retrying the batch of mutations until they succeed.
Global Indexes on Mutable Tables
Global Indexing for Mutable tables has been completely rewritten for version 4.15 (and 5.1)
Mutable table indexes for 4.15 (and 5.1) and newer versions
The new Strongly Consistent Global Indexing feature uses a three-phase indexing algorithm to guarantee that the index tables are always in sync with the data tables.
The implementation uses a shadow column to track the status of index rows:
-
Write:
- Set the status of existing index rows to unverified and write the new index rows with the unverified status
- Write the data table rows
- Delete the existing index rows and set the status of new rows to verified
-
Read:
- Read the index rows and check their status
- The unverified rows are repaired from the data table
-
Delete:
- Set the index table rows with the unverified status
- Delete the data table rows
- Delete index table rows
See resources for more in-depth information.
All newly created tables use the new indexing algorithm.
Indexes created with older Phoenix versions will continue to use the old implementation, until upgraded with IndexUpgradeTool
Mutable table indexes for 4.14 (and 5.0) and older versions
For non transactional mutable tables, we maintain index update durability by adding the index updates to the Write-Ahead-Log (WAL) entry of the primary table row. Only after the WAL entry is successfully synced to disk do we attempt to make the index/primary table updates. We write the index updates in parallel by default, leading to very high throughput. If the server crashes while we are writing the index updates, we replay the all the index updates to the index tables in the WAL recovery process and rely on the idempotence of the updates to ensure correctness. Therefore, indexes on non transactional mutable tables are only ever a single batch of edits behind the primary table.
It's important to note several points:
- For non transactional tables, you could see the index table out of sync with the primary table.
- As noted above, this is ok as we are only a very small bit behind and out of sync for very short periods
- Each data row and its index row(s) are guaranteed to to be written or lost - we never see partial updates as this is part of the atomicity guarantees of HBase.
- Data is first written to the table followed by the index tables (the reverse is true if the WAL is disabled).
Singular Write Path
There is a single write path that guarantees the failure properties. All writes to the HRegion get intercepted by our coprocessor. We then build the index updates based on the pending update (or updates, in the case of the batch). These update are then appended to the WAL entry for the original update.
If we get any failure up to this point, we return the failure to the client and no data is persisted or made visible to the client.
Once the WAL is written, we ensure that the index and primary table data will become visible, even in the case of a failure.
- If the server does crash, we then replay the index updates with the usual WAL replay mechanism
- If the server does not crash, we just insert the index updates to their respective tables.
- If the index updates fail, the various means of maintaining consistency are outlined below.
- If the Phoenix system catalog table cannot be reached when a failure occurs, we force the server to be immediately aborted and failing this, call
System.exiton the JVM, forcing the server to die. By killing the server, we ensure that the WAL will be replayed on recovery, replaying the index updates to their appropriate tables. This ensures that a secondary index is not continued to be used when it's in a know, invalid state.
Disallow table writes until mutable index is consistent
The highest level of maintaining consistency between your non transactional table and index is to declare that writes to the data table should be temporarily disallowed in the event of a failure to update the index. In this consistency mode, the table and index will be held at the timestamp before the failure occurred, with writes to the data table being disallowed until the index is back online and in-sync with the data table. The index will remain active and continue to be used by queries as usual.
The following server-side configurations control this behavior:
phoenix.index.failure.block.writemust be true to enable a writes to the data table to fail in the event of a commit failure until the index can be caught up with the data table.phoenix.index.failure.handling.rebuildmust be true (the default) to enable a mutable index to be rebuilt in the background in the event of a commit failure.
Disable mutable indexes on write failure until consistency restored
The default behavior with mutable indexes is to mark the index as disabled if a write to them fails at commit time, partially rebuild them in the background, and then mark them as active again once consistency is restored. In this consistency mode, writes to the data table will not be blocked while the secondary index is being rebuilt. However, the secondary index will not be used by queries while the rebuild is happening.
The following server-side configurations control this behavior:
phoenix.index.failure.handling.rebuildmust be true (the default) to enable a mutable index to be rebuilt in the background in the event of a commit failure.phoenix.index.failure.handling.rebuild.intervalcontrols the millisecond frequency at which the server checks whether or not a mutable index needs to be partially rebuilt to catch up with updates to the data table. The default is 10000 or 10 seconds.phoenix.index.failure.handling.rebuild.overlap.timecontrols how many milliseconds to go back from the timestamp at which the failure occurred to go back when a partial rebuild is performed. The default is 1.
Disable mutable index on write failure with manual rebuild required
This is the lowest level of consistency for mutable secondary indexes. In this case, when a write to a secondary index fails, the index will be marked as disabled with a manual rebuild of the index required to enable it to be used once again by queries.
The following server-side configurations control this behavior:
phoenix.index.failure.handling.rebuildmust be set to false to disable a mutable index from being rebuilt in the background in the event of a commit failure.
BulkLoad Tool Limitation
The BulkLoadTools (e.g. CSVBulkLoadTool and JSONBulkLoadTool) cannot presently generate correct updates to mutable
secondary indexes when pre-existing records are being updated. In the normal mutable secondary index write path, we can
safely calculate a Delete (for the old record) and a Put (for the new record) for each secondary index while holding a
row-lock to prevent concurrent updates. In the context of a MapReduce job, we cannot effectively execute this same logic
because we are specifically doing this "out of band" from the HBase RegionServers. As such, while these Tools generate
HFiles for the index tables with the proper updates for the data being loaded, any previous index records corresponding
to the same record in the table are not deleted. This net-effect of this limitation is: if you use these Tools to re-ingest
the same records to an index table, that index table will have duplicate records in it which will result in incorrect
query results from that index table.
To perform incremental loads of data using the BulkLoadTools which may update existing records, you must
drop and re-create all index tables after the data table is loaded. Re-creating the index with the ASYNC option and
using IndexTool to populate and enable that index is likely a must for tables of non-trivial size.
To perform incremental loading of CSV datasets that do not require any manual index intervention, the psql tool can
be used in place of the BulkLoadTools. Additionally, a MapReduce job could be written to parse CSV/JSON data and write
it directly to Phoenix; although, such a tool is not currently provided by Phoenix for users.
Setup
Non transactional, mutable indexing requires special configuration options on the region server and master to run - Phoenix ensures that they are setup correctly when you enable mutable indexing on the table; if the correct properties are not set, you will not be able to use secondary indexing. After adding these settings to your hbase-site.xml, you'll need to do a rolling restart of your cluster.
As Phoenix matures, it needs less and less manual configuration. For older Phoenix versions you'll need to add the properties listed for that version, as well as the properties listed for the later versions.
For Phoenix 4.12 and later
You will need to add the following parameters to hbase-site.xml on each region server:
<property>
  <name>hbase.regionserver.wal.codec</name>
  <value>org.apache.hadoop.hbase.regionserver.wal.IndexedWALEditCodec</value>
</property>
The above property enables custom WAL edits to be written, ensuring proper writing/replay of the index updates. This codec supports the usual host of WALEdit options, most notably WALEdit compression.
For Phoenix 4.8 - 4.11
The following configuration changes are also required to the server-side hbase-site.xml on the master and regions server nodes:
<property>
  <name>hbase.region.server.rpc.scheduler.factory.class</name>
  <value>org.apache.hadoop.hbase.ipc.PhoenixRpcSchedulerFactory</value>
  <description>Factory to create the Phoenix RPC Scheduler that uses separate queues for index and metadata updates</description>
</property>
<property>
  <name>hbase.rpc.controllerfactory.class</name>
  <value>org.apache.hadoop.hbase.ipc.controller.ServerRpcControllerFactory</value>
  <description>Factory to create the Phoenix RPC Scheduler that uses separate queues for index and metadata updates</description>
</property>
The above properties prevent deadlocks from occurring during index maintenance for global indexes (HBase 0.98.4+ and Phoenix 4.3.1+) by ensuring index updates are processed with a higher priority than data updates. It also prevents deadlocks by ensuring metadata rpc calls are processed with a higher priority than data rpc calls.
For Phoenix versions 4.7 and below
The following configuration changes are also required to the server-side hbase-site.xml on the master and regions server nodes:
<property>
  <name>hbase.master.loadbalancer.class</name>
  <value>org.apache.phoenix.hbase.index.balancer.IndexLoadBalancer</value>
</property>
<property>
  <name>hbase.coprocessor.master.classes</name>
  <value>org.apache.phoenix.hbase.index.master.IndexMasterObserver</value>
</property>
<property>
  <name>hbase.coprocessor.regionserver.classes</name>
  <value>org.apache.hadoop.hbase.regionserver.LocalIndexMerger</value>
</property>
The above properties are required to use local indexing.
Upgrading Local Indexes created before 4.8.0
While upgrading the Phoenix to 4.8.0+ version at server remove above three local indexing related configurations from hbase-site.xml if present. From client we are supporting both online(while initializing the connection from phoenix client of 4.8.0+ versions) and offline(using psql tool) upgrade of local indexes created before 4.8.0. As part of upgrade we recreate the local indexes in ASYNC mode. After upgrade user need to build the indexes using IndexTool
Following client side configuration used in the upgrade.
phoenix.client.localIndexUpgrade
The value of it is true means online upgrade and false means offline upgrade.
Default: true
Command to run offline upgrade using psql:
psql [zookeeper] -lTuning
Out the box, indexing is pretty fast. However, to optimize for your particular environment and workload, there are several properties you can tune.
All the following parameters must be set in hbase-site.xml - they are true for the entire cluster and all index tables, as well as across all regions on the same server (so, for instance, a single server would not write to too many different index tables at once).
index.builder.threads.max- Number of threads to used to build the index update from the primary table update
- Increasing this value overcomes the bottleneck of reading the current row state from the underlying HRegion. Tuning this value too high will just bottleneck at the HRegion as it will not be able to handle too many concurrent scan requests as well as general thread-swapping concerns.
- Default: 10
index.builder.threads.keepalivetime- Amount of time in seconds after we expire threads in the builder thread pool.
- Unused threads are immediately released after this amount of time and not core threads are retained (though this last is a small concern as tables are expected to sustain a fairly constant write load), but simultaneously allows us to drop threads if we are not seeing the expected load.
- Default: 60
index.writer.threads.max- Number of threads to use when writing to the target index tables.
- The first level of parallelization, on a per-table basis - it should roughly correspond to the number of index tables
- Default: 10
index.writer.threads.keepalivetime- Amount of time in seconds after we expire threads in the writer thread pool.
- Unused threads are immediately released after this amount of time and not core threads are retained (though this last is a small concern as tables are expected to sustain a fairly constant write load), but simultaneously allows us to drop threads if we are not seeing the expected load.
- Default: 60
hbase.htable.threads.max- Number of threads each index
HTablecan use for writes. - Increasing this allows more concurrent index updates (for instance across batches), leading to high overall throughput.
- Default: 2,147,483,647
- Number of threads each index
hbase.htable.threads.keepalivetime- Amount of time in seconds after we expire threads in the
HTable's thread pool. - Using the "direct handoff" approach, new threads will only be created if it is necessary and will grow unbounded. This could be bad but
HTables only create as manyRunnables as there are region servers; therefore, it also scales when new region servers are added. - Default: 60
- Amount of time in seconds after we expire threads in the
index.tablefactory.cache.size- Number of index
HTables we should keep in cache. - Increasing this number ensures that we do not need to recreate an
HTablefor each attempt to write to an index table. Conversely, you could see memory pressure if this value is set too high. - Default: 10
- Number of index
org.apache.phoenix.regionserver.index.priority.min- Value to specify to bottom (inclusive) of the range in which index priority may lie.
- Default: 1000
org.apache.phoenix.regionserver.index.priority.max- Value to specify to top (exclusive) of the range in which index priority may lie.
- Higher priorites within the index min/max range do not means updates are processed sooner.
- Default: 1050
org.apache.phoenix.regionserver.index.handler.count- Number of threads to use when serving index write requests for global index maintenance.
- Though the actual number of threads is dictated by the Max(number of call queues, handler count), where the number of call queues is determined by standard HBase configuration. To further tune the queues, you can adjust the standard rpc queue length parameters (currently, there are no special knobs for the index queues), specifically
ipc.server.max.callqueue.lengthandipc.server.callqueue.handler.factor. See the HBase Reference Guide for more details. - Default: 30
Performance
We track secondary index performance via our performance framework. This is a generic test of performance based on defaults - your results will vary based on hardware specs as well as you individual configuration.
That said, we have seen secondary indexing (both immutable and mutable) go as quickly as < 2x the regular write path on a small, (3 node) desktop-based cluster. This is actually pretty reasonable as we have to write to multiple tables as well as build the index update.
Index Scrutiny Tool
With Phoenix 4.12, there is now a tool to run a MapReduce job to verify that an index table is valid against its data table. The only way to find orphaned rows in either table is to scan over all rows in the table and do a lookup in the other table for the corresponding row. For that reason, the tool can run with either the data or index table as the "source" table, and the other as the "target" table. The tool writes all invalid rows it finds either to file or to an output table PHOENIX_INDEX_SCRUTINY. An invalid row is a source row that either has no corresponding row in the target table, or has an incorrect value in the target table (i.e. covered column value).
The tool has job counters that track its status. VALID_ROW_COUNT, INVALID_ROW_COUNT, BAD_COVERED_COL_VAL_COUNT. Note that invalid rows - bad col val rows = number of orphaned rows. These counters are written to the table PHOENIX_INDEX_SCRUTINY_METADATA, along with other job metadata.
The Index Scrutiny Tool can be launched via the hbase command (in hbase/bin) as follows:
hbase org.apache.phoenix.mapreduce.index.IndexScrutinyTool -dt my_table -it my_index -oIt can also be run from Hadoop using either the phoenix-core or phoenix-server jar as follows:
HADOOP_CLASSPATH=$(hbase mapredcp) hadoop jar phoenix-<version>-server.jar org.apache.phoenix.mapreduce.index.IndexScrutinyTool -dt my_table -it my_index -oBy default two mapreduce jobs are launched, one with the data table as the source table and one with the index table as the source table.
The following parameters can be used with the Index Scrutiny Tool:
| Parameter | Description |
|---|---|
| -dt,--data-table | Data table name (mandatory) |
| -it,--index-table | Index table name (mandatory) |
| -s,--schema | Phoenix schema name (optional) |
| -src,--source | DATA_TABLE_SOURCE, INDEX_TABLE_SOURCE, or BOTH. Defaults to BOTH |
| -o,--output | Whether to output invalid rows. Off by default |
| -of,--output-format | TABLE or FILE output format. Defaults to TABLE |
| -om,--output-max | Maximum number of invalid rows to output per mapper. Defaults to 1M |
| -op,--output-path | For FILE output format, the HDFS directory where files are written |
| -t,--time | Timestamp in millis at which to run the scrutiny. This is important so that incoming writes don't throw off the scrutiny. Defaults to current time minus 60 seconds |
| -b,--batch-size | Number of rows to compare at a time |
Limitations
- If rows are actively being updated or deleted while the scrutiny is running, the tool may give you false positives for inconsistencies (PHOENIX-4277).
- Snapshot reads are not supported by the scrutiny tool (PHOENIX-4270).
Index Upgrade Tool
IndexUpgradeTool updates global indexes created by Phoenix 4.14 and earlier (or 5.0) to use the new Strongly Consistent Global Indexes implementation.
It accepts following parameters:
| Parameter | Description | only in version |
|---|---|---|
| -o,--operation | upgrade or rollback (mandatory) | |
| -tb,--tables | [table1,table2,table3] (-tb or -f mandatory) | |
| -f,--file | Csv file with above format (-tb or -f mandatory) | |
| -d,--dry-run | If passed this will just output steps that will be executed; like a dry run | |
| -h,--help | Help on how to use the tool | |
| -lf,--logfile | File location to dump the logs | |
| -sr,--index-sync-rebuild | whether or not synchronously rebuild the indexes; default rebuild asynchronous | 4.15 |
| -rb,--index-rebuild | Rebuild the indexes. Set -tool to pass options to IndexTool | 4.16+, 5.1+ |
| -tool,--index-tool | Options to pass to indexTool when rebuilding indexes | 4.16+, 5.1+ |
${HBASE_HOME}/bin/hbase org.apache.phoenix.mapreduce.index.IndexUpgradeTool -o [upgrade/rollback] -tb [table_name] -lf [/tmp/index-upgrade-tool.log]For 4.16+/5.1+ either specifying the -rb option, or manually rebuilding the indexes with IndexTool after the upgrade is recommended, otherwise the first access of every index row will trigger an index row repair.
Depending on whether index is mutable, it will remove Indexer coprocessor from a data table and load new coprocessor IndexRegionObserver. For both immutable and mutable, it will load GlobalIndexChecker coprocessor on Index table. During this process, data table and index table are disabled-loaded/unloaded with coproc-enabled within short time span. At the end, it does an asynchronous index rebuilds. Index reads are not blocked while index-rebuild is still ongoing, however, they may be a bit slower for rows written prior to upgrade.
IndexUpgradeTool doesn't make any distinction between view-index and table-index. When a table is passed, it will perform the upgrade-operation on all the 'children' indexes of the given table.
Resources
There have been several presentations given on how secondary indexing works in Phoenix that have a more in-depth look at how indexing works (with pretty pictures!):
- Slides for Strongly Consistent Global Indexes for Apache Phoenix, 2019 Distributed SQL Summit
- Recording of Strongly Consistent Global Indexes for Apache Phoenix, 2019 Distributed SQL Summit
- Slides for Local Secondary Indexes in Apache Phoenix, 2017 PhoenixCon
These older resources refer to obsolete implementations in some cases
- Los Anglees HBase Meetup - Sept, 4th, 2013
- Local Indexes by Huawei
- PHOENIX-938 and HBASE-11513 for deadlock prevention during global index maintenance.
- PHOENIX-1112: Atomically rebuild index partially when index update fails
Storage Formats
As part of Phoenix 4.10, we have reduced on-disk storage size to improve overall performance by implementing the following enhancements:
- Introduce a layer of indirection between Phoenix column names and the corresponding HBase column qualifiers.
- Support a new encoding scheme for immutable tables that packs all values into a single cell per column family.
For more details on column mapping and immutable data encoding, see this blog.
How to use column mapping
You can set the column mapping property only when creating a table. Before deciding to use column mapping, think about how many columns your table and view hierarchy will require over their lifecycle. The following limits apply for each mapping scheme:
| Config/Property Value | Max # of columns |
|---|---|
| 1 | 255 |
| 2 | 65535 |
| 3 | 16777215 |
| 4 | 2147483647 |
| NONE | no limit (theoretically) |
For mutable tables, this limit applies to columns in all column families. For immutable tables, the limit applies per column family. By default, new Phoenix tables use column mapping. These defaults can be overridden by setting the following config value in hbase-site.xml.
| Table type | Default Column mapping | Config |
|---|---|---|
| Mutable/Immutable | 2 byte qualifiers | phoenix.default.column.encoded.bytes.attrib |
This config controls global defaults that apply to all tables. If you want a different mapping scheme than the global default, use the COLUMN_ENCODED_BYTES table property.
CREATE TABLE T
(
    a_string varchar not null,
    col1 integer,
    CONSTRAINT pk PRIMARY KEY (a_string)
)
COLUMN_ENCODED_BYTES = 1;
How to use immutable data encoding
Like column mapping, immutable data encoding can only be set when creating a table. Through performance testing, SINGLE_CELL_ARRAY_WITH_OFFSETS generally provides strong performance and space savings. Below are some scenarios where ONE_CELL_PER_COLUMN encoding may be a better fit.
- Data is sparse, i.e. less than 50% of the columns have values.
- Size of data within a column family gets too big. With default HBase block size of 64K, if data within a column family grows beyond 50K then
SINGLE_CELL_ARRAY_WITH_OFFSETSis generally not recommended. - Immutable tables that are expected to have views on them.
By default, immutable non-multitenant tables are created using two-byte column mapping and SINGLE_CELL_ARRAY_WITH_OFFSETS data encoding. Immutable multi-tenant tables are created with two-byte column mapping and ONE_CELL_PER_COLUMN data encoding. This is because users often create tenant-specific views on base multi-tenant tables, and as noted above this is more suitable for ONE_CELL_PER_COLUMN. Like column mapping, you can change these global defaults by setting the following configs in hbase-site.xml.
| Immutable Table type | Immutable storage scheme | Config |
|---|---|---|
| Multi-tenant | ONE_CELL_PER_COLUMN | phoenix.default.multitenant.immutable.storage.scheme |
| Non multi-tenant | SINGLE_CELL_ARRAY_WITH_OFFSETS | phoenix.default.immutable.storage.scheme |
You can also provide specific immutable storage and column mapping schemes with the IMMUTABLE_STORAGE_SCHEME and COLUMN_ENCODED_BYTES table properties. For example:
CREATE IMMUTABLE TABLE T
(
    a_string varchar not null,
    col1 integer,
    CONSTRAINT pk PRIMARY KEY (a_string)
)
IMMUTABLE_STORAGE_SCHEME = SINGLE_CELL_ARRAY_WITH_OFFSETS,
COLUMN_ENCODED_BYTES = 1;
You can choose not to use SINGLE_CELL_ARRAY_WITH_OFFSETS while still using numeric column mapping. For example:
CREATE IMMUTABLE TABLE T
(
    a_string varchar not null,
    col1 integer,
    CONSTRAINT pk PRIMARY KEY (a_string)
)
IMMUTABLE_STORAGE_SCHEME = ONE_CELL_PER_COLUMN,
COLUMN_ENCODED_BYTES = 1;
When using SINGLE_CELL_ARRAY_WITH_OFFSETS, you must use a numeric column mapping scheme. Attempting to use SINGLE_CELL_ARRAY_WITH_OFFSETS with COLUMN_ENCODED_BYTES = NONE throws an error.
How to disable column mapping
To disable column mapping across all new tables, set phoenix.default.column.encoded.bytes.attrib to 0. You can also keep it enabled globally and disable it selectively for a table by setting COLUMN_ENCODED_BYTES = 0 in the CREATE TABLE statement.
Atomic Upsert
To support atomic upsert, an optional ON DUPLICATE KEY clause, similar to the MySQL syntax, has been
incorporated into the UPSERT VALUES command as of Phoenix 4.9. The general syntax is described
here. This feature provides a superset of the HBase Increment and
CheckAndPut functionality to enable atomic upserts. On the server-side, when the commit
is processed, the row being updated will be locked while the current column values are read and the
ON DUPLICATE KEY clause is executed. Given that the row must be locked and read when the ON DUPLICATE KEY
clause is used, there will be a performance penalty (much like there is for an HBase Put versus a CheckAndPut).
In the presence of the ON DUPLICATE KEY clause, if the row already exists, the VALUES specified will
be ignored and instead either:
- the row will not be updated if
ON DUPLICATE KEY IGNOREis specified or - the row will be updated (under lock) by executing the expressions following the
ON DUPLICATE KEY UPDATEclause.
Multiple UPSERT statements for the same row in the same commit batch will be processed in the order of their
execution. Thus the same result will be produced when auto commit is on or off.
Examples
For example, to atomically increment two counter columns, you would execute the following command:
UPSERT INTO my_table(id, counter1, counter2) VALUES ('abc', 0, 0)
ON DUPLICATE KEY UPDATE counter1 = counter1 + 1, counter2 = counter2 + 1;
To only update a column if it doesn't yet exist:
UPSERT INTO my_table(id, my_col) VALUES ('abc', 100)
ON DUPLICATE KEY IGNORE;
Note that arbitrarily complex expressions may be used in this new clause:
UPSERT INTO my_table(id, total_deal_size, deal_size) VALUES ('abc', 0, 100)
ON DUPLICATE KEY UPDATE
    total_deal_size = total_deal_size + deal_size,
    approval_reqd = CASE WHEN total_deal_size < 100 THEN 'NONE'
    WHEN total_deal_size < 1000 THEN 'MANAGER APPROVAL'
    ELSE 'VP APPROVAL' END;
Limitations
The following limitations are enforced for the ON DUPLICATE KEY clause usage:
- Primary key columns may not be updated, since this would essentially be creating a new row.
- Transactional tables may not use this clause as atomic upserts are already possible through exception handling when a conflict occurs.
- Immutable tables may not use this clause as by definition there should be no updates to existing rows.
- The
CURRENT_SCNproperty may not be set on connection when this clause is used as HBase does not handle atomicity unless the latest value is being updated. - The same column should not be updated more than once in the same statement.
- No aggregation or references to sequences are allowed within the clause.
- Global indexes on columns being atomically updated are not supported, as potentially a separate RPC across the wire would be made while the row is under lock to maintain the secondary index.
Namespace Mapping
From v4.8.0 onward, users can map Phoenix schemas to HBase namespaces so that any table created with a schema is created in the corresponding HBase namespace.
Earlier, every table (with or without schema) was created in the default namespace.
Configuration
Parameters to enable namespace mapping:
| Property | Description | Default |
|---|---|---|
phoenix.schema.isNamespaceMappingEnabled | If enabled, tables created with a schema are mapped to the corresponding namespace. This must be set on both client and server. Once enabled, it should not be rolled back. Older clients will not work after this property is enabled. | false |
phoenix.schema.mapSystemTablesToNamespace | This takes effect when phoenix.schema.isNamespaceMappingEnabled is also set to true. If enabled, existing SYSTEM tables are automatically migrated to the SYSTEM namespace. If disabled, system tables are created only in the default namespace. This must be set on both client and server. | true |
Grammar available
The following DDL statements can be used to interact with schemas:
FAQ
- How to migrate existing tables with schema to namespace?
- How are system tables migrated?
- What permissions are required to CREATE and DROP SCHEMA?
- How are schemas mapped for different table types?
- What is a namespace and what are the benefits of mapping tables to namespaces?
How to migrate existing tables with schema to namespace
For a Kerberized environment, run with a user that has sufficient permission (admin) to create a namespace.
A table is mapped only to a namespace with the same name as the schema (schema_name). Currently, migrating an existing table to a different schema or namespace is not supported.
Usage example:
Move table_name to the namespace named schema_name:
$ bin/psql.py <zookeeper> -m <schema_name>.<table_name>How are system tables migrated
SYSTEM tables are migrated automatically during the first connection after enabling phoenix.schema.mapSystemTablesToNamespace along with phoenix.schema.isNamespaceMappingEnabled.
What permissions are required to CREATE and DROP SCHEMA
Users must have admin permission in HBase to execute CREATE SCHEMA and DROP SCHEMA, since these commands internally create or delete namespaces.
Details for ACL management in HBase can be found here.
How are schemas mapped for different table types
Schema support in Phoenix is similar to other databases.
The table below describes how physical tables map to Phoenix objects:
| DDL | Table Type | Physical Table | Description |
|---|---|---|---|
CREATE TABLE S.T (ID INTEGER PRIMARY KEY) | TABLE | S:T | Table T is created in namespace S. |
CREATE INDEX IDX ON S.T(ID) | INDEX | S:IDX | Indexes inherit schema and namespace from the base table. |
CREATE VIEW V AS SELECT * FROM S.T | VIEW with default schema | S:T | View does not inherit schema from the parent table and can use the default schema. |
CREATE VIEW X.V AS SELECT * FROM S.T | VIEW with different schema than physical table | S:T | View uses the parent physical table and can have a different (or same) schema. |
CREATE VIEW S.V AS SELECT * FROM S.T | VIEW with same schema as physical table | S:T | View uses the parent physical table and can have a different (or same) schema. |
CREATE INDEX IDX ON S.V(ID) | VIEW INDEX | S:_IDX_T | View indexes inherit schema and map to the corresponding namespace. |
What is a namespace and what are the benefits of mapping tables to namespaces
A namespace is a logical grouping of tables, analogous to a database in relational database systems. This abstraction lays the groundwork for multi-tenancy-related features:
- Quota Management - Restrict the amount of resources (i.e. regions, tables) a namespace can consume.
- Namespace Security Administration - Provide another level of security administration for tenants.
- Region server groups - A namespace/table can be pinned to a subset of RegionServers, guaranteeing a coarse level of isolation.
Details about namespace management can be read here.
Resources
- PHOENIX-1311: Implementation details and discussion for the namespace mapping feature.
Statistics Collection
The UPDATE STATISTICS command updates the statistics collected on a table.
This command collects a set of keys per region per column family that
are equal byte distanced from each other. These collected keys are called guideposts
and they act as hints/guides to improve the parallelization of queries on a given
target region.
Statistics are also automatically collected during major compactions and region splits so manually running this command may not be necessary.
Parallelization
Phoenix breaks up queries into multiple scans and runs them in parallel to reduce latency.
Parallelization in Phoenix is driven by statistics-related configuration parameters.
Each chunk of data between guideposts will be run in parallel in a separate scan to improve
query performance. The chunk size is determined by the GUIDE_POSTS_WIDTH table property (Phoenix 4.9+)
or the global server-side phoenix.stats.guidepost.width parameter if the table property is
not set. As the size of the chunks decrease,
you'll want to increase phoenix.query.queueSize as more work will be queued in that
case. Note that at a minimum, separate scans will be run for each table region. Statistics in Phoenix
provides a means of gaining intraregion parallelization. In addition to the guidepost width specification,
the client-side phoenix.query.threadPoolSize and phoenix.query.queueSize parameters
and the server-side hbase.regionserver.handler.count parameter have an impact on the amount
of parallelization.
Examples
To update the statistics for a given table my_table, execute the following command:
UPDATE STATISTICS my_tableThe above syntax would collect the statistics for the table my_table and all the index tables, views and view index tables associated with the table my_table.
The equivalent syntax is:
UPDATE STATISTICS my_table ALLTo collect statistics on the index table only:
UPDATE STATISTICS my_table INDEXTo collect statistics on the table only:
UPDATE STATISTICS my_table COLUMNSTo modify the guidepost width to 10MB for a table, execute the following command:
ALTER TABLE my_table SET GUIDE_POSTS_WIDTH = 10000000To remove the guidepost width, set the property to null:
ALTER TABLE my_table SET GUIDE_POSTS_WIDTH = nullKnown issues
Duplicated records (SQL count shows more rows than HBase row_count) can occur in Phoenix versions earlier than 4.12.
This may happen for tables with several regions where guideposts were not generated for the last region(s) because the region size is smaller than the guidepost width. In that case, parallel scans for those regions may start with the latest guidepost instead of the region start key. This was fixed in 4.12 as part of PHOENIX-4007.
Configuration
The configuration parameters controlling statistics collection include:
phoenix.stats.guidepost.width- A server-side parameter that specifies the number of bytes between guideposts. A smaller amount increases parallelization, but also increases the number of chunks which must be merged on the client side.
- The default value is 104857600 (100 MB).
phoenix.stats.updateFrequency- A server-side parameter that determines the frequency in milliseconds for which statistics will be refreshed from the statistics table and subsequently used by the client.
- The default value is 900000 (15 mins).
phoenix.stats.minUpdateFrequency- A client-side parameter that determines the minimum amount of time in milliseconds that must pass before statistics may again be manually collected through anotherUPDATE STATISTICScall. - The default value isphoenix.stats.updateFrequencydivided by two (7.5 mins).phoenix.stats.useCurrentTime- An advanced server-side parameter that, if true, causes the current time on the server-side to be used as the timestamp of rows in the statistics table when background tasks such as compactions or splits occur. If false, then the max timestamp found while traversing the table over which statistics are being collected is used as the timestamp. Unless your client is controlling the timestamps while reading and writing data, this parameter should be left alone.
- The default value is true.
phoenix.use.stats.parallelization- This configuration is available starting in Phoenix 4.12. It controls whether statistical information on the data should be used to drive query parallelization.
- The default value is true.
Row Timestamp Column
Phoenix 4.6 provides a way to map HBase’s native row timestamp to a Phoenix column. This helps you take advantage of HBase optimizations for time ranges in store files, along with query optimizations built into Phoenix.
For a column to be designated as ROW_TIMESTAMP, certain constraints need to be followed:
- Only a primary key column of type
TIME,DATE,TIMESTAMP,BIGINT, orUNSIGNED_LONGcan be designated asROW_TIMESTAMP. - Only one primary key column can be designated as
ROW_TIMESTAMP. - The column value cannot be
NULL(because it maps directly to the HBase row timestamp). This also means a column can be declared asROW_TIMESTAMPonly when creating the table. - A
ROW_TIMESTAMPcolumn value cannot be negative. ForDATE/TIME/TIMESTAMP, the corresponding epoch time in milliseconds cannot be less than zero.
When upserting rows for a table with a row timestamp column (using UPSERT VALUES or UPSERT SELECT), you can explicitly provide the row timestamp value or let Phoenix set it automatically. When not specified, Phoenix sets the row timestamp column value to server-side time. The value also becomes the timestamp of the corresponding row in HBase.
Sample schema
CREATE TABLE DESTINATION_METRICS_TABLE
(
    CREATED_DATE DATE NOT NULL,
    METRIC_ID CHAR(15) NOT NULL,
    METRIC_VALUE LONG
    CONSTRAINT PK PRIMARY KEY (CREATED_DATE ROW_TIMESTAMP, METRIC_ID)
)
SALT_BUCKETS = 8;
UPSERT INTO DESTINATION_METRICS_TABLE VALUES (?, ?, ?)This sets CREATED_DATE to the value specified in the corresponding bind parameter.
UPSERT INTO DESTINATION_METRICS_TABLE (METRIC_ID, METRIC_VALUE) VALUES (?, ?)This sets CREATED_DATE to server-side time.
UPSERT INTO DESTINATION_METRICS_TABLE (CREATED_DATE, METRICS_ID, METRIC_VALUE)
SELECT DATE, METRICS_ID, METRIC_VALUE FROM SOURCE_METRICS_TABLE
This sets CREATED_DATE to the DATE selected from SOURCE_METRICS_TABLE.
UPSERT INTO DESTINATION_METRICS_TABLE (METRICS_ID, METRIC_VALUE)
SELECT METRICS_ID, METRIC_VALUE FROM SOURCE_METRICS_TABLE
This sets CREATED_DATE in the destination table to the server timestamp.
When querying with filters on the row timestamp column, Phoenix performs its usual row-key optimizations and can also set scan min/max time ranges appropriately. Using this time range information, HBase can skip store files that do not fall in the target time range, which significantly improves performance, especially for tail-end data queries.
Paged Queries
Phoenix supports standard SQL constructs to enable paged queries:
- Row Value Constructors (RVC)
OFFSETwithLIMIT
Row Value Constructors (RVC)
A row value constructor is an ordered sequence of values delimited by parentheses. For example:
(4, 'foo', 3.5)
('Doe', 'Jane')
(my_col1, my_col2, 'bar')
Just like regular values, row value constructors may be used in comparison expressions:
WHERE (x, y, z) >= ('foo', 'bar')
WHERE (last_name, first_name) = ('Jane', 'Doe')
Row value constructors are compared by conceptually concatenating the values together and comparing them against each other, with the leftmost part being most significant. Section 8.2 (comparison predicates) of the SQL-92 standard explains this in detail, but here are a few examples of predicates that would evaluate to true:
(9, 5, 3) > (8, 8)
('foo', 'bar') < 'g'
(1, 2) = (1, 2)
Row value constructors may also be used in an IN list expression to efficiently query for a set of rows given the composite primary key columns. For example, the following would be optimized to be a point get of three rows:
WHERE (x, y) IN ((1, 2), (3, 4), (5, 6))Another primary use case for row value constructors is to support query-more type functionality by enabling an ordered set of rows to be incrementally stepped through. For example, the following query would step through a set of rows, 20 rows at a time:
SELECT title, author, isbn, description
FROM library
WHERE published_date > 2010
AND (title, author, isbn) > (?, ?, ?)
ORDER BY title, author, isbn
LIMIT 20
Assuming that the client binds the three bind variables to the values of the last row processed, the next invocation would find the next 20 rows that match the query. If the columns you supply in your row value constructor match in order the columns from your primary key (or from a secondary index), then Phoenix will be able to turn the row value constructor expression into the start row of your scan. This enables a very efficient mechanism to locate at or after a row.
OFFSET with LIMIT
Use OFFSET to specify the starting row offset into the result set returned by your query and LIMIT to specify the page size.
For example, if page size is 10, then to select the second page, the following query can be used (rows 11 to 20 are returned):
SELECT title, author, isbn, description
FROM library
WHERE published_date > 2010
ORDER BY title, author, isbn
LIMIT 10 OFFSET 10
OFFSET reads and skips rows on either the server or client depending on query type, whereas RVC is more effective for queries on the primary key axis because it can start directly from the provided key.
Salted Tables
Sequential writes in HBase may suffer from region server hotspotting if your row key is monotonically increasing. Salting the row key helps mitigate this problem. See this article for details.
Phoenix provides a way to transparently salt the row key with a salting byte for a table. Specify this at table creation time with the SALT_BUCKETS table property, using a value from 1 to 256:
CREATE TABLE table (a_key VARCHAR PRIMARY KEY, a_col VARCHAR) SALT_BUCKETS = 20;There are some behavior differences and cautions to be aware of when using a salted table.
Sequential scan
Since a salted table does not store data in natural key sequence, a strict sequential scan does not return data in natural sorted order. Clauses that force sequential scan behavior (for example, LIMIT) may return rows differently compared to a non-salted table.
Splitting
If no split points are specified, a salted table is pre-split on salt-byte boundaries to ensure load distribution across region servers, including during initial table growth. If split points are provided manually, they must include the salt byte.
Row key ordering
Pre-splitting also ensures that entries in each region start with the same salt byte and are therefore locally sorted. During a parallel scan across regions, Phoenix can use this property to perform a client-side merge sort. The resulting scan can still be returned sequentially, as if from a normal table.
This row-key ordered scan can be enabled by setting phoenix.query.rowKeyOrderSaltedTable=true in hbase-site.xml. When enabled, user-specified split points on salted tables are disallowed to ensure each bucket contains only entries with the same salt byte. With this property enabled, a salted table behaves more like a normal table for scans and returns items in row-key order.
Performance
Using salted tables with pre-splitting helps distribute write workload uniformly across region servers, which improves write performance. Our performance evaluation shows that salted tables can achieve up to 80% higher write throughput than non-salted tables.
Reads from salted tables can also benefit from more uniform data distribution. Our performance evaluation shows improved read performance for queries focused on subsets of data.
Skip Scan
Phoenix uses Skip Scan for intra-row scanning which allows for significant performance improvement over Range Scan when rows are retrieved based on a given set of keys.
Skip Scan leverages SEEK_NEXT_USING_HINT in HBase filters. It stores information about which key sets or key ranges are being searched for in each column. During filter evaluation, it checks whether a key is in one of the valid combinations or ranges. If not, it computes the next highest key to jump to.
Input to SkipScanFilter is a List<List<KeyRange>> where the top-level list represents each row-key column (that is, each primary key part), and the inner list represents OR-ed byte-array boundaries.
Consider the following query:
SELECT * FROM T
WHERE ((KEY1 >='a' AND KEY1 <= 'b') OR (KEY1 > 'c' AND KEY1 <= 'e'))
AND KEY2 IN (1, 2)
For the query above, the List<List<KeyRange>> passed to SkipScanFilter would look like:
[[[a - b], [d - e]], [1, 2]]Here, [[a - b], [d - e]] represents ranges for KEY1, and [1, 2] represents the keys for KEY2.
The following diagram illustrates graphically how the skip scan is able to jump around the key space:
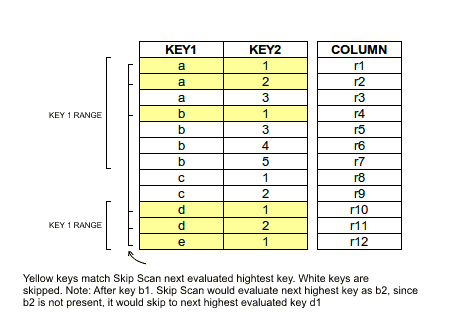
Table Sampling
To support table sampling (similar to PostgreSQL and T-SQL syntax), a TABLESAMPLE clause was incorporated into aliased table references as of Phoenix 4.12. The general syntax is described here. This feature limits the number of rows returned from a table to a percentage of rows. See PHOENIX-153 for implementation details.
This feature is implemented with a Bernoulli trial and a consistent-hashing-based table sampler to achieve Bernoulli sampling on a given row population. Given a sampling rate, it leverages Phoenix statistics and HBase region distribution to perform table sampling.
As part of statistics collection, a guidepost (a row reference) is created at equidistant byte intervals. When sampling is required, a Bernoulli trial process is applied repeatedly on each guidepost in each region with a probability proportional to the sampling rate. An included guidepost results in all rows between it and the next guidepost being included in the sample population.
Performance
Sampling on a table with a sampling rate of 100% costs roughly the same computational resources as a query without sampling.
Resource consumption drops quickly as sampling rate decreases. In general, the amortized complexity of the sampling process is O(k + mn), where:
nis the number of regions in the sampled HBase table.mis the number of guideposts.kis the sampled population size.
Repeatable
Repeatable means repeated sampling on the same table returns the same sampled result.
Repeatability is enabled by applying a consistent-hashing process to the binary representation of the start row key of each guidepost in each region during sampling. By default, an FNV1 implementation with lazy modulo is used. See FNV1.
Examples
To sample a table, execute a query such as the following. The sampling rate is a numeric value between 0 and 100, inclusive.
SELECT * FROM PERSON TABLESAMPLE (12.08);More examples:
SELECT * FROM PERSON TABLESAMPLE (12.08) WHERE ADDRESS = 'CA' OR NAME > 'aaa';
SELECT COUNT(*) FROM PERSON TABLESAMPLE (12.08) LIMIT 2;
SELECT COUNT(*) FROM (SELECT NAME FROM PERSON TABLESAMPLE (49) LIMIT 20);
SELECT * FROM (SELECT /*+ NO_INDEX */ * FROM PERSON TABLESAMPLE (10) WHERE NAME > 'tina10') WHERE ADDRESS = 'CA';
SELECT * FROM PERSON1, PERSON2 TABLESAMPLE (70) WHERE PERSON1.NAME = PERSON2.NAME;
SELECT /*+ NO_INDEX */ COUNT(*) FROM PERSON TABLESAMPLE (19), US_POPULATION TABLESAMPLE (28) WHERE PERSON.NAME > US_POPULATION.STATE;
UPSERT INTO PERSONBIG (ID, ADDRESS) SELECT ID, ADDRESS FROM PERSONBIG TABLESAMPLE (1);
To use with aggregation:
SELECT COUNT(*) FROM PERSON TABLESAMPLE (49) LIMIT 2;
SELECT COUNT(*) FROM (SELECT NAME FROM PERSON TABLESAMPLE (49) LIMIT 20);
To explain a sampled query:
EXPLAIN SELECT COUNT(*) FROM PERSON TABLESAMPLE (49) LIMIT 2;Tuning
- Due to the sampling process,
TABLESAMPLEshould be used with caution. For example, a join of two tables is likely to return a match for each row in both tables; however, when sampling is applied to one or both tables, join results may differ from non-sampled expectations. - Statistics should be collected to achieve the best sampling accuracy. To turn on statistics collection, refer to Statistics Collection.
ALTER TABLE my_table SET GUIDE_POSTS_WIDTH = 10000000;- A denser guidepost setting improves sampling accuracy, but may reduce performance. A comparison is shown below.
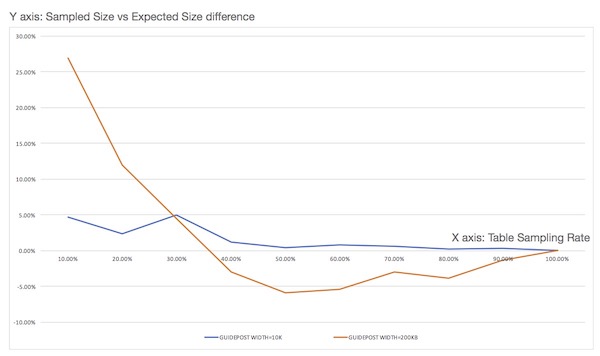
Views
The standard SQL view syntax (with some limitations) is now supported by Phoenix to enable multiple virtual tables to all share the same underlying physical HBase table. This is important in HBase as there are limits to the number of regions which HBase can manage. Limiting the number of tables can help limit the number of regions in a cluster.
For example, given the following table definition that defines a base table to collect product metrics:
CREATE TABLE product_metrics (
    metric_type CHAR(1),
    created_by VARCHAR,
    created_date DATE,
    metric_id INTEGER,
    CONSTRAINT pk PRIMARY KEY (metric_type, created_by, created_date, metric_id)
);
You may define the following view:
CREATE VIEW mobile_product_metrics (carrier VARCHAR, dropped_calls BIGINT) AS
SELECT * FROM product_metrics
WHERE metric_type = 'm';
In this case, the same underlying physical HBase table (i.e. PRODUCT_METRICS) stores all of the data. Notice that unlike with standard SQL views, you may define additional columns for your view. The view inherits all of the columns from its base table, in addition to being able to optionally add new KeyValue columns. You may also add these columns after-the-fact with an ALTER VIEW statement.
NOTE: Phoenix 4.15.0 onwards contains PHOENIX-4810 which introduces a new endpoint coprocessor on the SYSTEM.CHILD_LINK table for adding parent->child links, whenever a view is created. Thus, when namespace mapping is enabled, users that wish to create views will need to be granted EXEC permissions on SYSTEM.CHILD_LINK in order to be able to invoke this coprocessor.
Updatable Views
If your view uses only simple equality expressions in the WHERE clause, you are also allowed to issue DML against the view. These views are termed updatable views. For example, in this case you could issue the following UPSERT statement:
UPSERT INTO mobile_product_metrics(created_by, created_date, metric_id, carrier, dropped_calls)
VALUES('John Doe', CURRENT_DATE(), NEXT VALUE FOR metric_seq, 'Verizon', 20);
In this case, the row will be stored in the PRODUCT_METRICS HBase table and the metric_type column value will be inferred to be 'm' since the VIEW defines it as such.
Also, queries done through the view will automatically apply the WHERE clause filter. For example:
SELECT SUM(dropped_calls) FROM mobile_product_metrics WHERE carrier = 'Verizon';This would sum all the dropped_calls across all product_metrics with a metric_type of 'm' and a carrier of 'Verizon'.
Read-only Views
Views may also be defined with more complex WHERE clauses, but in that case you cannot issue DML against them as you'll get a ReadOnlyException. You are still allowed to query through them and their WHERE clauses will be in effect as with standard SQL views.
As expected, you may create a VIEW on another VIEW as well to further filter the data set. The same rules as above apply: if only simple equality expressions are used in the VIEW and its parent VIEW(s), the new view is updatable as well, otherwise it's read-only.
Note that the previous support for creating a read-only VIEW directly over an HBase table is still supported.
Indexes on Views
In addition, you may create an INDEX over a VIEW, just as with a TABLE. This is particularly useful to improve query performance over newly added columns on a VIEW, since it provides a way of doing point lookups based on these column values. Note that until PHOENIX-1499 gets implemented, an INDEX over a VIEW is only maintained if the updates are made through the VIEW (as opposed to through the underlying TABLE).
Limitations
Views have the following restrictions:
- An INDEX over a VIEW is only maintained if the updates are made through the VIEW. Updates made through the underlying TABLE or the parent VIEW will not be reflected in the index (PHOENIX-1499).
- A primary key column may not be added to a VIEW when its base table has a primary key constraint that ends with a variable-length column (PHOENIX-2157).
- A VIEW may be defined over only a single table through a simple
SELECT *query. You may not create a VIEW over multiple joined tables or over aggregations (PHOENIX-1505, PHOENIX-1506). - When a column is added to a VIEW, the new column is not automatically added to child VIEWs (PHOENIX-2054). The workaround is to manually add the column to child VIEWs.
- All columns must be projected into a VIEW when it is created (that is, only
CREATE VIEW ... AS SELECT *is supported). You may drop non-primary-key columns inherited from the base table after creation usingALTER VIEW. Providing a subset of columns or expressions in theSELECTclause is planned for a future release (PHOENIX-1507).
Multi-tenancy
Highlights
- Multi-tenancy in Phoenix works via a combination of multi-tenant tables and tenant-specific connections (detailed below).
- Tenants open tenant-specific connections to Phoenix. These connections can only access data that belongs to the tenant.
- Tenants only see their own data in multi-tenant tables and can see all data in regular tables.
- In order to add their own columns, tenants create tenant-specific views on top of multi-tenant tables and add their own columns to the views.
Multi-tenant tables
Multi-tenant tables in Phoenix are regular tables declared with the MULTI_TENANT=true DDL property. They work in conjunction with tenant-specific connections (detailed below) to ensure tenants only see their own data in these tables. The first primary key column of a multi-tenant table identifies the tenant. For example:
CREATE TABLE base.event (
    tenant_id VARCHAR,
    event_type CHAR(1),
    created_date DATE,
    event_id BIGINT
)
MULTI_TENANT=true;
The column that identifies the tenant may have any name, but it must be of type VARCHAR or CHAR. Regular Phoenix connections work with these tables without tenant constraints, including access across tenant boundaries.
Tenant-specific connections
Tenants are identified by the presence or absence of the TenantId property at JDBC connection time. A connection with a non-null TenantId is tenant-specific. A connection with an unspecified or null TenantId is a regular connection. A tenant-specific connection may query only:
- all data in non-multi-tenant (global) tables, that is, tables created with a regular connection without
MULTI_TENANT=true. - their own data in multi-tenant tables.
- their own schema, meaning it sees only tenant-specific views created by that tenant (detailed below).
For example, a tenant-specific connection is established like this:
Properties props = new Properties();
props.setProperty("TenantId", "Acme");
Connection conn = DriverManager.getConnection("localhost", props);
Tenant-specific views (optional)
Tenant-specific views may only be created using tenant-specific connections. They are created the same way as views, however the base table must be a multi-tenant table or another view that eventually points to one. Tenant-specific views are typically used when new columns and/or filter criteria, specific to that tenant, are required. Otherwise the base table may be used directly through a tenant-specific connection as described above.
For example, a tenant-specific view may be defined as follows:
CREATE VIEW acme.login_event(acme_user_id CHAR(15)) AS
SELECT * FROM base.event
WHERE event_type = 'L';
The tenant_id column is neither visible nor accessible from a tenant-specific view. Any reference to it causes a ColumnNotFoundException. As with any Phoenix view, whether the view is updatable follows the rules described here. In addition, indexes may be added to tenant-specific views just like regular tables and views (with these limitations).
Tenant data isolation
Any DML or query performed on multi-tenant tables using a tenant-specific connection is automatically constrained to that tenant’s data. For UPSERT, Phoenix automatically populates the tenant_id column with the tenant ID specified at connection time. For query and DELETE operations, a WHERE clause is transparently added so operations only see data for the current tenant.
Dynamic Columns
Sometimes defining a static schema up front is not feasible. Instead, a subset of columns may be specified at table create time while the rest are specified at query time. As of Phoenix 1.2, dynamic columns are supported by allowing column definitions in parentheses after the table name in the FROM clause of a SELECT statement. Although this is not standard SQL, it is useful for leveraging the late-binding capability of HBase.
For example:
SELECT eventTime, lastGCTime, usedMemory, maxMemory
FROM EventLog(lastGCTime TIME, usedMemory BIGINT, maxMemory BIGINT)
WHERE eventType = 'OOM' AND lastGCTime < eventTime - 1;
You might define only a subset of event columns at create time, because each event type can have different properties:
CREATE TABLE EventLog (
    eventId BIGINT NOT NULL,
    eventTime TIME NOT NULL,
    eventType CHAR(3),
    CONSTRAINT pk PRIMARY KEY (eventId, eventTime)
);
To upsert a row with dynamic columns:
UPSERT INTO EventLog (
    eventId,
    eventTime,
    eventType,
    lastGCTime TIME,
    usedMemory BIGINT,
    maxMemory BIGINT
)
VALUES (1, CURRENT_TIME(), 'abc', CURRENT_TIME(), 512, 1024);
Bulk Loading
Phoenix provides two methods for bulk loading data into Phoenix tables:
- Single-threaded client loading tool for CSV-formatted data via the psql command
- MapReduce-based bulk load tool for CSV and JSON-formatted data
The psql tool is typically appropriate for tens of megabytes, while the MapReduce-based loader is typically better for larger load volumes.
Sample data
For the following examples, assume we have a CSV file named data.csv with this content:
12345,John,Doe
67890,Mary,Poppins
We will use a table with the following structure:
CREATE TABLE example (
    my_pk BIGINT NOT NULL,
    m.first_name VARCHAR(50),
    m.last_name VARCHAR(50),
    CONSTRAINT pk PRIMARY KEY (my_pk)
);
Loading via PSQL
The psql command is invoked via psql.py in the Phoenix bin directory. To load CSV data, provide connection information for your HBase cluster, the target table name, and one or more CSV file paths. All CSV files must use the .csv extension (because arbitrary SQL scripts with the .sql extension can also be supplied on the psql command line).
To load the example data above into HBase running locally:
bin/psql.py -t EXAMPLE localhost data.csvThe following parameters can be used for loading data with psql:
| Parameter | Description |
|---|---|
-t | Provide the target table name. By default, the table name is taken from the CSV file name. This parameter is case-sensitive. |
-h | Override the column names to which CSV data maps (case-sensitive). A special value of in-line indicates that the first line of the CSV file determines column mapping. |
-s | Run in strict mode, throwing an error on CSV parsing errors. |
-d | Supply one or more custom delimiters for CSV parsing. |
-q | Supply a custom phrase delimiter (defaults to the double quote character). |
-e | Supply a custom escape character (default is backslash). |
-a | Supply an array delimiter (explained in more detail below). |
Loading via MapReduce
For higher-throughput loading distributed across the cluster, the MapReduce loader can be used. This loader first converts data into HFiles, then provides the created HFiles to HBase after HFile creation completes.
The CSV MapReduce loader is launched using the hadoop command with the Phoenix client JAR:
hadoop jar phoenix-<version>-client.jar org.apache.phoenix.mapreduce.CsvBulkLoadTool --table EXAMPLE --input /data/example.csvWhen using Phoenix 4.0 and above, there is a known HBase issue ("Notice to MapReduce users of HBase 0.96.1 and above" in the HBase Reference Guide). You should use:
HADOOP_CLASSPATH=$(hbase mapredcp):/path/to/hbase/conf hadoop jar phoenix-<version>-client.jar org.apache.phoenix.mapreduce.CsvBulkLoadTool --table EXAMPLE --input /data/example.csvOr:
HADOOP_CLASSPATH=/path/to/hbase-protocol.jar:/path/to/hbase/conf hadoop jar phoenix-<version>-client.jar org.apache.phoenix.mapreduce.CsvBulkLoadTool --table EXAMPLE --input /data/example.csvThe JSON MapReduce loader is launched similarly:
hadoop jar phoenix-<version>-client.jar org.apache.phoenix.mapreduce.JsonBulkLoadTool --table EXAMPLE --input /data/example.jsonThe input file must be present on HDFS (not the local filesystem where the command is run).
The following parameters can be used with the MapReduce loader:
| Parameter | Description |
|---|---|
-i,--input | Input CSV path (mandatory) |
-t,--table | Phoenix table name (mandatory) |
-a,--array-delimiter | Array element delimiter (optional) |
-c,--import-columns | Comma-separated list of columns to import |
-d,--delimiter | Input delimiter (defaults to comma) |
-g,--ignore-errors | Ignore input errors |
-o,--output | Output path for temporary HFiles (optional) |
-s,--schema | Phoenix schema name (optional) |
-z,--zookeeper | ZooKeeper quorum to connect to (optional) |
-it,--index-table | Index table name to load (optional) |
Notes on the MapReduce importer
The current MR-based bulk loader runs one MR job to load your data table and one MR job per index table to populate indexes. Use -it to load only one index table.
Permission issues when uploading HFiles
There can be issues due to file permissions on created HFiles in the final stage of a bulk load, when HFiles are handed over to HBase. HBase must be able to move the created HFiles, which means it needs write access to the directories where files were written. If not, HFile upload may hang for a long time before failing.
Two common workarounds are:
- Run the bulk load process as the
hbaseuser. - Create output files readable/writable for all users.
The first option can be done by running:
sudo -u hbase hadoop jar phoenix-<version>-client.jar org.apache.phoenix.mapreduce.CsvBulkLoadTool --table EXAMPLE --input /data/example.csvCreating output files readable by all can be done by setting fs.permissions.umask-mode to 000. This can be set in Hadoop config on the submit host, or only for job submission:
hadoop jar phoenix-<version>-client.jar org.apache.phoenix.mapreduce.CsvBulkLoadTool -Dfs.permissions.umask-mode=000 --table EXAMPLE --input /data/example.csvLoading array data
Both PSQL and MapReduce loaders support array values with -a. Arrays in CSV are represented by a field that uses a different delimiter than the main CSV delimiter. For example, this file represents an id field and an array of integers:
1,2:3:4
2,3:4:5
To load this file, use the default CSV delimiter (comma) and pass colon as the array delimiter via -a ':'.
A note on separator characters
The default separator for both loaders is comma (,). A common separator for input files is tab, which can be tricky to pass on the command line. A common mistake is:
-d '\t'This does not work because the shell passes two characters (backslash and t) to Phoenix.
Two working approaches:
- Prefix the string representation of tab with
$:
-d $'\\t'- Enter the separator as
Ctrl+vand then press tab:
-d '^v<tab>'A note on lowercase table/schema names
Table names in Phoenix are case-insensitive (generally uppercase), but users may need to map an existing lowercase HBase table name into Phoenix. In this case, double quotes around the table name (for example, "tablename") preserve case sensitivity.
This support was extended to bulk load options. However, due to how Apache Commons CLI parses command-line options (CLI-275), pass the argument as \"\"tablename\"\" instead of just "tablename" for CsvBulkLoadTool.
Example:
hadoop jar phoenix-<version>-client.jar org.apache.phoenix.mapreduce.CsvBulkLoadTool --table \"\"t\"\" --input /data/example.csvQuery Server
The Phoenix Query Server provides an alternative means for interaction with Phoenix and HBase.
Overview
Phoenix 4.4 introduces a stand-alone server that exposes Phoenix to "thin" clients. It is based on the Avatica component of Apache Calcite. The query server is comprised of a Java server that manages Phoenix Connections on the clients' behalf.
With the introduction of the Protobuf transport, Avatica is moving towards backwards compatibility with the provided thin JDBC driver. There are no such backwards compatibility guarantees for the JSON API.
To repeat, there is no guarantee of backwards compatibility with the JSON transport; however, compatibility with the Protobuf transport is stabilizing (although, not tested thoroughly enough to be stated as "guaranteed").
Clients
The primary client implementation is currently a JDBC driver with minimal dependencies. The default and primary transport mechanism since Phoenix 4.7 is Protobuf, the older JSON mechanism can still be enabled. The distribution includes the sqlline-thin.py CLI client that uses the JDBC thin client.
The Phoenix project also maintains the Python driver phoenixdb.
The Avatica Go client can also be used.
Proprietary ODBC drivers are also available for Windows and Linux.
Installation
In the 4.4-4.14 and 5.0 releases the query server and its JDBC client are part of the standard Phoenix distribution. They require no additional dependencies or installation.
After the 4.15 and 5.1 release, the query server has been unbundled into the phoenix-queryserver repository, and its version number has been reset to 6.0.
Download the latest source or binary release from the Download page, or check out the development version from GitHub.
Either unpack the binary distribution, or build it from source. See BUILDING.md in the source distribution on how to build.
Usage
Server
The standalone Query Server distribution does not contain the necessary Phoenix (thick) client library by default.
If using the standalone library you will either need to rebuild it from source to include the client library (See BUILDING.md), or manually copy the phoenix thick client library into the installation directory.
The server component is managed through bin/queryserver.py. Its usage is as
follows
bin/queryserver.py [start|stop]When invoked with no arguments, the query server is launched in the foreground, with logging directed to the console.
The first argument is an optional start or stop command to the daemon. When
either of these are provided, it will take appropriate action on a daemon
process, if it exists.
Any subsequent arguments are passed to the main class for interpretation.
The server is packaged in a standalone jar,
phoenix-queryserver-<version>.jar. This jar, the phoenix-client.jar and HBASE_CONF_DIR on the
classpath are all that is required to launch the server.
Client
Phoenix provides two mechanisms for interacting with the query server. A JDBC
driver is provided in the standalone
phoenix-queryserver-client-<version>.jar. The script
bin/sqlline-thin.py is available for the command line.
The JDBC connection string is composed as follows:
jdbc:phoenix:thin:url=<scheme>://<server-hostname>:<port>[;option=value...]<scheme> specifies the transport protocol (http or https) used when communicating with the
server.
<server-hostname> is the name of the host offering the service.
<port> is the port number on which the host is listening. Default is 8765,
though this is configurable (see below).
The full list of options that can be provided via the JDBC URL string is available in the Avatica documentation.
The script bin/sqlline-thin.py is intended to behave identically to its
sibling script bin/sqlline.py. It supports the following usage options.
bin/sqlline-thin.py [[scheme://]host[:port]] [sql_file]The first optional argument is a connection URL, as described previously. When
not provided, scheme defaults to http, host to localhost, and port to
8765.
bin/sqlline-thin.py http://localhost:8765The second optional parameter is a sql file from which to read commands.
Wire API documentation
The API itself is documented in the Apache Calcite project as it is the Avatica API -- there is no wire API defined in Phoenix itself.
For more information in building clients in other languages that work with Avatica, please feel free to reach out to the Apache Calcite dev mailing list.
Impersonation
By default, the Phoenix Query Server executes queries on behalf of the end-user. HBase permissions are enforced given the end-user, not the Phoenix Query Server's identity. In some cases, it may be desirable to execute the query as some other user -- this is referred to as "impersonation". This can enable workflows where a trusted user has the privilege to run queries for other users.
This can be enabled by setting the configuration property phoenix.queryserver.withRemoteUserExtractor
to true. The URL of the Query Server can be modified to include the required request parameter.
For example, to let "bob" to run a query as "alice", the following JDBC URL could be used:
jdbc:phoenix:thin:url=http://localhost:8765?doAs=aliceThe standard Hadoop "proxyuser" configuration keys are checked to validate if the "real" remote user is allowed to impersonate the "doAs" user. See the Hadoop documentation for more information on how to configure these rules.
As a word of warning: there is no end-to-end test coverage for the HBase 0.98 and 1.1 Phoenix releases because of missing test-related code in those HBase releases. While we expect no issues on these Phoenix release lines, we recommend additional testing by the user to verify that there are no issues.
Metrics
By default, the Phoenix Query Server exposes various Phoenix global client metrics via JMX (for HBase versions 1.3 and up). The list of metrics are available here.
PQS Metrics use Hadoop Metrics 2 internally for metrics publishing. Hence it publishes various JVM related metrics. Metrics can be filtered based on certain tags, which can be configured by the property specified in hbase-site.xml on the classpath. Further details are provided in Configuration section.
Configuration
Server components are spread across a number of java packages, so effective logging configuration requires updating multiple packages. The default server logging configuration sets the following log levels:
log4j.logger.org.apache.calcite.avatica=INFO
log4j.logger.org.apache.phoenix.queryserver.server=INFO
log4j.logger.org.eclipse.jetty.server=INFO
As of the time of writing, the underlying Avatica component respects the
following configuration options exposed via hbase-site.xml.
Server Instantiation
| Property | Description | Default |
|---|---|---|
phoenix.queryserver.http.port | Port the server listens on. | 8765 |
phoenix.queryserver.metafactory.class | Avatica Meta.Factory implementation class. | org.apache.phoenix.queryserver.server.PhoenixMetaFactoryImpl |
phoenix.queryserver.serialization | Transport/serialization format (PROTOBUF or JSON). | PROTOBUF |
HTTPS
HTTPS support is only available in unbundled phoenix-queryserver versions.
| Property | Description | Default |
|---|---|---|
phoenix.queryserver.tls.enabled | Enables HTTPS transport. When enabled, keystore/truststore files and passwords are also required. | false |
phoenix.queryserver.tls.keystore | Keystore file containing the HTTPS private key. | unset |
phoenix.queryserver.tls.keystore.password | Password for HTTPS keystore. | empty string |
phoenix.queryserver.tls.truststore | Keystore file containing the HTTPS certificate. | unset |
phoenix.queryserver.tls.truststore.password | Password for HTTPS truststore. | empty string |
Secure Cluster Connection
| Property | Description | Default |
|---|---|---|
hbase.security.authentication | When set to kerberos, server logs in before initiating Phoenix connections. | specified in hbase-default.xml |
phoenix.queryserver.keytab.file | Key for keytab file lookup. | unset |
phoenix.queryserver.kerberos.principal | Kerberos principal for authentication; also used for SPNEGO if HTTP principal is not configured. | unset |
phoenix.queryserver.http.keytab.file | Keytab for SPNEGO auth; required if phoenix.queryserver.kerberos.http.principal is set; falls back to phoenix.queryserver.keytab.file. | unset |
phoenix.queryserver.http.kerberos.principal | Kerberos principal for SPNEGO auth; falls back to phoenix.queryserver.kerberos.principal. | unset |
phoenix.queryserver.kerberos.http.principal | Deprecated; use phoenix.queryserver.http.kerberos.principal. | unset |
phoenix.queryserver.kerberos.allowed.realms | Additional Kerberos realms allowed for SPNEGO auth. | unset |
phoenix.queryserver.dns.nameserver | DNS hostname. | default |
phoenix.queryserver.dns.interface | Network interface name for DNS queries. | default |
Server Connection Cache
| Property | Description | Default |
|---|---|---|
avatica.connectioncache.concurrency | Connection cache concurrency level. | 10 |
avatica.connectioncache.initialcapacity | Connection cache initial capacity. | 100 |
avatica.connectioncache.maxcapacity | Connection cache maximum capacity; LRU eviction begins near this point. | 1000 |
avatica.connectioncache.expiryduration | Connection cache expiration duration. | 10 |
avatica.connectioncache.expiryunit | Time unit for avatica.connectioncache.expiryduration. | MINUTES |
Server Statement Cache
| Property | Description | Default |
|---|---|---|
avatica.statementcache.concurrency | Statement cache concurrency level. | 100 |
avatica.statementcache.initialcapacity | Statement cache initial capacity. | 1000 |
avatica.statementcache.maxcapacity | Statement cache maximum capacity; LRU eviction begins near this point. | 10000 |
avatica.statementcache.expiryduration | Statement cache expiration duration. | 5 |
avatica.statementcache.expiryunit | Time unit for avatica.statementcache.expiryduration. | MINUTES |
Impersonation
| Property | Description | Default |
|---|---|---|
phoenix.queryserver.withRemoteUserExtractor | If true, extracts impersonated user from request param instead of authenticated HTTP user. | false |
phoenix.queryserver.remoteUserExtractor.param | HTTP request parameter name for impersonated user. | doAs |
Metrics
| Property | Description | Default |
|---|---|---|
phoenix.client.metrics.tag | Tag for filtering Phoenix global client metrics emitted by PQS in hadoop-metrics2.properties. | FAT_CLIENT |
Query Server Additions
The Phoenix Query Server is meant to be horizontally scalable which means that it is a natural fit for add-on features like service discovery and load balancing.
Load balancing
The Query Server can use off-the-shelf HTTP load balancers such as the Apache HTTP Server, nginx, or HAProxy. The primary requirement of using these load balancers is that the implementation must implement "sticky session" (when a client communicates with a backend server, that client continues to talk to that backend server). The Query Server also provides some bundled functionality for load balancing using ZooKeeper.
The ZooKeeper-based load balancer functions by automatically registering PQS instances in ZooKeeper and then allows clients to query the list of available servers. This implementation, unlike the others mentioned above, requires that client use the advertised information to make a routing decision. In this regard, this ZooKeeper-based approach is more akin to a service-discovery layer than a traditional load balancer. This load balancer implementation does not support SASL-based (Kerberos) ACLs in ZooKeeper (see PHOENIX-4085).
The following properties configure this load balancer:
| Property | Description | Default |
|---|---|---|
phoenix.queryserver.loadbalancer.enabled | If true, PQS registers itself in ZooKeeper for load balancing. | false |
phoenix.queryserver.base.path | Root znode where PQS instances register themselves. | /phoenix |
phoenix.queryserver.service.name | Unique name to identify this PQS instance. | queryserver |
phoenix.queryserver.zookeeper.acl.username | Username for optional DIGEST ZooKeeper ACL. | phoenix |
phoenix.queryserver.zookeeper.acl.password | Password for optional DIGEST ZooKeeper ACL. | phoenix |
Metrics
Phoenix surfaces various metrics that provide an insight into what is going on within the Phoenix client as it is executing various SQL statements. These metrics are collected within the client JVM in two ways:
- Request level metrics - collected at an individual SQL statement level
- Global metrics - collected at the client JVM level
Request level metrics are helpful for figuring out at a more granular level about the amount of work done by every SQL statement executed by Phoenix. These metrics can be classified into three categories:
Request-level metrics
Mutation metrics
MUTATION_BATCH_SIZE- Batch sizes of mutationsMUTATION_BYTES- Size of mutations in bytesMUTATION_COMMIT_TIME- Time it took to commit mutations
Scan task metrics
NUM_PARALLEL_SCANS- Number of scans executed in parallelSCAN_BYTES- Number of bytes read by scansMEMORY_CHUNK_BYTES- Number of bytes allocated by the memory managerMEMORY_WAIT_TIME- Time in milliseconds threads needed to wait for memory to be allocated through memory managerSPOOL_FILE_SIZE- Size of spool files created in bytesSPOOL_FILE_COUNTER- Number of spool files createdCACHE_REFRESH_SPLITS_COUNTER- Number of times Phoenix's metadata cache was refreshed because of splitsTASK_QUEUE_WAIT_TIME- Time in milliseconds tasks had to wait in the queue of the thread pool executorTASK_END_TO_END_TIME- Time in milliseconds spent by tasks from creation to completionTASK_EXECUTION_TIME- Time in milliseconds tasks took to executeTASK_EXECUTED_COUNTER- Counter for number of tasks submitted to the thread pool executorTASK_REJECTED_COUNTER- Counter for number of tasks that were rejected by the thread pool executor
Overall query metrics
QUERY_TIMEOUT_COUNTER- Number of times query timed outQUERY_FAILED_COUNTER- Number of times query failedWALL_CLOCK_TIME_MS- Wall clock time elapsed for the overall query executionRESULT_SET_TIME_MS- Wall clock time elapsed for reading all records usingresultSet.next()
How to use SQL statement-level metrics
- Log and report query execution details which could be later used for analysis.
- Report top SQL queries by duration. Metric to use:
WALL_CLOCK_TIME_MS. - Check if the query is failing because it is timing out. Metric to use:
QUERY_TIMEOUT_COUNTER > 0. - Monitor the amount of bytes being written to or read from HBase for a SQL statement. Metrics to use:
MUTATION_BYTESandSCAN_BYTES. - Check if the query is doing too much work or needs tuning. Possible metrics to use:
TASK_EXECUTED_COUNTER,TASK_QUEUE_WAIT_TIME,WALL_CLOCK_TIME_MS. - Check if a successful query is facing thread starvation, i.e., number of threads in the thread pool likely needs to be increased. This is characterized by a relatively large difference between
TASK_EXECUTION_TIMEandTASK_END_TO_END_TIME.
Request level metrics can be turned on/off for every Phoenix JDBC connection. Below is an example of how you can do that:
Properties props = new Properties();
props.setProperty(QueryServices.COLLECT_REQUEST_LEVEL_METRICS, "true");
try (Connection conn = DriverManager.getConnection(getUrl(), props)) {
    // ...
}
A typical pattern for how one could get hold of read metrics for queries:
Map<String, Map<String, Long>> overAllQueryMetrics = null;
Map<String, Map<String, Long>> requestReadMetrics = null;
try (ResultSet rs = stmt.executeQuery()) {
    while (rs.next()) {
        // ...
    }
    overAllQueryMetrics = PhoenixRuntime.getOverAllReadRequestMetrics(rs);
    requestReadMetrics = PhoenixRuntime.getRequestReadMetrics(rs);
    // log or report metrics as needed
    PhoenixRuntime.resetMetrics(rs);
}
One could also get hold of write related metrics (collected per table) for DML statements by doing something like this:
Map<String, Map<String, Long>> mutationWriteMetrics = null;
Map<String, Map<String, Long>> mutationReadMetrics = null;
try (Connection conn = DriverManager.getConnection(url)) {
    conn.createStatement().executeUpdate(dml1);
    // ...
    conn.createStatement().executeUpdate(dml2);
    // ...
    conn.createStatement().executeUpdate(dml3);
    // ...
    conn.commit();
    mutationWriteMetrics = PhoenixRuntime.getWriteMetricsForMutationsSinceLastReset(conn);
    mutationReadMetrics = PhoenixRuntime.getReadMetricsForMutationsSinceLastReset(conn);
    PhoenixRuntime.resetMetrics(conn);
}
Global metrics on the other hand are collected at the Phoenix client’s JVM level. These metrics could be used for building out a trend and seeing what is going on within Phoenix from client’s perspective over time. Other than the metrics reported above for request level metrics, the global metrics also includes the following counters:
MUTATION_SQL_COUNTER- Counter for number of mutation SQL statementsSELECT_SQL_COUNTER- Counter for number of SQL queriesOPEN_PHOENIX_CONNECTIONS_COUNTER- Number of open Phoenix connections
Global metrics could be helpful in monitoring and tuning various aspects of the execution environment. For example: an increase in TASK_REJECTED_COUNTER is probably a symptom of too much work being submitted, or that the Phoenix thread pool queue depth or number of threads (or both) needs to be increased. Similarly, a spike in TASK_EXECUTION_TIME for a time frame could be symptomatic of several things including overloaded region servers, a network glitch, or client/region servers undergoing garbage collection.
Collection of global client metrics can be turned on/off (on by default) by setting the attribute phoenix.query.global.metrics.enabled to true/false in the client side hbase-site.xml. Below is a code snippet showing how to log/report global metrics by using a scheduled job that runs periodically:
ScheduledExecutorService service = Executors.newScheduledThreadPool(1);
service.submit(new Runnable() {
    @Override
    public void run() {
        Collection<GlobalMetric> metrics = PhoenixRuntime.getGlobalPhoenixClientMetrics();
        for (GlobalMetric m : metrics) {
            // log or report for trending purposes
        }
    }
});
Tracing
As of Phoenix 4.1.0, Phoenix supports collecting per-request traces. This allows you to see each important step in a query or insertion, all the way from the client through HBase and back again.
Phoenix leverages Cloudera's HTrace library to integrate with HBase tracing utilities. Trace metrics are then deposited into a Hadoop Metrics2 sink that writes them into a Phoenix table.
Writing traces to a Phoenix table is not supported on Hadoop 1.
Configuration
There are two key configuration files that you will need to update.
hadoop-metrics2-phoenix.propertieshadoop-metrics2-hbase.properties
They contain the properties you need to set on the client and server, respectively, as well as information on how the Metrics2 system uses the configuration files.
Put these files on their respective classpaths and restart the process to pick up the new configurations.
hadoop-metrics2-phoenix.properties
This file will configure the Hadoop Metrics2 system for Phoenix clients.
The default properties you should set are:
# Sample from all the sources every 10 seconds
*.period=10

# Write Traces to Phoenix
##########################
# ensure that we receive traces on the server
phoenix.sink.tracing.class=org.apache.phoenix.trace.PhoenixMetricsSink
# Tell the sink where to write the metrics
phoenix.sink.tracing.writer-class=org.apache.phoenix.trace.PhoenixTableMetricsWriter
# Only handle traces with a context of "tracing"
phoenix.sink.tracing.context=tracing
This enables standard Phoenix metrics sink (which collects the trace information) and writer (writes the traces to the Phoenix SYSTEM.TRACING_STATS table). You can modify this to set your own custom classes as well, if you have them.
See the properties file in the source (phoenix-hadoop2-compat/bin) for more information on setting custom sinks and writers.
hadoop-metrics2-hbase.properties
A default HBase deployment already includes a Metrics2 configuration, so Phoenix Metrics2 config can either replace the existing file (if you do not have custom settings) or be merged into your existing Metrics2 configuration file.
# ensure that we receive traces on the server
hbase.sink.tracing.class=org.apache.phoenix.trace.PhoenixMetricsSink
# Tell the sink where to write the metrics
hbase.sink.tracing.writer-class=org.apache.phoenix.trace.PhoenixTableMetricsWriter
# Only handle traces with a context of "tracing"
hbase.sink.tracing.context=tracing
These are essentially the same properties as in hadoop-metrics2-phoenix.properties, but prefixed with hbase instead of phoenix so they are loaded with the rest of HBase metrics.
Disabling tracing
You can disable tracing for client requests by creating a new connection without the tracing property enabled (see below).
However, on the server side, once the metrics sink is enabled you cannot turn off trace collection and writing unless you remove the Phoenix Metrics2 configuration and restart the region server. This is enforced by the Metrics2 framework, which assumes server metrics should always be collected.
Usage
There are only a couple small things you need to do to enable tracing a given request with Phoenix.
Client Property
The frequency of tracing is determined by the following client-side Phoenix property:
phoenix.trace.frequencyThere are three possible tracing frequencies you can use:
never- This is the default
always- Every request will be traced
probability- Take traces with a probabilistic frequency
- probability threshold is set by
phoenix.trace.probability.thresholdwith a default of 0.05 (5%).
As with other configuration properties, this property may be specified at JDBC connection time as a connection property. Enabling one of these properties only turns on trace collection. Trace data still needs to be deposited somewhere.
Example:
# Enable tracing on every request
Properties props = new Properties();
props.setProperty("phoenix.trace.frequency", "always");
Connection conn = DriverManager.getConnection("jdbc:phoenix:localhost", props);

# Enable tracing on 50% of requests
props.setProperty("phoenix.trace.frequency", "probability");
props.setProperty("phoenix.trace.probability.threshold", "0.5");
Connection conn = DriverManager.getConnection("jdbc:phoenix:localhost", props);
hbase-site.xml
You can also enable tracing via hbase-site.xml. However, only always and never are currently supported.
<configuration>
  <property>
    <name>phoenix.trace.frequency</name>
    <value>always</value>
  </property>
</configuration>
Reading Traces
Once the traces are deposited into the tracing table, by default SYSTEM.TRACING_STATS, but it is configurable in the HBase configuration via:
<property>
  <name>phoenix.trace.statsTableName</name>
  <value>YOUR_CUSTOM_TRACING_TABLE</value>
</property>
The tracing table is initialized via the DDL:
CREATE TABLE SYSTEM.TRACING_STATS (
  trace_id BIGINT NOT NULL,
  parent_id BIGINT NOT NULL,
  span_id BIGINT NOT NULL,
  description VARCHAR,
  start_time BIGINT,
  end_time BIGINT,
  hostname VARCHAR,
  tags.count SMALLINT,
  annotations.count SMALLINT,
  CONSTRAINT pk PRIMARY KEY (trace_id, parent_id, span_id)
)
The tracing table also contains a number of dynamic columns for each trace. A trace is identified by trace ID (request ID), parent ID (parent span ID), and span ID (individual segment ID), and may have multiple tags and annotations. Once you know the number of tags and annotations, you can retrieve them from the table with a query like:
SELECT <columns>
  FROM SYSTEM.TRACING_STATS
  WHERE trace_id = ?
  AND parent_id = ?
  AND span_id = ?
Where columns is either annotations.aX or tags.tX, where X is the index of the dynamic column to look up.
For more usage examples, see TraceReader, which can programmatically read traces from the tracing results table.
Custom annotations can also be passed into Phoenix to be added to traces. Phoenix looks for connection properties whose names start with phoenix.annotation. and adds them as annotations to client-side traces. For example, a connection property phoenix.annotation.myannotation=abc results in an annotation with key myannotation and value abc. Use this to link traces to other request identifiers in your system, such as user or session IDs.
Phoenix Tracing Web Application
How to start the tracing web application
-
Enable tracing for Apache Phoenix as above
-
Start the web app:
./bin/traceserver.py start -
Open this URL in your browser: http://localhost:8864/webapp/
-
Stop the tracing web app:
./bin/traceserver.py stop
Changing the web app port number
Execute the command below:
-Dphoenix.traceserver.http.port=8887Feature list
The tracing web app for Apache Phoenix includes: feature list, dependency tree, trace count, trace distribution, and timeline.
List
The most recent traces are listed down. The limiting value entered on the textbox is used to determine the trace count displayed. With each trace, there is a link to view either the dependency tree or the timeline.
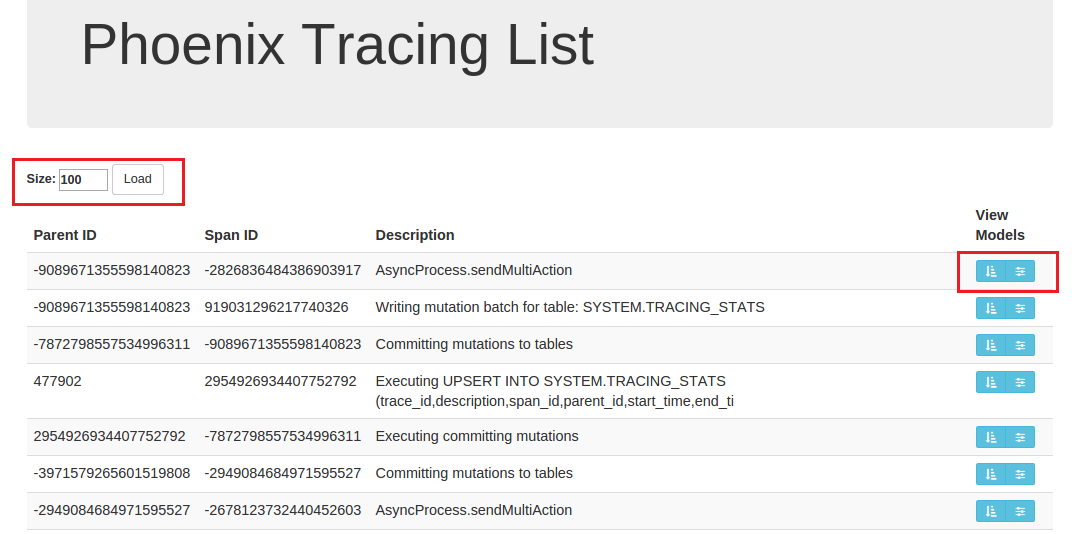
Dependency tree
The dependency tree shows traces for a given trace ID in a tree view. Parent-child relationships are displayed clearly. Tooltip data includes host name, parent ID, span ID, start time, end time, description, and duration. Each node is collapsible and expandable. The SQL query is shown for each tree rendering. Clear is used to remove the tree from view.
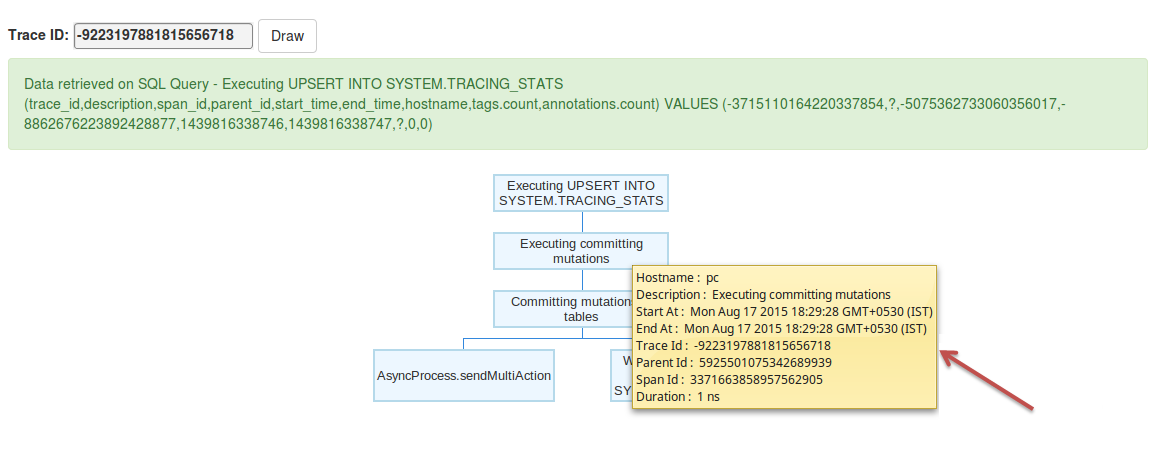
Trace count
The trace list is categorized by description. The trace count chart can be viewed as pie, line, bar, or area chart. The chart selector is collapsible and can be hidden.
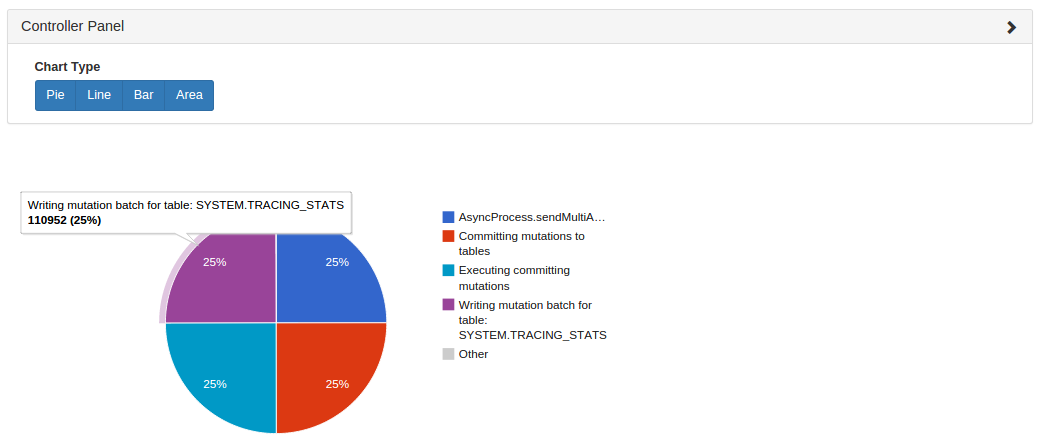
Trace distribution
The trace distribution chart shows traces across Phoenix hosts on which they are running. Chart types include pie, line, bar, and area. The chart selector is collapsible and can be hidden.
Timeline
The traces can be viewed along the time axis for a given trace id. Traces can be added or cleared from the timeline. There should be a minimum of two traces starting at two different times for the system to draw its timeline. This feature helps the user to easily compare execution times between traces and within the same trace.
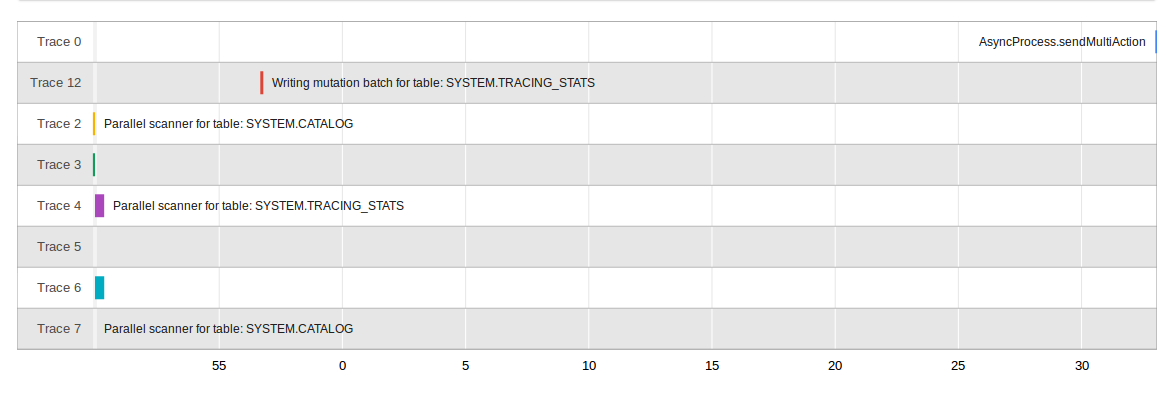
Cursor
To work on a subset of rows from a query, Phoenix supports a CURSOR control structure. The sequence below shows how to use a cursor.
Using a cursor
-
Define a cursor for a query using the
DECLAREstatement.PreparedStatement statement = conn.prepareStatement( "DECLARE empCursor CURSOR FOR SELECT * FROM EMP_TABLE" ); statement.execute(); -
Open the cursor.
statement = conn.prepareStatement("OPEN empCursor"); statement.execute(); -
Fetch a subset of rows to work with.
statement = conn.prepareStatement("FETCH NEXT 10 ROWS FROM empCursor"); ResultSet rset = statement.executeQuery(); -
Iterate through the fetched rows and process them as required.
while (rset.next()) { // ... } -
Fetch additional sets of rows as needed, and close the cursor when done.
statement = conn.prepareStatement("CLOSE empCursor");
statement.execute();
SQL Grammar
Commands
SELECT
Selects data from one or more tables. UNION ALL combines rows from multiple select statements. ORDER BY sorts the result based on the given expressions. LIMIT (or FETCH FIRST) limits the number of rows returned by the query with no limit applied if unspecified or specified as null or less than zero. The LIMIT (or FETCH FIRST) clause is executed after the ORDER BY clause to support top-N type queries. OFFSET clause skips that many rows before beginning to return rows. An optional hint may be used to override decisions made by the query optimizer.
Example
SELECT * FROM TEST LIMIT 1000;
SELECT * FROM TEST LIMIT 1000 OFFSET 100;
SELECT full_name FROM SALES_PERSON WHERE ranking >= 5.0
    UNION ALL SELECT reviewer_name FROM CUSTOMER_REVIEW WHERE score >= 8.0
UPSERT VALUES
Inserts if not present and updates otherwise the value in the table. The list of columns is optional and if not present, the values will map to the column in the order they are declared in the schema. The values must evaluate to constants.
Use the ON DUPLICATE KEY clause (available in Phoenix 4.9) if you need the UPSERT to be atomic. Performance will be slower in this case as the row needs to be read on the server side when the commit is done. Use IGNORE if you do not want the UPSERT performed if the row already exists. Otherwise, with UPDATE, the expression will be evaluated and the result used to set the column, for example to perform an atomic increment. An UPSERT to the same row in the same commit batch will be processed in the order of execution.
Example
UPSERT INTO TEST VALUES('foo','bar',3);
UPSERT INTO TEST(NAME,ID) VALUES('foo',123);
UPSERT INTO TEST(ID, COUNTER) VALUES(123, 0) ON DUPLICATE KEY UPDATE COUNTER = COUNTER + 1;
UPSERT INTO TEST(ID, MY_COL) VALUES(123, 0) ON DUPLICATE KEY IGNORE;
UPSERT SELECT
Inserts if not present and updates otherwise rows in the table based on the results of running another query. The values are set based on their matching position between the source and target tables. The list of columns is optional and if not present will map to the column in the order they are declared in the schema. If auto commit is on, and both a) the target table matches the source table, and b) the select performs no aggregation, then the population of the target table will be done completely on the server-side (with constraint violations logged, but otherwise ignored). Otherwise, data is buffered on the client and, if auto commit is on, committed in row batches as specified by the UpsertBatchSize connection property (or the phoenix.mutate.upsertBatchSize HBase config property which defaults to 10000 rows)
Example
UPSERT INTO test.targetTable(col1, col2) SELECT col3, col4 FROM test.sourceTable WHERE col5 < 100
UPSERT INTO foo SELECT * FROM bar;
DELETE
Deletes the rows selected by the where clause. If auto commit is on, the deletion is performed completely server-side.
Example
DELETE FROM TEST;
DELETE FROM TEST WHERE ID=123;
DELETE FROM TEST WHERE NAME LIKE 'foo%';
DECLARE CURSOR
Creates a cursor for the select statement
Example
DECLARE CURSOR TEST_CURSOR FOR SELECT * FROM TEST_TABLEOPEN CURSOR
Opens already declared cursor to perform FETCH operations
Example
OPEN CURSOR TEST_CURSORFETCH NEXT
Retrieves next or next n rows from already opened cursor
Example
FETCH NEXT FROM TEST_CURSOR
FETCH NEXT 10 ROWS FROM TEST_CURSOR
CLOSE
Closes an already open cursor
Example
CLOSE TEST_CURSORCREATE TABLE
Creates a new table. The HBase table and any column families referenced are created if they don't already exist. All table, column family and column names are uppercased unless they are double quoted in which case they are case sensitive. Column families that exist in the HBase table but are not listed are ignored. At create time, to improve query performance, an empty key value is added to the first column family of any existing rows or the default column family if no column families are explicitly defined. Upserts will also add this empty key value. This improves query performance by having a key value column we can guarantee always being there and thus minimizing the amount of data that must be projected and subsequently returned back to the client. HBase table and column configuration options may be passed through as key/value pairs to configure the HBase table as desired. Note that when using the IF NOT EXISTS clause, if a table already exists, then no change will be made to it. Additionally, no validation is done to check whether the existing table metadata matches the proposed table metadata. so it's better to use DROP TABLE followed by CREATE TABLE if the table metadata may be changing.
Example
CREATE TABLE my_schema.my_table ( id BIGINT not null primary key, date Date)
CREATE TABLE my_table ( id INTEGER not null primary key desc, date DATE not null,
    m.db_utilization DECIMAL, i.db_utilization)
    m.DATA_BLOCK_ENCODING='DIFF'
CREATE TABLE stats.prod_metrics ( host char(50) not null, created_date date not null,
    txn_count bigint CONSTRAINT pk PRIMARY KEY (host, created_date) )
CREATE TABLE IF NOT EXISTS "my_case_sensitive_table"
    ( "id" char(10) not null primary key, "value" integer)
    DATA_BLOCK_ENCODING='NONE',VERSIONS=5,MAX_FILESIZE=2000000 split on (?, ?, ?)
CREATE TABLE IF NOT EXISTS my_schema.my_table (
    org_id CHAR(15), entity_id CHAR(15), payload binary(1000),
    CONSTRAINT pk PRIMARY KEY (org_id, entity_id) )
    TTL=86400
DROP TABLE
Drops a table. The optional CASCADE keyword causes any views on the table to be dropped as well. When dropping a table, by default the underlying HBase data and index tables are dropped. The phoenix.schema.dropMetaData may be used to override this and keep the HBase table for point-in-time queries.
Example
DROP TABLE my_schema.my_table;
DROP TABLE IF EXISTS my_table;
DROP TABLE my_schema.my_table CASCADE;
CREATE FUNCTION
Creates a new function. The function name is uppercased unless they are double quoted in which case they are case sensitive. The function accepts zero or more arguments. The class name and jar path should be in single quotes. The jar path is optional and if not specified then the class name will be loaded from the jars present in directory configured for hbase.dynamic.jars.dir.
Example
CREATE FUNCTION my_reverse(varchar) returns varchar as 'com.mypackage.MyReverseFunction' using jar 'hdfs:/localhost:8080/hbase/lib/myjar.jar'
CREATE FUNCTION my_reverse(varchar) returns varchar as 'com.mypackage.MyReverseFunction'
CREATE FUNCTION my_increment(integer, integer constant defaultvalue='10') returns integer as 'com.mypackage.MyIncrementFunction' using jar '/hbase/lib/myincrement.jar'
CREATE TEMPORARY FUNCTION my_reverse(varchar) returns varchar as 'com.mypackage.MyReverseFunction' using jar 'hdfs:/localhost:8080/hbase/lib/myjar.jar'
DROP FUNCTION
Drops a function.
Example
DROP FUNCTION IF EXISTS my_reverse
DROP FUNCTION my_reverse
CREATE VIEW
Creates a new view over an existing HBase or Phoenix table. As expected, the WHERE expression is always automatically applied to any query run against the view. As with CREATE TABLE, the table, column family, and column names are uppercased unless they are double quoted. The newTableRef may refer directly to an HBase table, in which case, the table, column family, and column names must match the existing metadata exactly or an exception will occur. When a view is mapped directly to an HBase table, no empty key value will be added to rows and the view will be read-only. A view will be updatable (i.e. referenceable in a DML statement such as UPSERT or DELETE) if its WHERE clause expression contains only simple equality expressions separated by ANDs. Updatable views are not required to set the columns which appear in the equality expressions, as the equality expressions define the default values for those columns. If they are set, then they must match the value used in the WHERE clause, or an error will occur. All columns from the existingTableRef are included as columns in the new view as are columns defined in the columnDef list. An ALTER VIEW statement may be issued against a view to remove or add columns, however, no changes may be made to the primary key constraint. In addition, columns referenced in the WHERE clause are not allowed to be removed. Once a view is created for a table, that table may no longer altered or dropped until all of its views have been dropped.
Example
CREATE VIEW "my_hbase_table"
    ( k VARCHAR primary key, "v" UNSIGNED_LONG) default_column_family='a';
CREATE VIEW my_view ( new_col SMALLINT )
    AS SELECT * FROM my_table WHERE k = 100;
CREATE VIEW my_view_on_view
    AS SELECT * FROM my_view WHERE new_col > 70;
DROP VIEW
Drops a view. The optional CASCADE keyword causes any views derived from the view to be dropped as well. When dropping a view, the actual table data is not affected. However, index data for the view will be deleted.
Example
DROP VIEW my_view
DROP VIEW IF EXISTS my_schema.my_view
DROP VIEW IF EXISTS my_schema.my_view CASCADE
CREATE SEQUENCE
Creates a monotonically increasing sequence. START controls the initial sequence value while INCREMENT controls by how much the sequence is incremented after each call to NEXT VALUE FOR. By default, the sequence will start with 1 and be incremented by 1. Specify CYCLE to indicate that the sequence should continue to generate values after reaching either its MINVALUE or MAXVALUE. After an ascending sequence reaches its MAXVALUE, it generates its MINVALUE. After a descending sequence reaches its MINVALUE, it generates its MAXVALUE. CACHE controls how many sequence values will be reserved from the server, cached on the client, and doled out as need by subsequent NEXT VALUE FOR calls for that client connection to the cluster to save on RPC calls. If not specified, the phoenix.sequence.cacheSize config parameter defaulting to 100 will be used for the CACHE value.
Example
CREATE SEQUENCE my_sequence;
CREATE SEQUENCE my_sequence START WITH -1000
CREATE SEQUENCE my_sequence INCREMENT BY 10
CREATE SEQUENCE my_schema.my_sequence START 0 CACHE 10
DROP SEQUENCE
Drops a sequence.
Example
DROP SEQUENCE my_sequence
DROP SEQUENCE IF EXISTS my_schema.my_sequence
ALTER
Alters an existing table by adding or removing columns or updating table options. When a column is dropped from a table, the data in that column is deleted as well. PK columns may not be dropped, and only nullable PK columns may be added. For a view, the data is not affected when a column is dropped. Note that creating or dropping columns only affects subsequent queries and data modifications. Snapshot queries that are connected at an earlier timestamp will still use the prior schema that was in place when the data was written.
Example
ALTER TABLE my_schema.my_table ADD d.dept_id char(10) VERSIONS=10
ALTER TABLE my_table ADD dept_name char(50), parent_id char(15) null primary key
ALTER TABLE my_table DROP COLUMN d.dept_id, parent_id;
ALTER VIEW my_view DROP COLUMN new_col;
ALTER TABLE my_table SET IMMUTABLE_ROWS=true,DISABLE_WAL=true;
CREATE INDEX
Creates a new secondary index on a table or view. The index will be automatically kept in sync with the table as the data changes. At query time, the optimizer will use the index if it contains all columns referenced in the query and produces the most efficient execution plan. If a table has rows that are write-once and append-only, then the table may set the IMMUTABLE_ROWS property to true (either up-front in the CREATE TABLE statement or afterwards in an ALTER TABLE statement). This reduces the overhead at write time to maintain the index. Otherwise, if this property is not set on the table, then incremental index maintenance will be performed on the server side when the data changes. As of the 4.3 release, functional indexes are supported which allow arbitrary expressions rather than solely column names to be indexed. As of the 4.4.0 release, you can specify the ASYNC keyword to create the index using a map reduce job.
Example
CREATE INDEX my_idx ON sales.opportunity(last_updated_date DESC)
CREATE INDEX my_idx ON log.event(created_date DESC) INCLUDE (name, payload) SALT_BUCKETS=10
CREATE INDEX IF NOT EXISTS my_comp_idx ON server_metrics ( gc_time DESC, created_date DESC )
    DATA_BLOCK_ENCODING='NONE',VERSIONS=?,MAX_FILESIZE=2000000 split on (?, ?, ?)
CREATE INDEX my_idx ON sales.opportunity(UPPER(contact_name))
DROP INDEX
Drops an index from a table. When dropping an index, the data in the index is deleted. Note that since metadata is versioned, snapshot queries connecting at an earlier time stamp may still use the index, as the HBase table backing the index is not deleted.
Example
DROP INDEX my_idx ON sales.opportunity
DROP INDEX IF EXISTS my_idx ON server_metrics
ALTER INDEX
Alters the state of an existing index. DISABLE will cause the no further index maintenance to be performed on the index and it will no longer be considered for use in queries. REBUILD will completely rebuild the index and upon completion will enable the index to be used in queries again. UNUSABLE will cause the index to no longer be considered for use in queries, however index maintenance will continue to be performed. USABLE will cause the index to again be considered for use in queries. Note that a disabled index must be rebuild and cannot be set as USABLE.
Example
ALTER INDEX my_idx ON sales.opportunity DISABLE
ALTER INDEX IF EXISTS my_idx ON server_metrics REBUILD
EXPLAIN
Computes the logical steps necessary to execute the given command. Each step is represented as a string in a single column result set row.
Example
EXPLAIN SELECT NAME, COUNT(*) FROM TEST GROUP BY NAME HAVING COUNT(*) > 2;
EXPLAIN SELECT entity_id FROM CORE.CUSTOM_ENTITY_DATA WHERE organization_id='00D300000000XHP' AND SUBSTR(entity_id,1,3) = '002' AND created_date < CURRENT_DATE()-1;
UPDATE STATISTICS
Updates the statistics on the table and by default all of its associated index tables. To only update the table, use the COLUMNS option and to only update the INDEX, use the INDEX option. The statistics for a single index may also be updated by using its full index name for the tableRef. The default guidepost properties may be overridden by specifying their values after the SET keyword. Note that when a major compaction occurs, the default guidepost properties will be used again.
Example
UPDATE STATISTICS my_table
UPDATE STATISTICS my_schema.my_table INDEX
UPDATE STATISTICS my_index
UPDATE STATISTICS my_table COLUMNS
UPDATE STATISTICS my_table SET phoenix.stats.guidepost.width=50000000
CREATE SCHEMA
creates a schema and corresponding name-space in hbase. To enable namespace mapping, see namespace mapping
User that execute this command should have admin permissions to create namespace in HBase.
Example
CREATE SCHEMA IF NOT EXISTS my_schema
CREATE SCHEMA my_schema
USE
Sets a default schema for the connection and is used as a target schema for all statements issued from the connection that do not specify schema name explicitly. USE DEFAULT unset the schema for the connection so that no schema will be used for the statements issued from the connection.
schemaName should already be existed for the USE SCHEMA statement to succeed. see CREATE SCHEMA for creating schema.
Example
USE my_schema
USE DEFAULT
DROP SCHEMA
Drops a schema and corresponding name-space from hbase. To enable namespace mapping, see namespace mapping
This statement succeed only when schema doesn't hold any tables.
Example
DROP SCHEMA IF EXISTS my_schema
DROP SCHEMA my_schema
GRANT
Grant permissions at table, schema or user level. Permissions are managed by HBase in hbase:acl table, hence access controls need to be enabled. This feature will be available from Phoenix 4.14 version onwards.
Possible permissions are R - Read, W - Write, X - Execute, C - Create and A - Admin. To enable/disable access controls, see https://hbase.apache.org/docs/security/data-access#how-it-works
Permissions should be granted on base tables. It will be propagated to all its indexes and views. Group permissions are applicable to all users in the group and schema permissions are applicable to all tables with that schema. Grant statements without table/schema specified are assigned at GLOBAL level.
Phoenix doesn't expose Execute('X') functionality to end users. However, it is required for mutable tables with secondary indexes.
Important Note:
Every user requires 'RX' permissions on all Phoenix SYSTEM tables in order to work correctly. Users also require 'RWX' permissions on SYSTEM.SEQUENCE table for using SEQUENCES.
Example
GRANT 'RXC' TO 'User1'
GRANT 'RWXC' TO GROUP 'Group1'
GRANT 'A' ON Table1 TO 'User2'
GRANT 'RWX' ON my_schema.my_table TO 'User2'
GRANT 'A' ON SCHEMA my_schema TO 'User3'
REVOKE
Revoke permissions at table, schema or user level. Permissions are managed by HBase in hbase:acl table, hence access controls need to be enabled. This feature will be available from Phoenix 4.14 version onwards.
To enable/disable access controls, see https://hbase.apache.org/docs/security/data-access#how-it-works
Group permissions are applicable to all users in the group and schema permissions are applicable to all tables with that schema. Permissions should be revoked on base tables. It will be propagated to all its indexes and views. Revoke statements without table/schema specified are assigned at GLOBAL level.
Revoke removes all the permissions at that level.
Important Note:
Revoke permissions needs to be exactly at the same level as permissions assigned via GRANT permissions statement. Level refers to table, schema or user. Revoking any of 'RX' permissions on any Phoenix SYSTEM tables will cause exceptions. Revoking any of 'RWX' permissions on SYSTEM.SEQUENCE will cause exceptions while accessing sequences.
The examples below are for revoking permissions granted using the examples from GRANT statement above.
Example
REVOKE FROM 'User1'
REVOKE FROM GROUP 'Group1'
REVOKE ON Table1 FROM 'User2'
REVOKE ON my_schema.my_table FROM 'User2'
REVOKE ON SCHEMA my_schema FROM 'User3'
Other Grammar
Constraint
Defines a multi-part primary key constraint. Each column may be declared to be sorted in ascending or descending ordering. The default is ascending. One primary key column can also be designated as ROW_TIMESTAMP provided it is of one of the types: BIGINT, UNSIGNED_LONG, DATE, TIME and TIMESTAMP.
Example
CONSTRAINT my_pk PRIMARY KEY (host,created_date)
CONSTRAINT my_pk PRIMARY KEY (host ASC,created_date DESC)
CONSTRAINT my_pk PRIMARY KEY (host ASC,created_date DESC ROW_TIMESTAMP)
Options
Sets a built-in Phoenix table property or an HBase table or column descriptor metadata attribute. The name is case insensitive. If the name is a known HColumnDescriptor attribute, then the value is applied to the specified column family or, if omitted, to all column families. Otherwise, the HBase metadata attribute value is applied to the HTableDescriptor. Note that no validation is performed on the property name or value, so unknown or misspelled options will end up as adhoc metadata attributes values on the HBase table.
Built-in Phoenix table options include:
SALT_BUCKETS numeric property causes an extra byte to be transparently prepended to every row key to ensure an evenly distributed read and write load across all region servers. This is especially useful when your row key is always monotonically increasing and causing hot spotting on a single region server. However, even if it's not, it often improves performance by ensuring an even distribution of data across your cluster. The byte is determined by hashing the row key and modding it with the SALT_BUCKETS value. The value may be from 0 to 256, with 0 being a special means of turning salting off for an index in which the data table is salted (since by default an index has the same number of salt buckets as its data table). If split points are not defined for the table, the table will automatically be pre-split at each possible salt bucket value. For more information, see salted tables
DISABLE_WAL boolean option when true causes HBase not to write data to the write-ahead-log, thus making updates faster at the expense of potentially losing data in the event of a region server failure. This option is useful when updating a table which is not the source-of-truth and thus making the lose of data acceptable.
IMMUTABLE_ROWS boolean option when true declares that your table has rows which are write-once, append-only (i.e. the same row is never updated). With this option set, indexes added to the table are managed completely on the client-side, with no need to perform incremental index maintenance, thus improving performance. Deletes of rows in immutable tables are allowed with some restrictions if there are indexes on the table. Namely, the WHERE clause may not filter on columns not contained by every index. Upserts are expected to never update an existing row (failure to follow this will result in invalid indexes). For more information, see secondary indexing
MULTI_TENANT boolean option when true enables views to be created over the table across different tenants. This option is useful to share the same physical HBase table across many different tenants. For more information, see multi-tenancy
DEFAULT_COLUMN_FAMILY string option determines the column family used used when none is specified. The value is case sensitive. If this option is not present, a column family name of '0' is used.
STORE_NULLS boolean option (available as of Phoenix 4.3) determines whether or not null values should be explicitly stored in HBase. This option is generally only useful if a table is configured to store multiple versions in order to facilitate doing flashback queries (i.e. queries to look at the state of a record in the past).
TRANSACTIONAL option (available as of Phoenix 4.7) determines whether a table (and its secondary indexes) are tranactional. The default value is FALSE, but may be overridden with the phoenix.table.istransactional.default property. A table may be altered to become transactional, but it cannot be transitioned back to be non transactional. For more information on transactions, see transactions
UPDATE_CACHE_FREQUENCY option (available as of Phoenix 4.7) determines how often the server will be checked for meta data updates (for example, the addition or removal of a table column or the updates of table statistics). Possible values are ALWAYS (the default), NEVER, and a millisecond numeric value. An ALWAYS value will cause the client to check with the server each time a statement is executed that references a table (or once per commit for an UPSERT VALUES statement). A millisecond value indicates how long the client will hold on to its cached version of the metadata before checking back with the server for updates.
APPEND_ONLY_SCHEMA boolean option (available as of Phoenix 4.8) when true declares that columns will only be added but never removed from a table. With this option set we can prevent the RPC from the client to the server to fetch the table metadata when the client already has all columns declared in a CREATE TABLE/VIEW IF NOT EXISTS statement.
AUTO_PARTITION_SEQ string option (available as of Phoenix 4.8) when set on a base table determines the sequence used to automatically generate a WHERE clause with the first PK column and the unique identifier from the sequence for child views. With this option set, we prevent allocating a sequence in the event that the view already exists.
The GUIDE_POSTS_WIDTH option (available as of Phoenix 4.9) enables specifying a different guidepost width per table. The guidepost width determines the byte sized chunk of work over which a query will be parallelized. A value of 0 means that no guideposts should be collected for the table. A value of null removes any table specific guidepost setting, causing the global server-side phoenix.stats.guidepost.width config parameter to be used again. For more information, see the Statistics Collection page.
Example
IMMUTABLE_ROWS=true
DEFAULT_COLUMN_FAMILY='a'
SALT_BUCKETS=10
DATA_BLOCK_ENCODING='NONE',a.VERSIONS=10
MAX_FILESIZE=2000000000,MEMSTORE_FLUSHSIZE=80000000
UPDATE_CACHE_FREQUENCY=300000
GUIDE_POSTS_WIDTH=30000000
CREATE SEQUENCE id;
CREATE TABLE base_table (partition_id INTEGER, val DOUBLE) AUTO_PARTITION_SEQ=id;
CREATE VIEW my_view AS SELECT * FROM base_table;
The view statement for my_view will be : WHERE partition_id =  1
Hint
An advanced features that overrides default query processing behavior for decisions such as whether to use a range scan versus skip scan and an index versus no index. Note that strict parsing is not done on hints. If hints are misspelled or invalid, they are silently ignored.
Example
SKIP_SCAN,NO_INDEX
USE_SORT_MERGE_JOIN
NO_CACHE
INDEX(employee emp_name_idx emp_start_date_idx)
SMALL
Scan Hint
Use the SKIP_SCAN hint to force a skip scan to be performed on the query when it otherwise would not be. This option may improve performance if a query does not include the leading primary key column, but does include other, very selective primary key columns.
Use the RANGE_SCAN hint to force a range scan to be performed on the query. This option may improve performance if a query filters on a range for non selective leading primary key column along with other primary key columns
Example
SKIP_SCAN
RANGE_SCAN
Cache Hint
Use the NO_CACHE hint to prevent the results of the query from populating the HBase block cache. This is useful in situation where you're doing a full table scan and know that it's unlikely that the rows being returned will be queried again.
Example
NO_CACHEIndex Hint
Use the INDEX(<table_name> <index_name>...) to suggest which index to use for a given query. Double quotes may be used to surround a table_name and/or index_name to make them case sensitive. As of the 4.3 release, this will force an index to be used, even if it doesn't contain all referenced columns, by joining back to the data table to retrieve any columns not contained by the index.
Use the NO_INDEX hint to force the data table to be used for a query.
Use the USE_INDEX_OVER_DATA_TABLE hint to act as a tiebreaker for choosing the index table over the data table when all other criteria are equal. Note that this is the default optimizer decision.
Use the USE_DATA_OVER_INDEX_TABLE hint to act as a tiebreaker for choosing the data table over the index table when all other criteria are equal.
Example
INDEX(employee emp_name_idx emp_start_date_idx)
NO_INDEX
USE_INDEX_OVER_DATA_TABLE
USE_DATA_OVER_INDEX_TABLE
Small Hint
Use the SMALL hint to reduce the number of RPCs done between the client and server when a query is executed. Generally, if the query is a point lookup or returns data that is likely in a single data block (64 KB by default), performance may improve when using this hint.
Example
SMALLSeek To Column Hint
Use the SEEK_TO_COLUMN hint to force the server to seek to navigate between columns instead of doing a next. If there are many versions of the same column value or if there are many columns between the columns that are projected, then this may be more efficient.
Use the NO_SEEK_TO_COLUMN hint to force the server to do a next to navigate between columns instead of a seek. If there are few versions of the same column value or if the columns that are projected are adjacent to each other, then this may be more efficient.
Example
SEEK_TO_COLUMN
NO_SEEK_TO_COLUMN
Join Hint
Use the USE_SORT_MERGE_JOIN hint to force the optimizer to use a sort merge join instead of a broadcast hash join when both sides of the join are bigger than will fit in the server-side memory. Currently the optimizer will not make this determination itself, so this hint is required to override the default behavior of using a hash join.
Use the NO_STAR_JOIN hint to prevent the optimizer from using the star join query to broadcast the results of the querying one common table to all region servers. This is useful when the results of the querying the one common table is too large and would likely be substantially filtered when joined against one or more of the other joined tables.
Use the NO_CHILD_PARENT_JOIN_OPTIMIZATION hint to prevent the optimizer from doing point lookups between a child table (such as a secondary index) and a parent table (such as the data table) for a correlated subquery.
Example
NO_STAR_JOINSerial Hint
Use the SERIAL hint to force a query to be executed serially as opposed to being parallelized along the guideposts and region boundaries.
Example
SERIALColumn Def
Define a new primary key column. The column name is case insensitive by default and case sensitive if double quoted. The sort order of a primary key may be ascending (ASC) or descending (DESC). The default is ascending. You may also specify a default value (Phoenix 4.9 or above) for the column with a constant expression. If the column is the only column that forms the primary key, then it can be designated as ROW_TIMESTAMP column provided its data type is one of these: BIGINT, UNSIGNED_LONG, DATE, TIME and TIMESTAMP.
Example
id char(15) not null primary key
key integer null
m.response_time bigint

created_date date not null primary key row_timestamp
key integer null
m.response_time bigint
Table Ref
References a table or view with an optional schema name qualifier
Example
Sales.Contact
HR.Employee
Department
Sequence Ref
References a sequence with an optional schema name qualifier
Example
my_id_generator
my_seq_schema.id_generator
Column Ref
References a column with an optional family name qualifier
Example
e.salary
dept_name
Select Expression
An expression in a SELECT statement. All columns in a table may be selected using , and all columns in a column family may be selected using <familyName>..
Example
*
cf.*
ID AS VALUE
VALUE + 1 VALUE_PLUS_ONE
Select Statement
Selects data from a table. DISTINCT filters out duplicate results while ALL, the default, includes all results. FROM identifies the table being queried. Columns may be dynamically defined in parenthesis after the table name and then used in the query. Joins are processed in reverse order through a broadcast hash join mechanism. For best performance, order tables from largest to smallest in terms of how many rows you expect to be used from each table. GROUP BY groups the result by the given expression(s). HAVING filters rows after grouping. An optional hint may be used to override decisions made by the query optimizer.
Example
SELECT * FROM TEST;
SELECT DISTINCT NAME FROM TEST;
SELECT ID, COUNT(1) FROM TEST GROUP BY ID;
SELECT NAME, SUM(VAL) FROM TEST GROUP BY NAME HAVING COUNT(1) > 2;
SELECT d.dept_id,e.dept_id,e.name FROM DEPT d JOIN EMPL e ON e.dept_id = d.dept_id;
Split Point
Defines a split point for a table. Use a bind parameter with preparedStatement.setBinary(int,byte[]) to supply arbitrary bytes.
Example
'A'Table Spec
An optionally aliased table reference, or an optionally aliased select statement in paranthesis.
Example
PRODUCT_METRICS AS PM
PRODUCT_METRICS(referrer VARCHAR)
( SELECT feature FROM PRODUCT_METRICS ) AS PM
Aliased Table Ref
A reference to an optionally aliased table optionally followed by dynamic column definitions.
Example
PRODUCT_METRICS AS PM
PRODUCT_METRICS(referrer VARCHAR)
PRODUCT_METRICS TABLESAMPLE (12.08)
Join Type
The type of join
Example
INNER
LEFT OUTER
RIGHT
Func Argument
The function argument is sql data type. It can be constant and also we can provide default,min and max values for the argument in single quotes.
Example
VARCHAR
INTEGER DEFAULTVALUE='100'
INTEGER CONSTANT DEFAULTVALUE='10' MINVALUE='1' MAXVALUE='15'
Class Name
Canonical class name in single quotes.
Example
'com.mypackage.MyReverseFunction'Jar Path
Hdfs path of jar in single quotes.
Example
'hdfs://localhost:8080:/hbase/lib/myjar.jar'
'/tmp/lib/myjar.jar'
Order
Sorts the result by an expression.
Example
NAME DESC NULLS LASTExpression
Value or condition.
Example
ID=1 OR NAME='Hi'And Condition
Condition separated by AND.
Example
FOO!='bar' AND ID=1Boolean Condition
Boolean condition.
Example
ID=1 AND NAME='Hi'Condition
Boolean value or condition. When comparing with LIKE, the wildcards characters are "" (any one character) and "%" (any characters). ILIKE is the same, but the search is case insensitive. To search for the characters "%" and "", the characters need to be escaped. The escape character is " \ " (backslash). Patterns that end with an escape character are invalid and the expression returns NULL. BETWEEN does an inclusive comparison for both operands.
Example
FOO = 'bar'
NAME LIKE 'Jo%'
IN (1, 2, 3)
NOT EXISTS (SELECT 1 FROM FOO WHERE BAR < 10)
N BETWEEN 1 and 100
RHS Operand
Right-hand side operand
Example
s.my_col
ANY(my_col + 1)
ALL(select foo from bar where bas > 5)
Operand
A string concatenation.
Example
'foo'|| sSummand
An addition or subtraction of numeric or date type values
Example
a + b
a - b
Factor
A multiplication, division, or modulus of numeric type values.
Example
c * d
e / 5
f % 10
Term
A term which may use subscript notation if it's an array.
Example
'Hello'
23
my_array[my_index]
array_col[1]
Array Constructor
Constructs an ARRAY out of the list of expressions.
Example
ARRAY[1.0,2.2,3.3]
ARRAY['foo','bas']
ARRAY[col1,col2,col3+1,?]
Sequence
Gets the CURRENT or NEXT value for a sequence, a monotonically incrementing BIGINT value. Each call to NEXT VALUE FOR increments the sequence value and returns the current value. The NEXT <n> VALUES syntax may be used to reserve <n> consecutive sequence values. A sequence is only increment once for a given statement, so multiple references to the same sequence by NEXT VALUE FOR produce the same value. Use CURRENT VALUE FOR to access the last sequence allocated with NEXT VALUE FOR for cluster connection of your client. If no NEXT VALUE FOR had been previously called, an error will occur. These calls are only allowed in the SELECT expressions or UPSERT VALUES expressions.
Example
NEXT VALUE FOR my_table_id
NEXT 5 VALUES FOR my_table_id
CURRENT VALUE FOR my_schema.my_id_generator
Cast
The CAST operator coerces the given expression to a different dataType. This is useful, for example, to convert a BIGINT or INTEGER to a DECIMAL or DOUBLE to prevent truncation to a whole number during arithmetic operations. It is also useful to coerce from a more precise type to a less precise type since this type of coercion will not automatically occur, for example from a TIMESTAMP to a DATE. If the coercion is not possible, an error will occur.
Example
CAST ( my_int AS DECIMAL )
CAST ( my_timestamp AS DATE )
Row Value Constructor
A row value constructor is a list of other terms which are treated together as a kind of composite structure. They may be compared to each other or to other other terms. The main use case is 1) to enable efficiently stepping through a set of rows in support of query-more type functionality, or 2) to allow IN clause to perform point gets on composite row keys.
Example
(col1, col2, 5)Bind Parameter
A parameters can be indexed, for example ":1" meaning the first parameter.
Example
:1
?
Value
A literal value of any data type, or null.
Example
10Case
Returns the first expression where the value is equal to the test expression. If no else part is specified, return NULL.
Example
CASE CNT WHEN 0 THEN 'No' WHEN 1 THEN 'One' ELSE 'Some' ENDCase When
Returns the first expression where the condition is true. If no else part is specified, return NULL.
Example
CASE WHEN CNT<10 THEN 'Low' ELSE 'High' ENDName
Unquoted names are not case sensitive. There is no maximum name length.
Example
my_columnQuoted Name
Quoted names are case sensitive, and can contain spaces. There is no maximum name length. Two double quotes can be used to create a single double quote inside an identifier.
Example
"first-name"Alias
An alias is a name that is only valid in the context of the statement.
Example
ANull
NULL is a value without data type and means 'unknown value'.
Example
NULLData Type
A type name optionally declared as an array. An array is mapped to "java.sql.Array". Only single dimension arrays are supported and varbinary arrays are not allowed.
Example
CHAR(15)
VARCHAR
DECIMAL(10,2)
DOUBLE
DATE
VARCHAR ARRAY
CHAR(10) ARRAY [5]
INTEGER []
SQL Data Type
A standard SQL data type.
Example
TINYINT
CHAR(15)
VARCHAR
VARCHAR(1000)
DECIMAL(10,2)
DOUBLE
INTEGER
BINARY(200)
DATE
HBase Data Type
A type that maps to a native primitive HBase value serialized through the Bytes.toBytes() utility methods. Only positive values are allowed.
Example
UNSIGNED_INT
UNSIGNED_DATE
UNSIGNED_LONG
String
A string starts and ends with a single quote. Two single quotes can be used to create a single quote inside a string.
Example
'John''s car'Boolean
A boolean value.
Example
TRUENumeric
The data type of a numeric value is always the lowest possible for the given value. If the number contains a dot this is decimal; otherwise it is int, long, or decimal (depending on the value).
Example
SELECT -10.05
SELECT 5
SELECT 12345678912345
Int
The maximum integer number is 2147483647, the minimum is -2147483648.
Example
10Long
Long numbers are between -9223372036854775808 and 9223372036854775807.
Example
100000Decimal
A decimal number with fixed precision and scale. Internally, java.lang.BigDecimal is used.
Example
SELECT -10.5Number
The maximum length of the number depends on the data type used.
Example
100Comments
Comments can be used anywhere in a command and are ignored by the database. Line comments end with a newline. Block comments cannot be nested, but can be multiple lines long.
Example
// This is a commentSQL Functions
Functions (Aggregate)
AVG
The average (mean) value. If no rows are selected, the result is NULL. Aggregates are only allowed in select statements. The returned value is of the same data type as the parameter.
Example
AVG(X)COUNT
The count of all row, or of the non-null values. This method returns a long. When DISTINCT is used, it counts only distinct values. If no rows are selected, the result is 0. Aggregates are only allowed in select statements.
Example
COUNT(*)APPROX_COUNT_DISTINCT
The approximate distinct count of all row, or of the non-null values. The relative error of approximation by default is less than 0.00405 This method returns a long. If no rows are selected, the result is 0. Aggregates are only allowed in select statements.
Example
APPROX_COUNT_DISTINCT(*)MAX
The highest value. If no rows are selected, the result is NULL. Aggregates are only allowed in select statements. The returned value is of the same data type as the parameter.
Example
MAX(NAME)MIN
The lowest value. If no rows are selected, the result is NULL. Aggregates are only allowed in select statements. The returned value is of the same data type as the parameter.
Example
MIN(NAME)SUM
The sum of all values. If no rows are selected, the result is NULL. Aggregates are only allowed in select statements. The returned value is of the same data type as the parameter.
Example
SUM(X)PERCENTILE_CONT
The nth percentile of values in the column. The percentile value can be between 0 and 1 inclusive. Aggregates are only allowed in select statements. The returned value is of decimal data type.
Example
PERCENTILE_CONT( 0.9 ) WITHIN GROUP (ORDER BY X ASC)PERCENTILE_DISC
PERCENTILE_DISC is an inverse distribution function that assumes a discrete distribution model. It takes a percentile value and a sort specification and returns an element from the set. Nulls are ignored in the calculation.
Example
PERCENTILE_DISC( 0.9 ) WITHIN GROUP (ORDER BY X DESC)PERCENT_RANK
The percentile rank for a hypothetical value, if inserted into the column. Aggregates are only allowed in select statements. The returned value is of decimal data type.
Example
PERCENT_RANK( 100 ) WITHIN GROUP (ORDER BY X ASC)FIRST_VALUE
The first value in each distinct group ordered according to the ORDER BY specification.
Example
FIRST_VALUE( name ) WITHIN GROUP (ORDER BY salary DESC)LAST_VALUE
The last value in each distinct group ordered according to the ORDER BY specification.
Example
LAST_VALUE( name ) WITHIN GROUP (ORDER BY salary DESC)FIRST_VALUES
Returns an array of at most the given numeric size of the first values in each distinct group ordered according to the ORDER BY specification.
Example
FIRST_VALUES( name, 3 ) WITHIN GROUP (ORDER BY salary DESC)LAST_VALUES
Returns an array of at most the given numeric size of the last values in each distinct group ordered according to the ORDER BY specification.
Example
LAST_VALUES( name, 3 ) WITHIN GROUP (ORDER BY salary DESC)NTH_VALUE
The nth value in each distinct group ordered according to the ORDER BY specification.
Example
NTH_VALUE( name, 2 ) WITHIN GROUP (ORDER BY salary DESC)STDDEV_POP
The population standard deviation of all values. Aggregates are only allowed in select statements. The returned value is of decimal data type.
Example
STDDEV_POP( X )STDDEV_SAMP
The sample standard deviation of all values. Aggregates are only allowed in select statements. The returned value is of decimal data type.
Example
STDDEV_SAMP( X )Functions (Numeric)
ROUND
Rounds the numeric or timestamp expression to the nearest scale or time unit specified. If the expression is a numeric type, then the second argument is the scale to be used for rounding off the number, defaulting to zero. If the expression is a date/time type, then the second argument may be one of the time units listed to determine the remaining precision of the date/time. A default of MILLISECONDS is used if not present. The multiplier is only applicable for a date/time type and is used to round to a multiple of a time unit (i.e. 10 minute) and defaults to 1 if not specified. This method returns the same type as its first argument.
Example
ROUND(number)
ROUND(number, 2)
ROUND(timestamp)
ROUND(time, 'HOUR')
ROUND(date, 'MINUTE', 30)
CEIL
Same as ROUND, except it rounds any fractional value up to the next even multiple.
Example
CEIL(number, 3)
CEIL(2.34)
CEIL(timestamp, 'SECOND', 30)
CEIL(date, 'DAY', 7)
FLOOR
Same as ROUND, except it rounds any fractional value down to the previous even multiple.
Example
FLOOR(timestamp)
FLOOR(date, 'DAY', 7)
TRUNC
Same as FLOOR
Example
TRUNC(timestamp, 'SECOND', 30)
TRUNC(date, 'DAY', 7)
TO_NUMBER
Formats a string or date/time type as a number, optionally accepting a format string. For details on the format, see java.text.DecimalFormat. For date, time, and timeStamp terms, the result is the time in milliseconds since the epoch. This method returns a decimal number.
Example
TO_NUMBER('$123.33', '\u00A4###.##')RAND
Function that produces a random, uniformly distributed double value between 0.0 (inclusive) and 1.0 (exclusive). If a seed is provided, then the the returned value is identical across each invocation for the same row. If a seed is not provided, then the returned value is different for each invocation. The seed must be a constant.
Example
RAND()
RAND(5)
Functions (String)
SUBSTR
Returns a substring of a string starting at the one-based position. If zero is used, the position is zero-based. If the start index is negative, then the start index is relative to the end of the string. The length is optional and if not supplied, the rest of the string will be returned.
Example
SUBSTR('[Hello]', 2, 5)
SUBSTR('Hello World', -5)
INSTR
Returns the one-based position of the initial occurrence of the second argument in the first argument. If the second argument is not contained in the first argument, then zero is returned.
Example
INSTR('Hello World', 'World')
INSTR('Simon says', 'mon')
INSTR('Peace on earth', 'war')
TRIM
Removes leading and trailing spaces from the input string.
Example
TRIM(' Hello ')LTRIM
Removes leading spaces from the input string.
Example
LTRIM(' Hello')RTRIM
Removes trailing spaces from the input string.
Example
RTRIM('Hello ')LPAD
Pads the string expression with the specific pad character (space by default) up to the length argument.
Example
LPAD('John',30)LENGTH
Returns the length of the string in characters.
Example
LENGTH('Hello')REGEXP_SUBSTR
Returns a substring of a string by applying a regular expression start from the offset of a one-based position. Just like with SUBSTR, if the start index is negative, then it is relative to the end of the string. If not specified, the start index defaults to 1.
Example
REGEXP_SUBSTR('na1-appsrv35-sj35', '[^-]+') evaluates to 'na1'REGEXP_REPLACE
Returns a string by applying a regular expression and replacing the matches with the replacement string. If the replacement string is not specified, it defaults to an empty string.
Example
REGEXP_REPLACE('abc123ABC', '[0-9]+', '#') evaluates to 'abc#ABC'REGEXP_SPLIT
Splits a string into a VARCHAR ARRAY using a regular expression. If characters that have a special meaning in regular expressions are to be used as a regular delimiter in the pattern string, they must be escaped with backslashes.
Example
REGEXP_SPLIT('ONE,TWO,THREE', ',') evaluates to ARRAY['ONE', 'TWO', 'THREE']
REGEXP_SPLIT('ONE!#TWO#,!THREE', '[,!#]+') evaluates to ARRAY['ONE', 'TWO', 'THREE']
UPPER
Returns upper case string of the string argument. If localeString (available in Phoenix 4.14) is provided, it identifies the locale whose rules are used for the conversion. If localeString is not provided, the default locale is used. The localeString must be of the form returned by the Java 6 implementation of java.util.Locale.toString() e.g. 'zh_TW_STROKE' or 'en_US' or 'fr_FR'.
Example
UPPER('Hello')
UPPER('Hello', 'tr_TR')
LOWER
Returns lower case string of the string argument. If localeString (available in Phoenix 4.14) is provided, it identifies the locale whose rules are used for the conversion. If localeString is not provided, the default locale is used. The localeString must be of the form returned by the Java 6 implementation of java.util.Locale.toString() e.g. 'zh_TW_STROKE' or 'en_US' or 'fr_FR'.
Example
LOWER('HELLO')
LOWER('HELLO', 'en_US')
REVERSE
Returns reversed string of the string argument.
Example
REVERSE('Hello')TO_CHAR
Formats a date, time, timestamp, or number as a string. The default date format is "yyyy-MM-dd HH:mm:ss" and the default number format is "#,##0.###". For details, see java.text.SimpleDateFormat for date/time values and java.text.DecimalFormat for numbers. This method returns a string.
Example
TO_CHAR(myDate, '2001-02-03 04:05:06')
TO_CHAR(myDecimal, '#,##0.###')
COLLATION_KEY
Calculates a collation key that can be used to sort strings in a natural-language-aware way. The localeString must be of the form returned by the Java 6 implementation of java.util.Locale.toString() e.g. 'zh_TW_STROKE' or 'en_US' or 'fr_FR'. The third, fourth and fifth arguments are optional and determine respectively whether to use a special upper-case collator, the strength value of the collator, and the decomposition value of the collator. (See java.text.Collator to learn about strength and decomposition).
Example
SELECT NAME FROM EMPLOYEE ORDER BY COLLATION_KEY(NAME, 'zh_TW')Functions (Array)
ARRAY_ELEM
Alternative to using array subscript notation to access an array element. Returns the element in the array at the given position. The position is one-based.
Example
ARRAY_ELEM(my_array_col, 5)
ARRAY_ELEM(ARRAY[1,2,3], 1)
ARRAY_LENGTH
Returns the current length of the array.
Example
ARRAY_LENGTH(my_array_col)
ARRAY_LENGTH(ARRAY[1,2,3])
ARRAY_APPEND
Appends the given element to the end of the array.
Example
ARRAY_APPEND(my_array_col, my_element_col)
ARRAY_APPEND(ARRAY[1,2,3], 4) evaluates to ARRAY[1,2,3,4]
ARRAY_PREPEND
Appends the given element to the beginning of the array.
Example
ARRAY_PREPEND(my_element_col, my_array_col)
ARRAY_PREPEND(0, ARRAY[1,2,3]) evaluates to ARRAY[0,1,2,3]
ARRAY_CAT
Concatenates the input arrays and returns the result.
Example
ARRAY_CAT(my_array_col1, my_array_col2)
ARRAY_CAT(ARRAY[1,2], ARRAY[3,4]) evaluates to ARRAY[1,2,3,4]
ARRAY_FILL
Returns an array initialized with supplied value and length.
Example
ARRAY_FILL(my_element_col, my_length_col)
ARRAY_FILL(1, 3) evaluates to ARRAY[1,1,1]
ARRAY_TO_STRING
Concatenates array elements using supplied delimiter and optional null string and returns the resulting string. If the nullString parameter is omitted or NULL, any null elements in the array are simply skipped and not represented in the output string.
Example
ARRAY_TO_STRING(my_array_col, my_delimiter_col, my_null_string_col)
ARRAY_TO_STRING(ARRAY['a','b','c'], ',') evaluates to 'a,b,c'
ARRAY_TO_STRING(ARRAY['a','b',null,'c'], ',') evaluates to 'a,b,c'
ARRAY_TO_STRING(ARRAY['a','b',null,'c'], ',', 'NULL') evaluates to 'a,b,NULL,c'
ANY
Used on the right-hand side of a comparison expression to test that any array element satisfies the comparison expression against the left-hand side.
Example
1 = ANY(my_array)
10 > ANY(my_array)
ALL
Used on the right-hand side of a comparison expression to test that all array elements satisfy the comparison expression against the left-hand side. of the array.
Example
1 = ALL(my_array)
10 > ALL(my_array)
Functions (General)
MD5
Computes the MD5 hash of the argument, returning the result as a BINARY(16).
Example
MD5(my_column)INVERT
Inverts the bits of the argument. The return type will be the same as the argument.
Example
INVERT(my_column)ENCODE
Encodes the expression according to the encoding format provided and returns the resulting string. For 'BASE62', converts the given base 10 number to a base 62 number and returns a string representing the number.
Example
ENCODE(myNumber, 'BASE62')DECODE
Decodes the expression according to the encoding format provided and returns the resulting value as a VARBINARY. For 'HEX', converts the hex string expression to its binary representation, providing a mechanism for inputting binary data through the console.
Example
DECODE('000000008512af277ffffff8', 'HEX')COALESCE
Returns the value of the first argument if not null and the second argument otherwise. Useful to guarantee that a column in an UPSERT SELECT command will evaluate to a non null value.
Example
COALESCE(last_update_date, CURRENT_DATE())GET_BIT
Retrieves the bit at the given index in the given binary value.
Example
GET_BIT(CAST('FFFF' as BINARY), 1)GET_BYTE
Retrieves the byte at the given index in the given binary value.
Example
GET_BYTE(CAST('FFFF' as BINARY), 1)OCTET_LENGTH
Returns the number of bytes in a binary value.
Example
OCTET_LENGTH(NAME)SET_BIT
Replaces the bit at the given index in the binary value with the provided newValue.
Example
SET_BIT(CAST('FFFF' as BINARY), 1, 61)SET_BYTE
Replaces the byte at the given index in the binary value with the provided newValue.
Example
SET_BYTE(CAST('FFFF' as BINARY), 1, 61)Functions (Time and Date)
TO_DATE
Parses a string and returns a date. Note that the returned date is internally represented as the number of milliseconds since the java epoch. The most important format characters are: y year, M month, d day, H hour, m minute, s second. The default format string is "yyyy-MM-dd HH:mm:ss". For details of the format, see java.text.SimpleDateFormat. By default, GMT will be used as the time zone when parsing the date. However, a time zone id can also be supplied. This is a time zone id such as 'GMT+1'. If 'local' is provided as the time zone id, the local time zone will be used for parsing. The configuration setting "phoenix.query.dateFormatTimeZone" can also be set to a time zone id, which will cause the default of GMT to be overridden with the configured time zone id. Please see the Data Type reference guide about how Apache Phoenix presently defines the DATE datatype. Additionally, Phoenix supports the ANSI SQL "date" literal which acts similarly to the single-argument "TO_DATE" function.
Example
TO_DATE('Sat, 3 Feb 2001 03:05:06 GMT', 'EEE, d MMM yyyy HH:mm:ss z')
TO_DATE('1970-01-01', 'yyyy-MM-dd', 'GMT+1')
date '1970-01-01 12:30:00'
CURRENT_DATE
Returns the current server-side date, bound at the start of the execution of a query based on the current time on the region server owning the metadata of the table being queried. Please see the Data Type reference guide about how Apache Phoenix presently defines the DATE datatype.
Example
CURRENT_DATE()TO_TIME
Converts the given string into a TIME instance. When a date format is not provided it defaults to "yyyy-MM-dd HH:mm:ss.SSS" or whatever is defined by the configuration property phoenix.query.dateFormat. The configuration setting phoenix.query.dateFormatTimeZone can also be set to a time zone id, which will cause the default of GMT to be overridden with the configured time zone id. Additionally, Phoenix supports the ANSI SQL "time" literal which acts similarly to the single-argument "TO_TIME" function.
Example
TO_TIME('2005-10-01 14:03:22.559')
TO_TIME('1970-01-01', 'yyyy-MM-dd', 'GMT+1')
time '2005-10-01 14:03:22.559'
TO_TIMESTAMP
Converts the given string into a TIMESTAMP instance. When a date format is not provided it defaults to "yyyy-MM-dd HH:mm:ss.SSS" or whatever is defined by the configuration property phoenix.query.dateFormat. The configuration setting phoenix.query.dateFormatTimeZone can also be set to a time zone id, which will cause the default of GMT to be overridden with the configured time zone id. Additionally, Phoenix supports the ANSI SQL "timestamp" literal which acts similarly to the single-argument "TO_TIMESTAMP" function.
Example
TO_TIMESTAMP('2005-10-01 14:03:22.559')
TO_TIMESTAMP('1970-01-01', 'yyyy-MM-dd', 'GMT+1')
timestamp '2005-10-01 14:03:22.559'
CURRENT_TIME
Same as CURRENT_DATE(), except returns a value of type TIME. In either case, the underlying representation is the epoch time as a long value. Please see the Data Type reference guide about how Apache Phoenix presently defines the TIME datatype.
Example
CURRENT_TIME()CONVERT_TZ
Converts date/time from one time zone to another returning the shifted date/time value.
Example
CONVERT_TZ(myDate, 'UTC', 'Europe/Prague')TIMEZONE_OFFSET
Returns offset (shift in minutes) of a time zone at particular date/time in minutes.
Example
TIMEZONE_OFFSET('Indian/Cocos', myDate)NOW
Returns the current date, bound at the start of the execution of a query based on the current time on the region server owning the metadata of the table being queried.
Example
NOW()YEAR
Returns the year of the specified date.
Example
YEAR(TO_DATE('2015-6-05'))MONTH
Returns the month of the specified date.
Example
MONTH(TO_TIMESTAMP('2015-6-05'))WEEK
Returns the week of the specified date.
Example
WEEK(TO_TIME('2010-6-15'))DAYOFYEAR
Returns the day of the year of the specified date.
Example
DAYOFYEAR(TO_DATE('2004-01-18 10:00:10'))DAYOFMONTH
Returns the day of the month of the specified date.
Example
DAYOFMONTH(TO_DATE('2004-01-18 10:00:10'))DAYOFWEEK
Returns the day of the week of the specified date.
Example
DAYOFWEEK(TO_DATE('2004-01-18 10:00:10'))HOUR
Returns the hour of the specified date.
Example
HOUR(TO_TIMESTAMP('2015-6-05'))MINUTE
Returns the minute of the specified date.
Example
MINUTE(TO_TIME('2015-6-05'))SECOND
Returns the second of the specified date.
Example
SECOND(TO_DATE('2015-6-05'))Functions (Math)
SIGN
Returns the signum function of the given numeric expression as an INTEGER. The return value is -1 if the given numeric expression is negative; 0 if the given numeric expression is zero; and 1 if the given numeric expression is positive.
Example
SIGN(number)
SIGN(1.1)
SIGN(-1)
ABS
Returns the absolute value of the given numeric expression maintaining the same type.
Example
ABS(number)
ABS(1.1)
ABS(-1)
SQRT
Returns the correctly rounded square root of the given non-negative numeric expression as a DOUBLE.
Example
SQRT(number)
SQRT(1.1)
CBRT
Returns the cube root of the given numeric expression as a DOUBLE.
Example
CBRT(number)
CBRT(1.1)
CBRT(-1)EXP
Returns Euler's number e raised to the power of the given numeric value as a DOUBLE.
Example
EXP(number)
EXP(1.1)
EXP(-1)POWER
Returns the value of the first argument raised to the power of the second argument as a DOUBLE.
Example
POWER(number, number)
POWER(3, 2)
POWER(2, 3)LN
Returns the natural logarithm (base e) of the given positive expression as a DOUBLE.
Example
LN(number)
LN(3)
LN(2)LOG
Returns the logarithm of the first argument computed at the base of the second argument as a DOUBLE. If omitted, a base of 10 will be used for the second argument.
Example
LOG(3, 2)
LOG(2, 3)
LOG(2)Data Types
Data Types
INTEGER Type
Possible values: -2147483648 to 2147483647.
Mapped to java.lang.Integer. The binary representation is a 4 byte integer with the sign bit flipped (so that negative values sorts before positive values).
Example
INTEGERUNSIGNED_INT Type
Possible values: 0 to 2147483647. Mapped to java.lang.Integer. The binary representation is a 4 byte integer, matching the Bytes.toBytes(int) method. The purpose of this type is to map to existing HBase data that was serialized using this HBase utility method. If that is not the case, use the regular signed type instead.
Example
UNSIGNED_INTBIGINT Type
Possible values: -9223372036854775808 to 9223372036854775807. Mapped to java.lang.Long. The binary representation is an 8 byte long with the sign bit flipped (so that negative values sorts before positive values).
Example
BIGINTUNSIGNED_LONG Type
Possible values: 0 to 9223372036854775807. Mapped to java.lang.Long. The binary representation is an 8 byte integer, matching the Bytes.toBytes(long) method. The purpose of this type is to map to existing HBase data that was serialized using this HBase utility method. If that is not the case, use the regular signed type instead.
Example
UNSIGNED_LONGTINYINT Type
Possible values: -128 to 127. Mapped to java.lang.Byte. The binary representation is a single byte, with the sign bit flipped (so that negative values sorts before positive values).
Example
TINYINTUNSIGNED_TINYINT Type
Possible values: 0 to 127. Mapped to java.lang.Byte. The binary representation is a single byte, matching the Bytes.toBytes(byte) method. The purpose of this type is to map to existing HBase data that was serialized using this HBase utility method. If that is not the case, use the regular signed type instead.
Example
UNSIGNED_TINYINTSMALLINT Type
Possible values: -32768 to 32767. Mapped to java.lang.Short. The binary representation is a 2 byte short with the sign bit flipped (so that negative values sort before positive values).
Example
SMALLINTUNSIGNED_SMALLINT Type
Possible values: 0 to 32767. Mapped to java.lang.Short. The binary representation is an 2 byte integer, matching the Bytes.toBytes(short) method. The purpose of this type is to map to existing HBase data that was serialized using this HBase utility method. If that is not the case, use the regular signed type instead.
Example
UNSIGNED_SMALLINTFLOAT Type
Possible values: -3.402823466 E + 38 to 3.402823466 E + 38. Mapped to java.lang.Float. The binary representation is an 4 byte float with the sign bit flipped (so that negative values sort before positive values).
Example
FLOATUNSIGNED_FLOAT Type
Possible values: 0 to 3.402823466 E + 38. Mapped to java.lang.Float. The binary representation is an 4 byte float matching the Bytes.toBytes(float) method. The purpose of this type is to map to existing HBase data that was serialized using this HBase utility method. If that is not the case, use the regular signed type instead.
Example
UNSIGNED_FLOATDOUBLE Type
Possible values: -1.7976931348623158 E + 308 to 1.7976931348623158 E + 308. Mapped to java.lang.Double. The binary representation is an 8 byte double with the sign bit flipped (so that negative values sort before positive value).
Example
DOUBLEUNSIGNED_DOUBLE Type
Possible values: 0 to 1.7976931348623158 E + 308. Mapped to java.lang.Double. The binary representation is an 8 byte double matching the Bytes.toBytes(double) method. The purpose of this type is to map to existing HBase data that was serialized using this HBase utility method. If that is not the case, use the regular signed type instead.
Example
UNSIGNED_DOUBLEDECIMAL Type
Data type with fixed precision and scale. A user can specify precision and scale by expression DECIMAL(precision,scale) in a DDL statement, for example, DECIMAL(10,2). The maximum precision is 38 digits. Mapped to java.math.BigDecimal. The binary representation is binary comparable, variable length format. When used in a row key, it is terminated with a null byte unless it is the last column.
Example
DECIMAL
DECIMAL(10,2)BOOLEAN Type
Possible values: TRUE and FALSE.
Mapped to java.lang.Boolean. The binary representation is a single byte with 0 for false and 1 for true
Example
BOOLEANTIME Type
The time data type. The format is yyyy-MM-dd hh:mm:ss, with both the date and time parts maintained. Mapped to java.sql.Time. The binary representation is an 8 byte long (the number of milliseconds from the epoch), making it possible (although not necessarily recommended) to store more information within a TIME column than what is provided by "java.sql.Time". Note that the internal representation is based on a number of milliseconds since the epoch (which is based on a time in GMT), while "java.sql.Time" will format times based on the client's local time zone. Please note that this TIME type is different than the TIME type as defined by the SQL 92 standard in that it includes year, month, and day components. As such, it is not in compliance with the JDBC APIs. As the underlying data is still stored as a long, only the presentation of the value is incorrect.
Example
TIMEDATE Type
The date data type. The format is yyyy-MM-dd hh:mm:ss, with both the date and time parts maintained to a millisecond accuracy. Mapped to java.sql.Date. The binary representation is an 8 byte long (the number of milliseconds from the epoch), making it possible (although not necessarily recommended) to store more information within a DATE column than what is provided by "java.sql.Date". Note that the internal representation is based on a number of milliseconds since the epoch (which is based on a time in GMT), while "java.sql.Date" will format dates based on the client's local time zone. Please note that this DATE type is different than the DATE type as defined by the SQL 92 standard in that it includes a time component. As such, it is not in compliance with the JDBC APIs. As the underlying data is still stored as a long, only the presentation of the value is incorrect.
Example
DATETIMESTAMP Type
The timestamp data type. The format is yyyy-MM-dd hh:mm:ss[.nnnnnnnnn]. Mapped to java.sql.Timestamp with an internal representation of the number of nanos from the epoch. The binary representation is 12 bytes: an 8 byte long for the epoch time plus a 4 byte integer for the nanos. Note that the internal representation is based on a number of milliseconds since the epoch (which is based on a time in GMT), while "java.sql.Timestamp" will format timestamps based on the client's local time zone.
Example
TIMESTAMPUNSIGNED_TIME Type
The unsigned time data type. The format is yyyy-MM-dd hh:mm:ss, with both the date and time parts maintained to the millisecond accuracy. Mapped to java.sql.Time. The binary representation is an 8 byte long (the number of milliseconds from the epoch) matching the HBase.toBytes(long) method. The purpose of this type is to map to existing HBase data that was serialized using this HBase utility method. If that is not the case, use the regular signed type instead.
Example
UNSIGNED_TIMEUNSIGNED_DATE Type
The unsigned date data type. The format is yyyy-MM-dd hh:mm:ss, with both the date and time parts maintained to a millisecond accuracy. Mapped to java.sql.Date. The binary representation is an 8 byte long (the number of milliseconds from the epoch) matching the HBase.toBytes(long) method. The purpose of this type is to map to existing HBase data that was serialized using this HBase utility method. If that is not the case, use the regular signed type instead.
Example
UNSIGNED_DATEUNSIGNED_TIMESTAMP Type
The timestamp data type. The format is yyyy-MM-dd hh:mm:ss[.nnnnnnnnn]. Mapped to java.sql.Timestamp with an internal representation of the number of nanos from the epoch. The binary representation is 12 bytes: an 8 byte long for the epoch time plus a 4 byte integer for the nanos with the long serialized through the HBase.toBytes(long) method. The purpose of this type is to map to existing HBase data that was serialized using this HBase utility method. If that is not the case, use the regular signed type instead.
Example
UNSIGNED_TIMESTAMPVARCHAR Type
A variable length String with an optional max byte length. The binary representation is UTF8 matching the Bytes.toBytes(String) method. When used in a row key, it is terminated with a null byte unless it is the last column.
Mapped to java.lang.String.
Example
VARCHAR
VARCHAR(255)CHAR Type
A fixed length String with single-byte characters. The binary representation is UTF8 matching the Bytes.toBytes(String) method.
Mapped to java.lang.String.
Example
CHAR(10)BINARY Type
Raw fixed length byte array.
Mapped to byte[].
Example
BINARYVARBINARY Type
Raw variable length byte array.
Mapped to byte[].
Example
VARBINARYARRAY
Mapped to java.sql.Array. Every primitive type except for VARBINARY may be declared as an ARRAY. Only single dimensional arrays are supported.
Example
VARCHAR ARRAY
CHAR(10) ARRAY [5]
INTEGER []
INTEGER [100]Array Type
Apache Phoenix 3.0/4.0 introduced support for the JDBC ARRAY type. Any primitive type may be used in an ARRAY. Here is an example of declaring an array type when creating a table:
CREATE TABLE regions (
region_name VARCHAR NOT NULL PRIMARY KEY,
zips VARCHAR ARRAY[10]
);or alternately:
CREATE TABLE regions (
region_name VARCHAR NOT NULL PRIMARY KEY,
zips VARCHAR[]
);Insertion into the array may be done entirely through a SQL statement:
UPSERT INTO regions(region_name, zips)
VALUES ('SF Bay Area', ARRAY['94115', '94030', '94125']);or programmatically through JDBC:
PreparedStatement stmt = conn.prepareStatement("UPSERT INTO regions VALUES(?,?)");
stmt.setString(1, "SF Bay Area");
String[] zips = new String[] {"94115", "94030", "94125"};
Array array = conn.createArrayOf("VARCHAR", zips);
stmt.setArray(2, array);
stmt.execute();The entire array may be selected:
SELECT zips FROM regions WHERE region_name = 'SF Bay Area';or an individual element in the array may be accessed via a subscript notation. The subscript is one-based, so the following would select the first element:
SELECT zips[1] FROM regions WHERE region_name = 'SF Bay Area';Use of the array subscript notation is supported in other expressions as well, for example in a WHERE clause:
SELECT region_name FROM regions WHERE zips[1] = '94030' OR zips[2] = '94030' OR zips[3] = '94030';The array length grows dynamically as needed and can be accessed through the built-in ARRAY_LENGTH function:
SELECT ARRAY_LENGTH(zips) FROM regions;Attempts to access an array element beyond the current length will evaluate to null.
For searching in an array, built-in functions like ANY and ALL are provided. For example,
SELECT region_name FROM regions WHERE '94030' = ANY(zips);
SELECT region_name FROM regions WHERE '94030' = ALL(zips);The built-in function ANY checks if any array element satisfies the condition and is equivalent to an OR condition:
SELECT region_name FROM regions WHERE zips[1] = '94030' OR zips[2] = '94030' OR zips[3] = '94030';The built-in function ALL checks if all array elements satisfy the condition and is equivalent to an AND condition:
SELECT region_name FROM regions WHERE zips[1] = '94030' AND zips[2] = '94030' AND zips[3] = '94030';Limitations
- Only one-dimensional arrays are currently supported.
- For an array of fixed width types, null elements occurring in the middle of an array are not tracked.
- The declaration of an array length at DDL time is not enforced currently, but maybe in the future. Note that it is persisted with the table metadata.
- An array may only be used as the last column in a primary key constraint.
- Partial update of an array is currently not possible. Instead, the array may be manipulated on the client-side and then upserted back in its entirety.
Sequences
Sequences are a standard SQL feature that generate monotonically increasing numbers, typically used to create IDs. To create a sequence, use:
CREATE SEQUENCE my_schema.my_sequence;This creates a sequence named my_schema.my_sequence with an initial value of 1, incremented by 1 each time, with no cycle, minimum value, or maximum value, and 100 sequence values cached in your session (controlled by the phoenix.sequence.cacheSize config parameter). The complete syntax of CREATE SEQUENCE is documented here.
Caching sequence values on your session improves performance, as we don't need to ask the server for more sequence values until we run out of cached values. The tradeoff is that you may end up with gaps in your sequence values when other sessions also use the same sequence.
All of these parameters can be overridden when the sequence is created like this:
CREATE SEQUENCE my_schema.my_sequence START WITH 100 INCREMENT BY 2 CACHE 10;Phoenix 3.1/4.1 added support for defining minimum and maximum values using MINVALUE and MAXVALUE, and for controlling cycling with the CYCLE keyword. Specifying CYCLE means the sequence continues generating values after reaching either boundary. For ascending sequences, after the maximum it returns to the minimum. For descending sequences, after the minimum it returns to the maximum. For example:
CREATE SEQUENCE my_cycling_sequence MINVALUE 1 MAXVALUE 100 CYCLE;will cause the sequence to cycle continuously from 1 to 100.
Sequences are incremented using the NEXT VALUE FOR <sequence_name> expression in UPSERT VALUES, UPSERT SELECT, or SELECT statements:
UPSERT INTO my_table(id, col1, col2)
VALUES (NEXT VALUE FOR my_schema.my_sequence, 'foo', 'bar');This will allocate a BIGINT based on the next value from the sequence (beginning with the START WITH value and incrementing from there based on the INCREMENT BY amount).
When used in an UPSERT SELECT or SELECT statement, each row returned by the statement would have a unique value associated with it. For example:
UPSERT INTO my_table(id, col1, col2)
SELECT NEXT VALUE FOR my_schema.my_sequence, 'foo', 'bar' FROM my_other_table;This allocates a new sequence value for each row returned from the SELECT expression. A sequence is incremented only once per statement, so multiple references to the same sequence by NEXT VALUE FOR produce the same value. For example, in the statement below, my_table.col1 and my_table.col2 would end up with the same value:
UPSERT INTO my_table(col1, col2)
VALUES (NEXT VALUE FOR my_schema.my_sequence, NEXT VALUE FOR my_schema.my_sequence);You may also access the last sequence value allocated using a CURRENT VALUE FOR expression as shown below:
SELECT CURRENT VALUE FOR my_schema.my_sequence, col1, col2 FROM my_table;This would evaluate to the last sequence value allocated from the previous NEXT VALUE FOR expression for your session (i.e. all connections on the same JVM for the same client machine). If no NEXT VALUE FOR expression had been previously called, this would produce an exception. If in a given statement a CURRENT VALUE FOR expression is used together with a NEXT VALUE FOR expression for the same sequence, then both would evaluate to the value produced by the NEXT VALUE FOR expression.
The NEXT VALUE FOR and CURRENT VALUE FOR expressions may only be used as SELECT expressions or in the UPSERT VALUES statement. Use in WHERE, GROUP BY, HAVING, or ORDER BY will produce an exception. In addition, they cannot be used as the argument to an aggregate function.
To drop a sequence, issue the following command:
DROP SEQUENCE my_schema.my_sequence;To discover all sequences that have been created, you may query the SYSTEM.SEQUENCE table as shown here:
SELECT sequence_schema, sequence_name, start_with, increment_by, cache_size FROM SYSTEM."SEQUENCE";Note that only read-only access to the SYSTEM.SEQUENCE table is supported.
Joins
The standard SQL join syntax (with some limitations) is now supported by Phoenix to combine records from two or more tables based on their fields having common values.
For example, we have the following tables to store our order records, our customer information and the item information we sell in those orders.
The "Orders" table:
| OrderID | CustomerID | ItemID | Quantity | Date |
|---|---|---|---|---|
| 1630781 | C004 | I001 | 650 | 09-01-2013 |
| 1630782 | C003 | I006 | 2500 | 09-02-2013 |
| 1630783 | C002 | I002 | 340 | 09-03-2013 |
| 1630784 | C004 | I006 | 1260 | 09-04-2013 |
| 1630785 | C005 | I003 | 1500 | 09-05-2013 |
The "Customers" table:
| CustomerID | CustomerName | Country |
|---|---|---|
| C001 | Telefunken | Germany |
| C002 | Logica | Belgium |
| C003 | Salora Oy | Finland |
| C004 | Alps Nordic AB | Sweden |
| C005 | Deister Electronics | Germany |
| C006 | Thales Nederland | Netherlands |
The "Items" table:
| ItemID | ItemName | Price |
|---|---|---|
| I001 | BX016 | 15.96 |
| I002 | MU947 | 20.35 |
| I003 | MU3508 | 9.60 |
| I004 | XC7732 | 55.24 |
| I005 | XT0019 | 12.65 |
| I006 | XT2217 | 12.35 |
You may get a combined view of the "Orders" table and the "Customers" table by running the following join query:
SELECT O.OrderID, C.CustomerName, C.Country, O.Date
FROM Orders AS O
INNER JOIN Customers AS C
ON O.CustomerID = C.CustomerID;This will produce results like:
| O.OrderID | C.CustomerName | C.Country | O.Date |
|---|---|---|---|
| 1630781 | Alps Nordic AB | Sweden | 09-01-2013 |
| 1630782 | Salora Oy | Finland | 09-02-2013 |
| 1630783 | Logica | Belgium | 09-03-2013 |
| 1630784 | Alps Nordic AB | Sweden | 09-04-2013 |
| 1630785 | Deister Electronics | Germany | 09-05-2013 |
Joining Tables with Indices
Secondary indices will be automatically utilized when running join queries. For example, if we create indices on the "Orders" table and the "Items" table respectively, which are defined as follows:
CREATE INDEX iOrders ON Orders (ItemID) INCLUDE (CustomerID, Quantity);
CREATE INDEX i2Orders ON Orders (CustomerID) INCLUDE (ItemID, Quantity);
CREATE INDEX iItems ON Items (ItemName) INCLUDE (Price);We can find out each item's total sales value by joining the "Items" table and the "Orders" table and then grouping the joined result with "ItemName" (and also adding some filtering conditions):
SELECT ItemName, SUM(Price * Quantity) AS OrderValue
FROM Items
JOIN Orders
ON Items.ItemID = Orders.ItemID
WHERE Orders.CustomerID > 'C002'
GROUP BY ItemName;The results will be like:
| ItemName | OrderValue |
|---|---|
| BX016 | 10374 |
| MU3508 | 14400 |
| XT2217 | 46436 |
The execution plan for this query (by running EXPLAIN <query>) will be:
CLIENT PARALLEL 32-WAY FULL SCAN OVER iItems
SERVER AGGREGATE INTO ORDERED DISTINCT ROWS BY [iItems.0:ItemName]
CLIENT MERGE SORT
PARALLEL INNER-JOIN TABLE 0
CLIENT PARALLEL 32-WAY RANGE SCAN OVER i2Orders ['C002'] - [*]In this case, the index table iItems is used in place of the data table Items since the index table iItems is indexed on column ItemName and will hence benefit the GROUP BY clause in this query. Meanwhile, the index table i2Orders is favored over the data table Orders and another index table iOrders because a range scan instead of a full scan can be applied as a result of the WHERE clause.
Grouped Joins and Derived Tables
Phoenix also supports complex join syntax such as grouped joins (or sub joins) and joins with derived-tables. You can group joins by using parenthesis to prioritize certain joins before other joins are executed. You can also replace any one (or more) of your join tables with a subquery (derived table), which could be yet another join query.
For grouped joins, you can write something like:
SELECT O.OrderID, I.ItemName, S.SupplierName
FROM Orders AS O
LEFT JOIN
(Items AS I
INNER JOIN Suppliers AS S
ON I.SupplierID = S.SupplierID)
ON O.ItemID = I.ItemID;By replacing the sub join with a subquery (derived table), we get an equivalent query as:
SELECT O.OrderID, J.ItemName, J.SupplierName
FROM Orders AS O
LEFT JOIN
(SELECT ItemID, ItemName, SupplierName
FROM Items AS I
INNER JOIN Suppliers AS S
ON I.SupplierID = S.SupplierID) AS J
ON O.ItemID = J.ItemID;As an alternative to the earlier example where we find each item's sales figures, instead of using GROUP BY after joining two tables, we can join the "Items" table with grouped results from the "Orders" table:
SELECT ItemName, O.OrderValue
FROM Items
JOIN
(SELECT ItemID, SUM(Price * Quantity) AS OrderValue
FROM Orders
WHERE CustomerID > 'C002'
GROUP BY ItemID) AS O
ON Items.ItemID = O.ItemID;Hash Join vs. Sort-Merge Join
Basic hash join usually outperforms other types of join algorithms, but it has its limitations too, the most significant of which is the assumption that one of the relations must be small enough to fit into memory. Thus Phoenix now has both hash join and sort-merge join implemented to facilitate fast join operations as well as join between two large tables.
Phoenix currently uses hash join whenever possible since it is usually faster. You can force sort-merge join with hint USE_SORT_MERGE_JOIN. Choosing between algorithms and detecting the smaller relation for hash join is expected to be increasingly guided by table statistics.
Foreign Key to Primary Key Join Optimization
Oftentimes a join will occur from a child table to a parent table, mapping the foreign key of the child table to the primary key of the parent. So instead of doing a full scan on the parent table, Phoenix will drive a skip-scan or a range-scan based on the foreign key values it got from the child table result.
Phoenix will extract and sort multiple key parts from the join keys so that it can get the most accurate key hints/ranges possible for the parent table scan.
For example, we have parent table "Employee" and child table "Patent" defined as:
CREATE TABLE Employee (
Region VARCHAR NOT NULL,
LocalID VARCHAR NOT NULL,
Name VARCHAR NOT NULL,
StartDate DATE NOT NULL,
CONSTRAINT pk PRIMARY KEY (Region, LocalID)
);
CREATE TABLE Patent (
PatentID VARCHAR NOT NULL,
Region VARCHAR NOT NULL,
LocalID VARCHAR NOT NULL,
Title VARCHAR NOT NULL,
Category VARCHAR NOT NULL,
FileDate DATE NOT NULL,
CONSTRAINT pk PRIMARY KEY (PatentID)
);Now we'd like to find employees who filed patents after January 2000 and list their names by patent count:
SELECT E.Name, E.Region, P.PCount
FROM Employee AS E
JOIN
(SELECT Region, LocalID, COUNT(*) AS PCount
FROM Patent
WHERE FileDate >= TO_DATE('2000/01/01')
GROUP BY Region, LocalID) AS P
ON E.Region = P.Region AND E.LocalID = P.LocalID;The above statement will do a skip-scan over the "Employee" table and will use both join key "Region" and "LocalID" for runtime key hint calculation. Below is the execution time of this query with and without this optimization on an "Employee" table of about 5000000 records and a "Patent" table of about 1000 records:
| W/O Optimization | W/ Optimization |
|---|---|
| 8.1s | 0.4s |
However, there are times when foreign key values from the child table account for the complete primary key space in the parent table, so skip scans may be slower. You can turn off this optimization with hint NO_CHILD_PARENT_OPTIMIZATION. Table statistics are expected to help make smarter choices between these schemes.
Configuration
As mentioned earlier, if we decide to use the hash join approach for our join queries, the prerequisite is that either of the relations can be small enough to fit into memory in order to be broadcast over all servers that have the data of concern from the other relation. And aside from making sure that the region server heap size is big enough to hold the smaller relation, we might also need to pay a attention to a few configuration parameters that are crucial to running hash joins.
The server-side caches hold the hash table built on the smaller relation. Cache size and lifetime are controlled by the following parameters. A relation may be a physical table, a view, a subquery, or a joined result of other relations in a multi-join query.
phoenix.query.maxServerCacheBytes- Maximum size (in bytes) of the raw results of a relation before being compressed and sent over to the region servers.
- Attempting to serializing the raw results of a relation with a size bigger than this setting will result in a
MaxServerCacheSizeExceededException. - Default: 104,857,600
phoenix.query.maxGlobalMemoryPercentage- Percentage of total heap memory (i.e.
Runtime.getRuntime().maxMemory()) that all threads may use. - The summed size of all living caches must be smaller than this global memory pool size. Otherwise, you would get an
InsufficientMemoryException. - Default: 15
- Percentage of total heap memory (i.e.
phoenix.coprocessor.maxServerCacheTimeToLiveMs- Maximum living time (in milliseconds) of server caches. A cache entry expires after this amount of time has passed since last access.
- Consider adjusting this parameter when a server-side
IOException("Could not find hash cache for joinId") happens. Getting warnings like "Earlier hash cache(s) might have expired on servers" might also be a sign that this number should be increased. - Default: 30,000
See our Configuration and Tuning Guide for more details.
Although changing parameters can sometimes be a solution to getting rid of the exceptions mentioned above, it is highly recommended that you first consider optimizing the join queries according to the information provided in the following section.
Optimizing Your Query
Now that we know hash joins depend heavily on available memory, instead of immediately changing configuration, it can be enough to understand execution internals and adjust table order in your join query.
Below is the default join order (without table statistics) and which side of the query is treated as the "smaller" relation and put into server cache:
- lhs INNER JOIN rhs
rhs will be built as hash table in server cache. - lhs LEFT OUTER JOIN rhs
rhs will be built as hash table in server cache. - lhs RIGHT OUTER JOIN rhs
lhs will be built as hash table in server cache.
Join order is more complicated with multi-join queries. You can run EXPLAIN <join_query> to inspect the actual execution plan. For multi-inner-join queries, Phoenix applies star-join optimization by default, which means the leading (left-hand-side) table is scanned once while joining all right-hand-side tables at the same time. You can disable this optimization with hint NO_STAR_JOIN if total size of right-hand-side tables exceeds memory limits.
Let's take the previous query for example:
SELECT O.OrderID, C.CustomerName, I.ItemName, I.Price, O.Quantity
FROM Orders AS O
INNER JOIN Customers AS C
ON O.CustomerID = C.CustomerID
INNER JOIN Items AS I
ON O.ItemID = I.ItemID;The default join order (using star-join optimization) will be:
1. SCAN Customers --> BUILD HASH[0]
SCAN Items --> BUILD HASH[1]
2. SCAN Orders JOIN HASH[0], HASH[1] --> Final ResultsetAlternatively, if we use hint NO_STAR_JOIN:
SELECT /*+ NO_STAR_JOIN*/ O.OrderID, C.CustomerName, I.ItemName, I.Price, O.Quantity
FROM Orders AS O
INNER JOIN Customers AS C
ON O.CustomerID = C.CustomerID
INNER JOIN Items AS I
ON O.ItemID = I.ItemID;The join order will be:
1. SCAN Customers --> BUILD HASH[0]
2. SCAN Orders JOIN HASH[0]; CLOSE HASH[0] --> BUILD HASH[1]
3. SCAN Items JOIN HASH[1] --> Final ResultsetIt is also worth mentioning that not the entire dataset of the table should be counted into the memory consumption. Instead, only those columns used by the query, and of only the records that satisfy the predicates will be built into the server hash table.
Limitations
In our Phoenix 3.3.0 and 4.3.0 releases, joins have the following restrictions and improvements to be made:
- PHOENIX-1555: Fallback to many-to-many join if hash join fails due to insufficient memory.
- PHOENIX-1556: Base hash join versus many-to-many decision on how many guideposts will be traversed for RHS table(s).
Continuous efforts are being made to bring in more performance enhancement for join queries based on table statistics. Please refer to our Roadmap for more information.
Subqueries
Phoenix now supports subqueries in the WHERE clause and the FROM clause. Subqueries can be specified in many places, like IN/NOT IN, EXISTS/NOT EXISTS, unmodified comparison operators or ANY/SOME/ALL comparison operators.
Subqueries with IN or NOT IN
The following query finds the names of the items that have sales record after Sept 2nd 2013. The inner query returns a list of items that satisfy the search criteria and the outer query will make use of this list to find matching entries.
SELECT ItemName
FROM Items
WHERE ItemID IN
(SELECT ItemID
FROM Orders
WHERE Date >= TO_DATE('2013/09/02'));Subqueries with EXISTS or NOT EXISTS
EXISTS simply tests the existence of the returned rows by the inner query. If the inner query returns one or more rows, EXISTS returns a value of TRUE; otherwise a value of FALSE. Many EXISTS queries are used to achieve the same goal as with IN queries or with ANY/SOME/ALL comparison queries. The below query returns the same results as the query in the previous example does:
SELECT ItemName
FROM Items i
WHERE EXISTS
(SELECT *
FROM Orders
WHERE Date >= TO_DATE('2013/09/02')
AND ItemID = i.ItemID);Semi-joins and Anti-joins
Queries with IN/NOT IN or EXISTS/NOT EXISTS are implemented with semi-joins and anti-joins wherever possible. A semi-join is different from a conventional join in that rows in the first table will be returned at most once, regardless of how many matches the second table contains for a certain row in the first table. A semi-join returns all those rows from the first table which can find at least one match in the second table. An IN or EXISTS construct is often translated into semi-joins.
An anti-join is the opposite of a semi-join. The results of an anti-join are all those rows from the first table that can find no match in the second table. A NOT IN or NOT EXISTS construct is often translated into anti-joins.
Semi-join Optimization
The "Foreign Key to Primary Key Join Optimization" mentioned in Phoenix Joins is equally applied to semi-joins. So if a skip-scan is driven for a semi-join qualified for this optimization and the IN or EXISTS semantics can be fully substituted by the skip-scan alone, the server-side join operation will not happen at all.
Subqueries with Comparison Operators
Subqueries can be specified as the right-hand-side operand of the comparison operators (=, <>, >, >=, <, !>, !<, or <=).
The example below finds participants whose contest scores are greater than the overall average score.
SELECT ID, Name
FROM Contest
WHERE Score >
(SELECT AVG(Score)
FROM Contest)
ORDER BY Score DESC;A subquery introduced with an unmodified comparison operator (a comparison operator not followed by ANY or ALL) must only return a single row; otherwise it would result in getting a SQL error message.
Subqueries with ANY/SOME/ALL Comparison Operators
Subqueries can be introduced with a comparison operator modified by the keywords ANY, SOME or ALL, which has exactly the same semantics with static arrays, only that the array elements have to be dynamically computed through the execution of the inner query.
The following query provides an example which lists the orders with a quantity greater than or equal to the maximum order quantity of any item.
SELECT OrderID
FROM Orders
WHERE quantity >= ANY
(SELECT MAX(quantity)
FROM Orders
GROUP BY ItemID);Correlated Subqueries
Correlated subqueries (also known as synchronized subqueries) are subqueries that contain references to the outer queries. Unlike independent subqueries, which only need to be evaluated once, the correlated inner query result depends on the outer query values and may differ from row to row.
The following example finds the patents filed earlier than or equal to all patents filed within the same region:
SELECT PatentID, Title
FROM Patents p
WHERE FileDate <= ALL
(SELECT FileDate
FROM Patents
WHERE Region = p.Region);Phoenix optimizes such queries by rewriting them into equivalent join queries so that the inner query only needs to be executed once instead of once per outer row. The correlated subquery above will be rewritten in Phoenix as:
SELECT PatentID, Title
FROM Patents p
JOIN
(SELECT Region col1, collect_distinct(FileDate) col2
FROM Patent
GROUP BY Region) t1
ON Region = t1.col1
WHERE FileDate <= ALL(t1.col2);Here, collect_distinct() is a reserved internal function in Phoenix, which collects distinct values of a given column or expression into a Phoenix array.
AND/OR Branches and Multiple levels of Nesting
Correlated subqueries or independent subqueries can be specified anywhere in the WHERE clause, whether in AND branches or in OR branches. And a query can have more than one level of subquery nesting, which means a subquery can include yet another (or more) subquery in itself.
Below is an example of a complicated query that has multiple levels of subqueries connected with AND and OR branches, which is to find the items not involved in the orders sold to customers in Belgium with a quantity lower than 1000 or to customers in Germany with a quantity lower than 2000:
SELECT ItemID, ItemName
FROM Items i
WHERE NOT EXISTS
(SELECT *
FROM Orders
WHERE CustomerID IN
(SELECT CustomerID
FROM Customers
WHERE Country = 'Belgium')
AND Quantity < 1000
AND ItemID = i.ItemID)
OR ItemID != ALL
(SELECT ItemID
FROM Orders
WHERE CustomerID IN
(SELECT CustomerID
FROM Customers
WHERE Country = 'Germany')
AND Quantity < 2000);Row subqueries
A subquery can return multiple fields in one row, which is considered returning a row constructor. The row constructor on both sides of the operator (IN/NOT IN, EXISTS/NOT EXISTS or comparison operator) must contain the same number of values, like in the below example:
SELECT column1, column2
FROM t1
WHERE (column1, column2) IN
(SELECT column3, column4
FROM t2
WHERE column5 = 'nowhere');This query returns all pairs of (column1, column2) that can match any pair of (column3, column4) in the second table after being filtered by condition: column5 = ‘nowhere’.
Derived Tables
Subqueries specified in the FROM clause are also called derived tables. For example, suppose you want to list a set of maximum values of a grouped table by their frequency of occurrence, and the below query will return the desired result:
SELECT m, COUNT(*)
FROM
(SELECT MAX(x) m
FROM a1
GROUP BY name) AS t
GROUP BY m
ORDER BY COUNT(*) DESC;Derived tables can also be specified anywhere in a join query as join-tables. Please refer to the "Grouped Joins and Derived Tables" section of Phoenix Joins for more information and examples.
Limitations
In our Phoenix 3.2 and 4.2 releases, the subquery support has the following restrictions:
- PHOENIX-1388 Support correlated subqueries in the HAVING clause.
- PHOENIX-1392 Using subqueries as expressions.
Explain Plan
Explain Plan
An EXPLAIN plan tells you a lot about how a query will be run:
- All the HBase range queries that will be executed
- An estimate of the number of bytes that will be scanned
- An estimate of the number of rows that will be traversed
- Time at which the above estimate information was collected
- Which HBase table will be used for each scan
- Which operations (sort, merge, scan, limit) are executed on the client versus the server
Use an EXPLAIN plan to check how a query will run, and consider rewriting queries to meet the following goals:
- Emphasize operations on the server rather than the client. Server operations are distributed across the cluster and operate in parallel, while client operations execute within the single client JDBC driver.
- Use
RANGE SCANorSKIP SCANwhenever possible rather thanTABLE SCAN. - Filter against leading columns in the primary key constraint. This assumes you have designed the primary key to lead with frequently-accessed or frequently-filtered columns as described in “Primary Keys,” above.
- If necessary, introduce a local index or a global index that covers your query.
- If you have an index that covers your query but the optimizer is not detecting it, try hinting the query:
SELECT /*+ INDEX() */ …
See also: SQL Language Reference - EXPLAIN
Anatomy of an Explain Plan
An explain plan consists of lines of text that describe operations that Phoenix will perform during a query, using the following terms:
AGGREGATE INTO ORDERED DISTINCT ROWS— aggregates the returned rows using an operation such as addition. WhenORDEREDis used, theGROUP BYoperation is applied to the leading part of the primary key constraint, which allows the aggregation to be done in place rather than keeping all distinct groups in memory on the server side.AGGREGATE INTO SINGLE ROW— aggregates the results into a single row using an aggregate function with noGROUP BYclause. For example, thecount()statement returns one row with the total number of rows that match the query.CLIENT— the operation will be performed on the client side. It's faster to perform most operations on the server side, so you should consider whether there's a way to rewrite the query to give the server more of the work to do.FILTER BYexpression—returns only results that match the expression.FULL SCAN OVERtableName—the operation will scan every row in the specified table.INNER-JOIN— the operation will join multiple tables on rows where the join condition is met.MERGE SORT— performs a merge sort on the results.RANGE SCAN OVERtableName[...]— The information in the square brackets indicates the start and stop for each primary key that's used in the query.ROUND ROBIN— when the query doesn't containORDER BYand therefore the rows can be returned in any order,ROUND ROBINorder maximizes parallelization on the client side.<x>-CHUNK— describes how many threads will be used for the operation. The maximum parallelism is limited to the number of threads in the thread pool. The minimum parallelization corresponds to the number of regions the table has between the start and stop rows of the scan. The number of chunks will increase with a lower guidepost width, as there is more than one chunk per region.PARALLEL <x>-WAY— describes how many parallel scans will be merge sorted during the operation.SERIAL— some queries run serially. For example, a single row lookup or a query that filters on the leading part of the primary key and limits the results below a configurable threshold.EST_BYTES_READ- provides an estimate of the total number of bytes that will be scanned as part of executing the query.EST_ROWS_READ- provides an estimate of the total number of rows that will be scanned as part of executing the query.EST_INFO_TS- epoch time in milliseconds at which the estimate information was collected.
Example
+-----------------------------------------------------------------------------------------------------------------------------------
| PLAN | EST_BYTES_READ | EST_ROWS_READ | EST_INFO_TS |
+-----------------------------------------------------------------------------------------------------------------------------------
| CLIENT 36-CHUNK 237878 ROWS 6787437019 BYTES PARALLEL 36-WAY FULL SCAN
| OVER exDocStoreb | 237878 | 6787437019 | 1510353318102|
| PARALLEL INNER-JOIN TABLE 0 (SKIP MERGE) | 237878 | 6787437019 | 1510353318102|
| CLIENT 36-CHUNK PARALLEL 36-WAY RANGE SCAN OVER indx_exdocb
| [0,' 42ecf4abd4bd7e7606025dc8eee3de 6a3cc04418cbc2619ddc01f54d88d7 c3bf']
| - [0,' 42ecf4abd4bd7e7606025dc8eee3de 6a3cc04418cbc2619ddc01f54d88d7 c3bg' | 237878 | 6787437019 | 1510353318102|
| SERVER FILTER BY FIRST KEY ONLY | 237878 | 6787437019 | 1510353318102|
| SERVER AGGREGATE INTO ORDERED DISTINCT ROWS BY ["ID"] | 237878 | 6787437019 | 1510353318102|
| CLIENT MERGE SORT | 237878 | 6787437019 | 1510353318102|
| DYNAMIC SERVER FILTER BY (A.CURRENT_TIMESTAMP, [A.ID](http://a.id/))
IN ((TMP.MCT, TMP.TID)) | 237878 | 6787437019 | 1510353318102|
+-----------------------------------------------------------------------------------------------------------------------------------JDBC Explain Plan API and Estimates
The information displayed in the explain plan API can also be accessed programmatically through the standard JDBC interfaces. When statistics collection is enabled for a table, the explain plan also gives an estimate of number of rows and bytes a query is going to scan. To get hold of the info, you can use corresponding columns in the result set returned by the explain plan statement. When stats collection is not enabled or if for some reason Phoenix cannot provide the estimate information, the columns return null. Below is an example:
String explainSql = "EXPLAIN SELECT * FROM T";
Long estimatedBytes = null;
Long estimatedRows = null;
Long estimateInfoTs = null;
try (Statement statement = conn.createStatement(explainSql)) {
int paramIdx = 1;
ResultSet rs = statement.executeQuery(explainSql);
rs.next();
estimatedBytes =
(Long) rs.getObject(PhoenixRuntime.EXPLAIN_PLAN_ESTIMATED_BYTES_READ_COLUMN);
estimatedRows =
(Long) rs.getObject(PhoenixRuntime.EXPLAIN_PLAN_ESTIMATED_ROWS_READ_COLUMN);
estimateInfoTs =
(Long) rs.getObject(PhoenixRuntime.EXPLAIN_PLAN_ESTIMATE_INFO_TS_COLUMN);
}Contributing
General process
The general process for contributing code to Phoenix works as follows:
- Discuss your changes on the dev mailing list
- Create a JIRA issue unless there already is one
- Setup your development environment
- Prepare a patch containing your changes
- Submit the patch
These steps are explained in greater detail below.
Note that the instructions below are for the main Phoenix project. Use the corresponding repository for the other subprojects. Tephra and Omid also have their own JIRA projects.
Discuss on the mailing list
It's often best to discuss a change on the public mailing lists before creating and submitting a patch.
If you're unsure whether certain behavior in Phoenix is a bug, please send a mail to the user mailing list to check.
If you're considering adding major new functionality to Phoenix, it's a good idea to first discuss the idea on the developer mailing list to make sure that your plans are in line with others in the Phoenix community.
Log a JIRA ticket
The first step is to create a ticket on the Phoenix JIRA.
Setup development environment
To set up your development environment, see these directions.
Generate a patch
There are two general approaches for creating and submitting a patch: GitHub pull requests, or manual patch creation with Git. Both are explained below. Please make sure that the patch applies cleanly on all active branches, including master and the unified 4.x branch.
Regardless of which approach is taken, please make sure to follow the Phoenix code conventions (more information below). Whenever possible, unit tests or integration tests should be included with patches.
Please make sure that the patch contains only one commit, then click the "Submit patch" button to automatically trigger tests on the patch.
The commit message should reference the JIRA ticket issue (which has the format
PHOENIX-{NUMBER}:{JIRA-TITLE}).
To effectively get the patch reviewed, please raise the pull request against an appropriate branch.
Naming convention for the patch
When generating a patch, make sure the patch name uses the following format:
PHOENIX-{NUMBER}.{BRANCH-NAME}.{VERSION}.patch
Examples: PHOENIX-4872.master.v1.patch, PHOENIX-4872.master.v2.patch, PHOENIX-4872.4.x-HBase-1.3.v1.patch, etc.
GitHub workflow
- Create a pull request in GitHub for the mirror of the Phoenix Git repository.
- Generate a patch and attach it to JIRA so Hadoop QA runs automated tests.
- If you update the PR, generate a new patch with a different name so patch changes are detected and tests run for the new patch.
Local Git workflow
- Create a local branch:
git checkout -b <branch-name> - Make and commit changes
- Generate a patch based on the JIRA issue number:
git format-patch --stdout HEAD^ > PHOENIX-{NUMBER}.patch - Attach the created patch file to the JIRA ticket.
Code conventions
The Phoenix code conventions are similar to the Sun/Oracle Java Code Convention. We use 4 spaces (no tabs) for indentation and limit lines to 100 characters.
Eclipse code formatting settings and import order settings (which can also be imported into Intellij IDEA) are available in the dev directory of the Phoenix codebase.
All new source files should include the Apache license header.
Committer workflow
In general, the "rebase" workflow should be used with the Phoenix codebase (see this blog post for more information on the difference between "merge" and "rebase" workflows in Git).
A patch file can be downloaded from a GitHub pull request by adding .patch to the end of the pull request URL, for example: https://github.com/apache/phoenix/pull/35.patch.
When applying a user-contributed patch, use git am when a fully formatted patch file is available, as this preserves contributor contact information. Otherwise, add the contributor's name to the commit message.
If a single ticket consists of a patch with multiple commits, the commits can be squashed into a single commit using git rebase.
Developing Phoenix
Getting Started
- Review the How to Contribute documentation.
- Sign up for a GitHub account if you do not have one.
- Go to the Phoenix GitHub repository and create a fork, which creates
{username}/phoenix. - Set up Git locally.
- Make sure you have a JDK (Phoenix historically required JDK 7).
- Make sure you have Maven 3+ installed.
- Add the following to your
.bashrcor equivalent to ensure Maven and Java are configured correctly for command-line usage.
export JAVA_HOME={path to jdk}
export JDK_HOME={path to jdk}
export M2_HOME={path to maven}
export PATH=$M2_HOME/bin:$PATHOther Phoenix Subprojects
The instructions here are for the main Phoenix project. For the other subprojects, use the corresponding repository and JIRA project.
The Eclipse and IntelliJ setup instructions may not necessarily work well for the other projects.
Setup Local Git Repository
You may find it easier to clone from your IDE of choice, especially with IntelliJ.
-
Create a local clone of your new forked repository
git clone https://github.com/{username}/phoenix.git -
Configure your local repository to be able to sync with the apache/phoenix repository
cd {repository} git remote add upstream https://github.com/apache/phoenix.git -
Setup your development environment
For Eclipse IDE for Java Developers (Luna)
- Download Eclipse
- Configure Eclipse to handle Maven Issues appropriately so you don't see unnecessary errors.
- Window -> Preferences -> Maven -> Errors/Warnings
- Choose Ignore option for 'Plugin execution not covered by lifecycle configuration' -> Ok
- Add the local Git repository to Eclipse
- Window -> Show View -> Other... -> Git | Git Repositories -> Ok
- Click 'Add an existing local Git Repository to this view'
- Search for appropriate git repository
- Finish
- Import Maven Projects
- File -> Import -> Maven -> Existing Maven Projects
- Choose Root directory where phoenix git repository is located
- Select All
- Finish
- Generate Lexer and Parser Files
- Select phoenix-core project
- Run -> Run As -> Maven generate-sources
- Make sure you are setup to develop now.
- Open IndexUtilTest.Java
- Run -> Run As -> JUnit Test
Get Settings and Preferences Correct
- Import General Preferences
- File -> Import... -> General -> Preferences
- From -
{repository}/dev/eclipse_prefs_phoenix.epf - Import All
- Finish
- Import Code Templates
- Window -> Preferences -> Java -> Code Style -> Code Templates -> Import...
- Navigate to
{repository}/dev/PhoenixCodeTemplate.xml-> Ok
- Import Formatter
- Window -> Preferences -> Java -> Code Style -> Formatter-> Import...
- Navigate to
{repository}/dev/PhoenixCodeTemplate.xml-> Ok
- Import correct import order settings
- Window -> Preferences -> Java -> Code Style -> Organize Imports -> Import...
- Navigate to
{repository}/dev/phoenix.importorder-> Ok
- Make sure you use space for tabs
- Window -> Preferences -> General -> Editors -> Text Editors
- Select 'Insert Spaces for tabs' -> Ok
Connecting to Jira
- Install Connector for Jira
- Help -> Install New Software -> Add
- Location - https://update.atlassian.com/atlassian-eclipse-plugin/rest/e3.7 -> Atlassian Connector
- Finish
- Add Task Repository
- Window -> Show View -> Mylyn -> Task Repositories -> Add Task Repository
- JIRA -> Next -> Server - https://issues.apache.org/jira -> Validate Settings
- Finish
- Add Filter Of All JIRAs assigned to you
- Right Click on Repository You added -> New Query... -> Predefined Filter
- Select Phoenix Project -> Select Assigned to me
- Finish
Commit
- Commit Changes and Push to Github with appropriate Message
- CTRL-# -> Set Commit message to include jira number at beginning PHOENIX-####
- Commit and Push
For Intellij
If you don't have a local git repository setup
This will automatically create the local clone of your repository for you. You will still want to add the remote upstream repository from above afterwards.
- Clone Github project and Import Maven Projects to IDE
- Check out from Version Control -> GitHub -> Enter your GitHub Login Info
https://github.com/{username}/phoenix.git-> Check out from Version Control | Yes
- Generate Parser and Lexer Files
- Maven Projects -> Phoenix Core -> Lifecycle -> compile
- Compile Project
- Build -> Make Project
- Make sure you are setup to develop now.
- Open IndexUtilTest.Java -> Run -> Run IndexUtilTest
If you already have a local git repository setup
- Import Projects
- Import Project
- Select Directory of your local repository -> Next
- Import project from external model -> Maven -> Next
- Select 'Import Maven project automatically'
- Select 'Create IntelliJ IDEA modules for aggregator projects'
- Select 'Keep source and test folders on reimport'
- Select 'Exclude build directory'
- Select 'Use Maven output directories' -> Next
- Select maven-3 -> Next
- Next a whole bunch
- Generate Parser and Lexer Files
- Maven Projects -> Phoenix Core -> Lifecycle -> compile
- Compile Project
- Build -> Make Project
- Make sure you are setup to develop now.
- Open IndexUtilTest.Java -> Run -> Run IndexUtilTest
Get Settings and Preferences Correct
- Import Settings from eclipse profile
- File -> Settings -> Editor -> Code Style -> Java
- Set From... -> Import... -> Eclipse XML Profile ->
{repository}/dev/PhoenixCodeTemplate.xml
Connecting to Jira
- Create Connection to Apache Jira
- Tools -> Tasks and Contexts -> Configure Servers -> + -> Jira ->
- Server Url:
https://issues.apache.org/jira - Query: 'project=Phoenix and ...'
- Switch Easily between Tasks
- Tools-> Tasks and Contexts -> Open Task->PHOENIX-####
- Select Create branch PHOENIX-#### from master->OK
Commit
- Commit Changes and Push to Github with appropriate Message
- VCS -> Commit -> Set Commit message to include jira number PHOENIX-####
- Commit and Push
Contributing finished work
Create pull request
- Review the How to Contribute documentation.
- Navigate to branch:
https://github.com/{username}/phoenix/tree/{branchname} - Click Pull Request
- Confirm that you see
apache:master ... {username}:{branchname} - Make sure the pull request title begins with the JIRA key, for example
PHOENIX-####. - Click Create pull request.
Building Website
Prerequisites
- Node.js 22.x (minimum
22.12.0) - npm (bundled with Node.js)
Building Phoenix Project Website
- Clone the repository:
git clone git@github.com:apache/phoenix-site.git
cd phoenix-site- During development, install dependencies:
npm ci- For local iteration, run checks/build directly when needed:
npm run ci- Before opening a pull request, run the mandatory build script:
./build.shbuild.sh is required for all contributors. It:
- ensures Node/npm are available
- runs a clean install (
npm ci) - runs full validation/build (
npm run ci) - copies
build/client/intooutput/
There is no remote CI/CD runner currently executing this script. The generated output/ directory is a build artifact that must be committed and pushed with your PR.
Publishing Website Artifact
Current publishing flow:
- Run
./build.shlocally - Commit both source changes and updated
output/ - Push your branch and open a PR
After merge, output/ is used as the website artifact for deployment.
Local Testing During Development
Start the development server with hot reload:
npm run devBy default, the website is available at:
http://localhost:5173To test the production build locally:
npm run startHow to Release
How to Release
Phoenix has several repos: phoenix-thirdparty, phoenix-omid, phoenix-tephra, phoenix, phoenix-connectors, and phoenix-queryserver.
The create-release scripts provide a unified script to handle the release from each repo.
The create-release scripts are in the master branch of the phoenix repo, in the dev/create-release directory.
Pre-Reqs
- Make sure that the JIRAs included in the release have their fix-version and release notes fields set correctly, and are resolved.
The script will query them and create theCHANGESandRELEASE_NOTESfiles from that information.
Usedev/misc_utils/git_jira_fix_version_check.pyto find discrepancies between commits and JIRAs. - Make sure you have set up your user for release signing. Details: http://www.apache.org/dev/release-signing.html.
- Make sure you have set up Maven for deploying to the ASF repo. Details: https://infra.apache.org/publishing-maven-artifacts.html.
- Clone the Phoenix
masterbranch locally (the script will download the actual repo to release itself). - Make sure Docker is running locally.
Note that Docker Desktop for Mac works, but will be slow (several hours for a Phoenix core release). Running on a native Linux machine is much faster because you avoid filesystem translation layer overhead.
Do a dry run
Read /dev/create_release/README.txt to understand what the script does and how to set up gpg-agent for signing.
Run the dev/create-release/do-release-docker.sh -d <workdir> -p <project> command, where
<project>is the repo name you're releasing from (i.e. phoenix)<workdir>is any existing directory that can be deleted
The script will ask a number of questions. Some of them will have intelligent default, but make sure you check them all:
[stoty@IstvanToth-MBP15:~/workspaces/apache-phoenix/phoenix (PHOENIX-6307)$]dev/create-release/do-release-docker.sh -p phoenix -d ~/x/phoenix-build/
Output directory already exists. Overwrite and continue? [y/n] y
========================
=== Gathering release details.
PROJECT [phoenix]:
GIT_BRANCH []: master
Current branch VERSION is 5.1.0-SNAPSHOT.
RELEASE_VERSION [5.1.0]:
RC_COUNT [0]:
RELEASE_TAG [5.1.0RC0]:
This is a dry run. If tag does not actually exist, please confirm the ref that will be built for testing.
GIT_REF [5.1.0RC0]:
ASF_USERNAME [stoty]:
GIT_NAME [Istvan Toth]:
GPG_KEY [stoty@apache.org]:
We think the key 'stoty@apache.org' corresponds to the key id '0x77E592D4'. Is this correct [y/n]? y
================
Release details:
GIT_BRANCH: master
RELEASE_VERSION: 5.1.0
RELEASE_TAG: 5.1.0RC0
API_DIFF_TAG:
ASF_USERNAME: stoty
GPG_KEY: 0x77E592D4
GIT_NAME: Istvan Toth
GIT_EMAIL: stoty@apache.org
DRY_RUN: yes
================PROJECT: the repo to release (default specified by-pon the command line)GIT_BRANCH: the git branch to use for release. This can bemaster, or a pre-created release branch.RC_COUNT: the RC number, starting from 0RELEASE_TAG: the git tag the script will tag the RC commit with.ASF_USERNAME: your ASF username, for publishing the release artifacts.ASF_PASSWORD: your ASF password, only for non-dry runsGIT_NAME/GIT_EMAIL: will be used for the RC commitGPG_KEY: ID for your GPG key. The script will offer a GPG secret key from your key ring, double-check that it is your code-signing key, and correct it if it is not.
The dry-run will generate the signed release files into <workdir>/output directory.
The Maven artifacts will be in <workdir>/output/phoenix-repo-XXXX local Maven repo, in the usual structure.
Create real RC
If the dry-run release artifacts (source, binary, and Maven) check out, then publish a real RC to ASF.
Repeat the dry run process, but add the -f switch to the do-release-docker.sh command.
The script will upload the source and binary release artifacts to a directory under https://dist.apache.org/repos/dist/dev/phoenix/.
The script will also deploy the Maven artifacts to https://repository.apache.org/#stagingRepositories.
Check that these are present.
Close the staging repository
The published staging repository is in the "open" state. Open staging repositories are aggressively cleaned up, and may be removed by the time the vote passes. To avoid this, close (but DO NOT release) the staging repository immediately after deployment.
Voting
- Initiate the vote email. See example here, or use the
<workdir>/output/vote.txttemplate generated by the script. - In case the RC (Release Candidate) is rejected via the vote, you will have to repeat the above process and re-initiate the vote for the next RC (RC0, RC1, etc.).
Release
-
Once voting is successful (say for RC1), copy artifacts to
https://dist.apache.org/repos/dist/release/phoenix:svn mv https://dist.apache.org/repos/dist/dev/phoenix/apache-phoenix-4.15.0-HBase-1.3-rc1 \ https://dist.apache.org/repos/dist/release/phoenix/apache-phoenix-4.15.0-HBase-1.3 -
Set release tag and commit:
git tag -a v4.15.0-HBase-1.3 v4.15.0-HBase-1.3-rc1 -m "Phoenix v4.15.0-HBase-1.3 release" -
Remove any obsolete releases on
https://dist.apache.org/repos/dist/release/phoenixgiven the current release. -
Go to
https://repository.apache.org/#stagingRepositoriesand release the staged artifacts (this takes a while so you may need to refresh multiple times). -
Create new branch based on current release if needed, for ex: 4.15 branches in this case.
-
Set version to the upcoming
SNAPSHOTand commit:mvn versions:set -DnewVersion=4.16.0-HBase-1.3-SNAPSHOT -DgenerateBackupPoms=false -
If releasing Phoenix (core) Create a JIRA to update
PHOENIX_MAJOR_VERSION,PHOENIX_MINOR_VERSIONandPHOENIX_PATCH_NUMBERinMetaDataProtocol.javaappropriately to next version (4, 16, 0 respectively in this case) andcompatible_client_versions.jsonfile with the client versions that are compatible against the next version (in this case 4.14.3 and 4.15.0 would be the backward compatible clients for 4.16.0). This JIRA should be committed/marked with fixVersion of the next release candidate. -
Add documentation of released version to the downloads page and wiki.
-
Update the Apache Committee Report Helper DB
-
Send out an announcement email. See example here.
-
Bulk close JIRAs that were marked for the release fixVersion.
Congratulations!